
Shopify app Matrixify now offers the ability to create a Batch import job that will monitor your FTP/SFTP folder and import any files automatically that you put in this directory.
This way you can set up a monitoring job for your server directly that continuously watches your folder. No need to manually import each file, just put it in your FTP/SFTP folder!

Quick summary on how to set up an FTP/SFTP server directory monitoring job
- Set up folders in your FTP/SFTP server.
- Save your FTP/SFTP server in Matrixify.
- Create a Batch job by importing from the directory.
- Inspect your import and set up Options:
- Press the “Import” button to start your Batch import.
- Follow the progress of the import and enjoy!
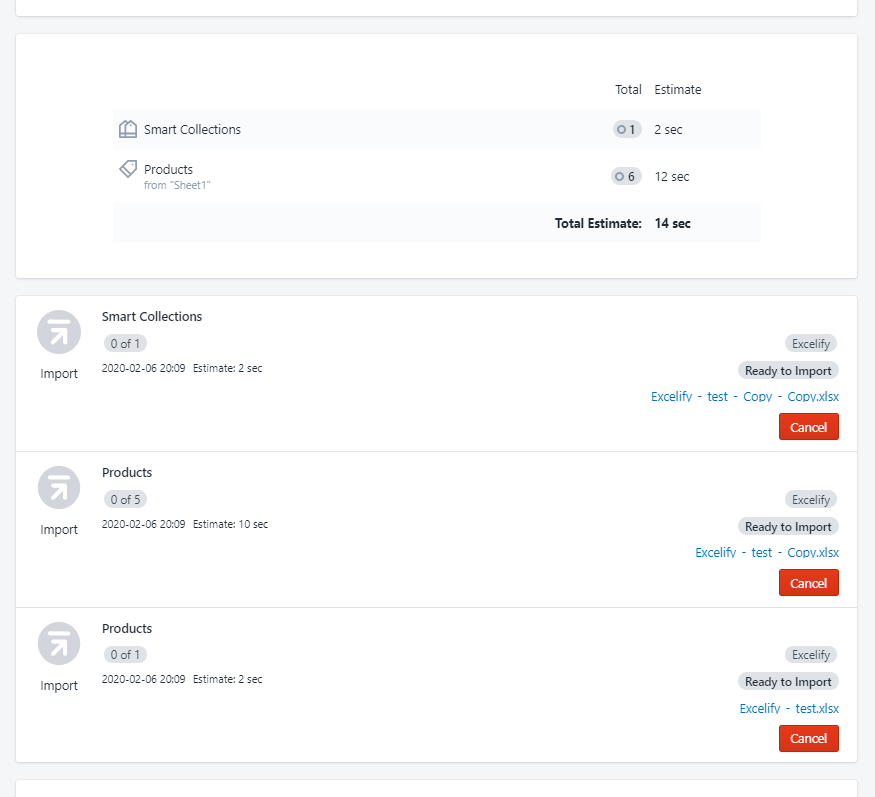
Once you have gone through these steps, the app will create a “child” job for each file in a directory that you imported.
You can track all your file import progress right from this Batch job or you can click on the individual job to see more details about it.
At the start of the directory import, the app will already create the next import if you have set up an option to repeat.
Note – importing whole directory, not a specific file is only available for Matrixify Big or Enterprise plan users.
Let’s go through each step to import your server’s directory.
1. Set up folders in your FTP/SFTP server
First, let’s understand how the batch monitoring process will work on your server.
In essence, you would set up a repeated Batch import job that will run at each specified time interval, e.g. every 5 minutes. It will check the specified directory on your server and import any CSV, XLSX or ZIP files that are there.
To ensure that after 5 minutes the same file is not imported again, we can set up the Import Options to move imported files to a different folder, or to delete the file when it’s imported.
Additionally, the app also returns Import Results file for each file that you import, so optionally, you can set up to upload that to your server too – in the Import Options.
In this tutorial, we will be using ExaVault.com as a server host, but you can use any software or host for your FTP/SFTP server that allows you to create and edit folders and files.
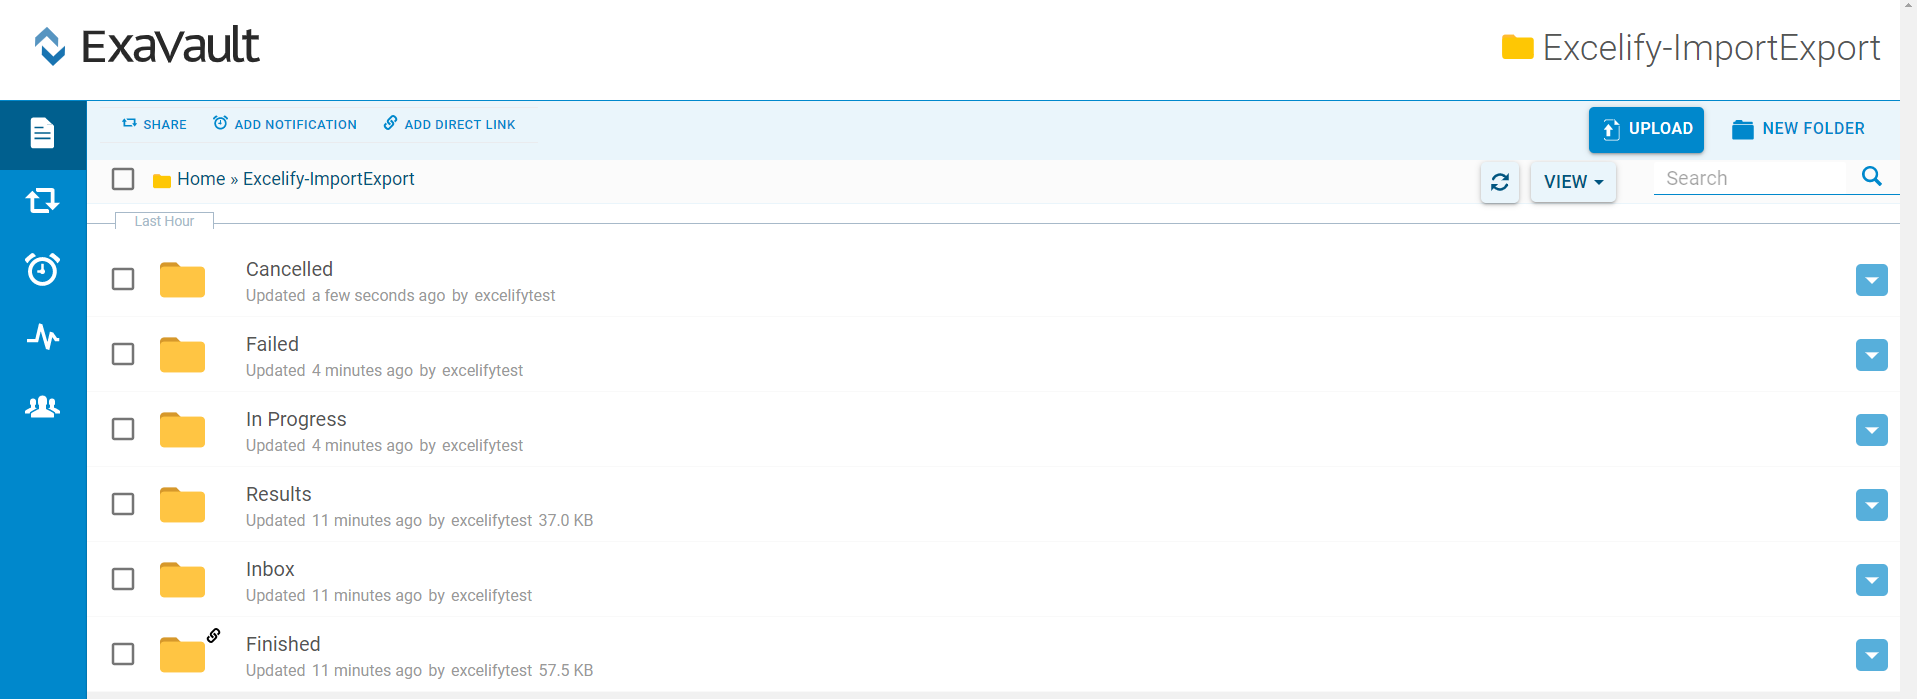
I will set up a separate folder in my server for Matrixify imports, called “Matrixify-ImportExport”, this will work as my folder for all things Matrixify.
In the Excelify-ImportExport folder, let’s a folder for each status – “Inbox”, “In Progress”, “Finished”, “Failed, “Cancelled” and “Results”. Those are just an example – you can create whatever folders you want, and in whatever path you need to have them.
- Inbox – This will be a directory that the app checks and imports any files from.
- In Progress – Here the file will get moved when the Matrixify starts to import it.
- Finished – In this directory, the Matrixify will move file once it’s done importing (regardless if there were any failed items in that file).
- Failed – Here the file will get moved if the whole file crashes/fails in the app. For example, if Matrixify was not able to recognize its template.
- Cancelled – If the job is cancelled for any reason, then it will get moved here.
- Results – In this directory, the Matrixify will upload the Import Results file once each file import is finished.
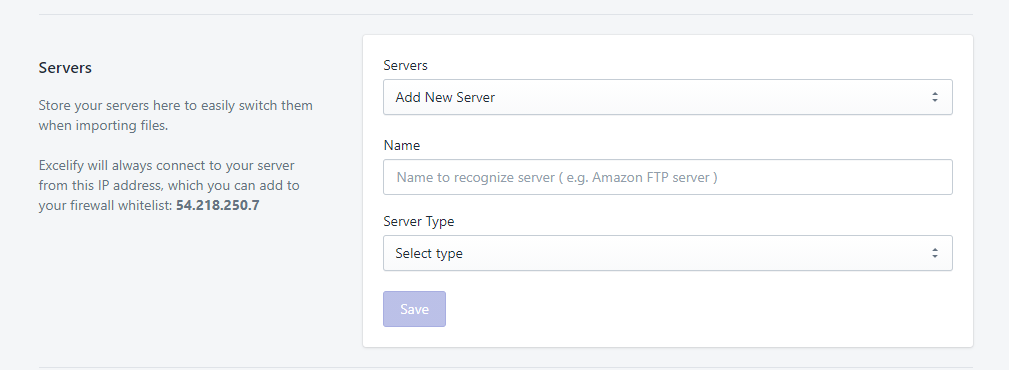
2. Save your FTP/SFTP server in Matrixify
You can open the Matrixify app and head into the Settings page.
On this page, you can find the section “Servers” and there you can create a new server to save your user credentials.
Find more details about how to set up a server in Matrixify “Set up Servers for importing files to Shopify” tutorial.
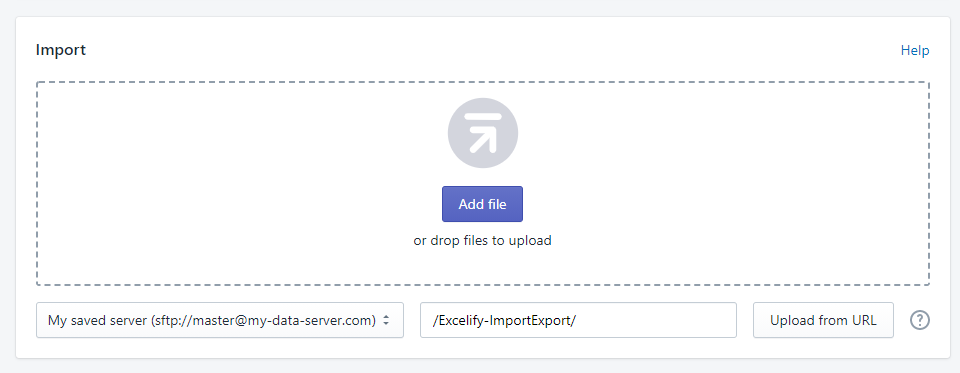
3. Create a Batch job by importing from the directory
Once you have the server set up, you can go into the Matrixify app and create a batch import job from the directory.
In the Home page of the Matrixify app, in the “Import” section click on the drop-down menu and select your server to import from.
Next to the drop-down, you can fill the “path to file” field. In this field, you need to list directory that you wish to import from.
If you are importing from the root directory then simply type slash character in this field – /
If importing from a sub-directory then list the path to this directory.
Optionally
You can also import from Full URL without saving the server by constructing the full URL in the following templates:
For FTP server the link would be:
ftp://user:[email protected]:port/path/to/directory/
For SFTP server the would be constructed almost the same:
sftp://user:[email protected]:port/path/to/directory/
4. Inspect and set up your Batch import
In the new Batch import page, first, you will see basic information about the import job.
You can see such things as format, plan, created dates and more.
The Format of the import job should be “Batch”.
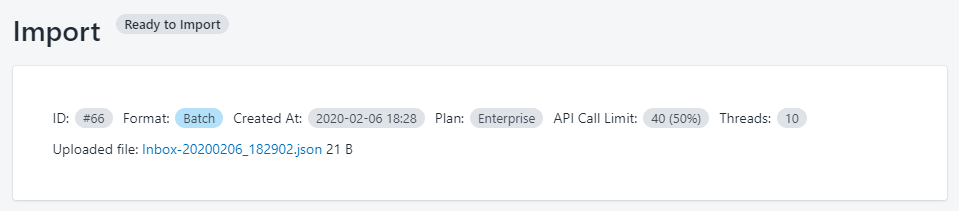
If your folder already contains any CSV or XLSX files then you will also see those listed here and they will get imported when you accept to import the job.
First, you see the total amount of items and an approximate estimate of how long it would take. Below that, you see each file that will get imported.
Inspect how many items each file contains and it imported entity (Products, Customers, etc.) matches what you are importing.
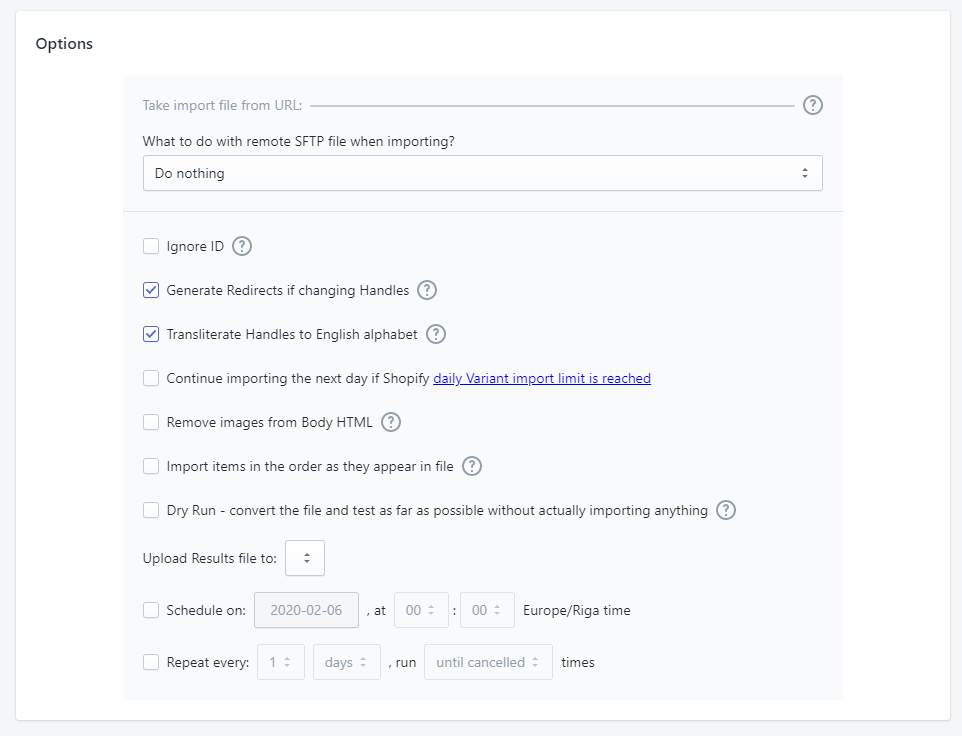
Further below you will see the Options section. Let’s edit Options to set up the continuous batch import that will monitor our import directory and will repeat importing all files that appear there:
Set up Options to move your import file by folders
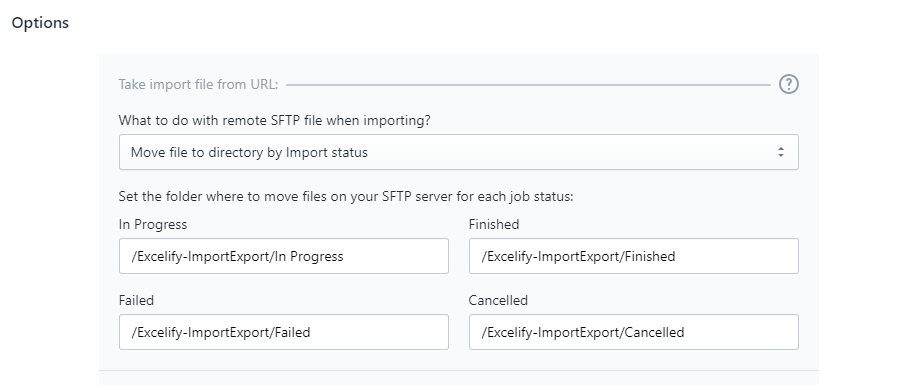
First, in the Options, we need to set up the option “What to do with remote SFTP file when importing?”
Here you can choose one of three settings:
- Do nothing – nothing will happen to your file in your server it will just get import and stay there.
- Delete that file on SFTP server – the app will delete each file it imports.
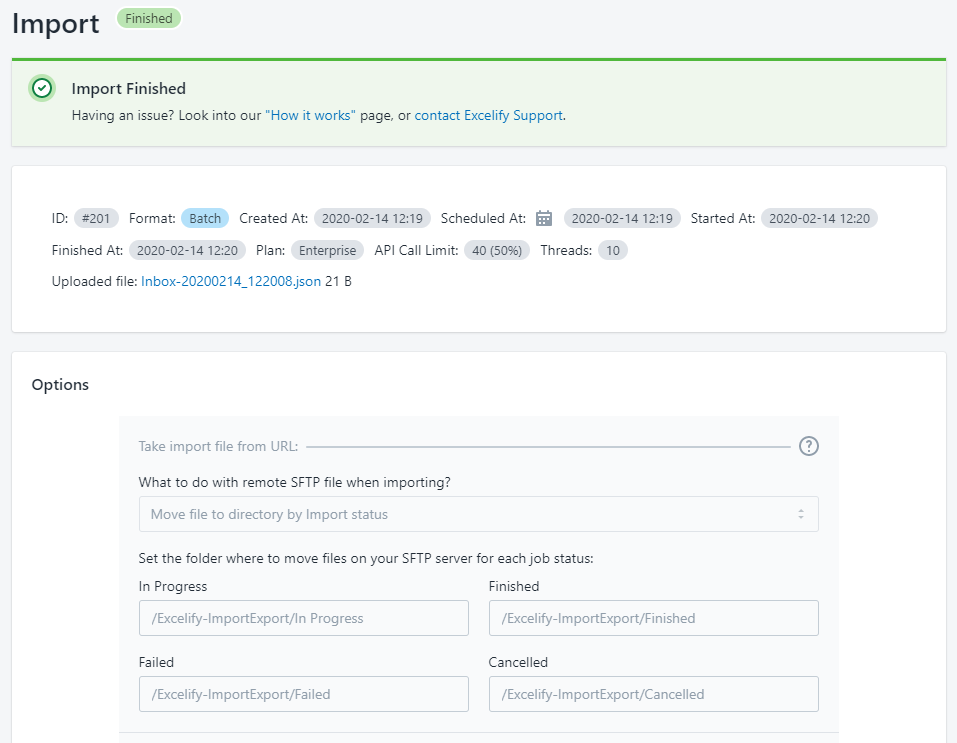
- Move file to directory by Import status – moves the file to a different directory based on its current status within this batch job.
Lets select “Move file to directory by Import status” so that the app moves our file automatically.
This will show us 4 options that we can set:
- In Progress – the app will move the file to a specific directory once the app starts to import it.
- Finished – the file will get moved to the specific folder once it finishes importing (the file will be moved here even if there are some failed items inside the import, because in principle that import was finished).
- Failed – move the file if the whole job file fails to import (in most cases, when the template format is not recognized at all).
- Cancelled – move the file if that import job was cancelled.
We created a separate folder for each stage of the file import so the file gets moved around. We can now set those directories in the app.
In our example setup it would be like this:
- In Progress – “/Excelify-ImportExport/In Progress”
- Finished – “/Excelify-ImportExport/Inbox”
- Failed – “/Excelify-ImportExport/Failed”
- Cancelled – “/Excelify-ImportExport/Cancelled”
Note that you need to include the full directory path to that folder on your server. That allows you to put those directories on any path. And those folders need to exist, so you need to create them first.
Set up where to move Results file (optional)
Now further below you see a lot of checkboxes, you can leave all these as they are, for default importing it should be fine.
Check here for more information about all the Options.
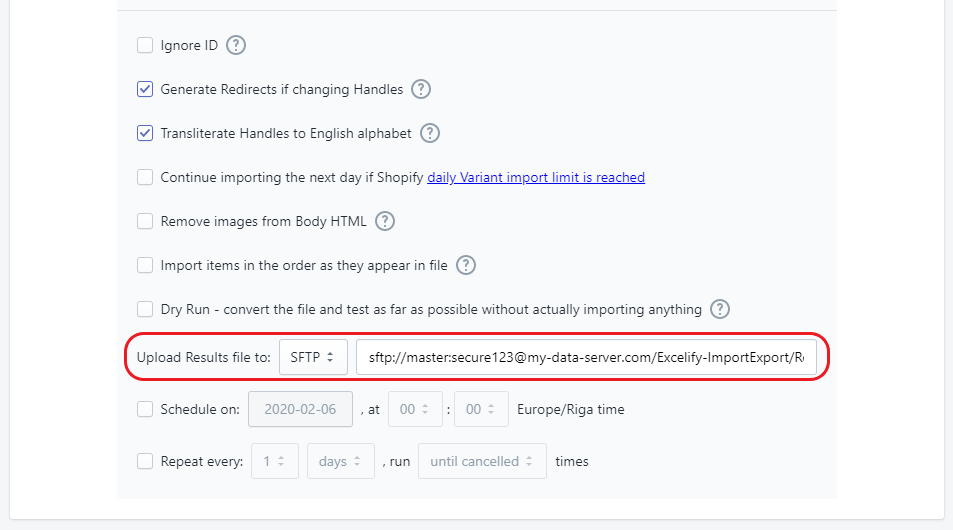
If you want Results file to be uploaded to your server, find and fill the option “Upload Results file to:“.
Each job will save and return the Import Results file in the app, but you can also upload it automatically to your server.
Click on the dropdown to select if you wish for it to upload to FTP or SFTP server.
Once selected, fill the URL with username and password that leads to the server and directory path where you wish for this file to get saved.
In my example, this would be:
sftp://master:[email protected]/Excelify-ImportExport/Results/
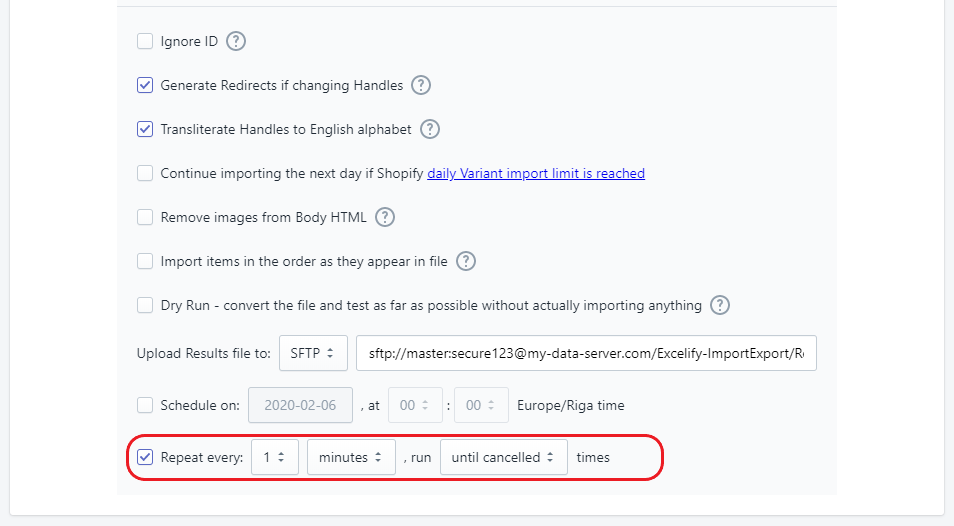
Set up how often the Matrixify should import from your directory
At the very end of the Options section, you can set up scheduled and repeated import.
In this case, we would not set up “Schedule on:” option as we want our import to start now.
Check the box for “Repeat every:” option and set the time interval how often do you want Matrixify to repeat the Batch import from your server directory. The most frequent is every 1 minute, but note that it means it will generate a new Batch import each minute and will connect to your FTP/SFTP server to check if there are any files to import, which might be exactly what you need.
5. Start your initial Batch import
The batch import that monitors your server directory every 1 minute should be now set up all correctly.
Take one more quick look over your setup and press the “Import” button to start the job.
If your directory already contained any files then you can follow the job as they are being imported.
You can also click on each of the sub-jobs to open them and see more details about each of them.
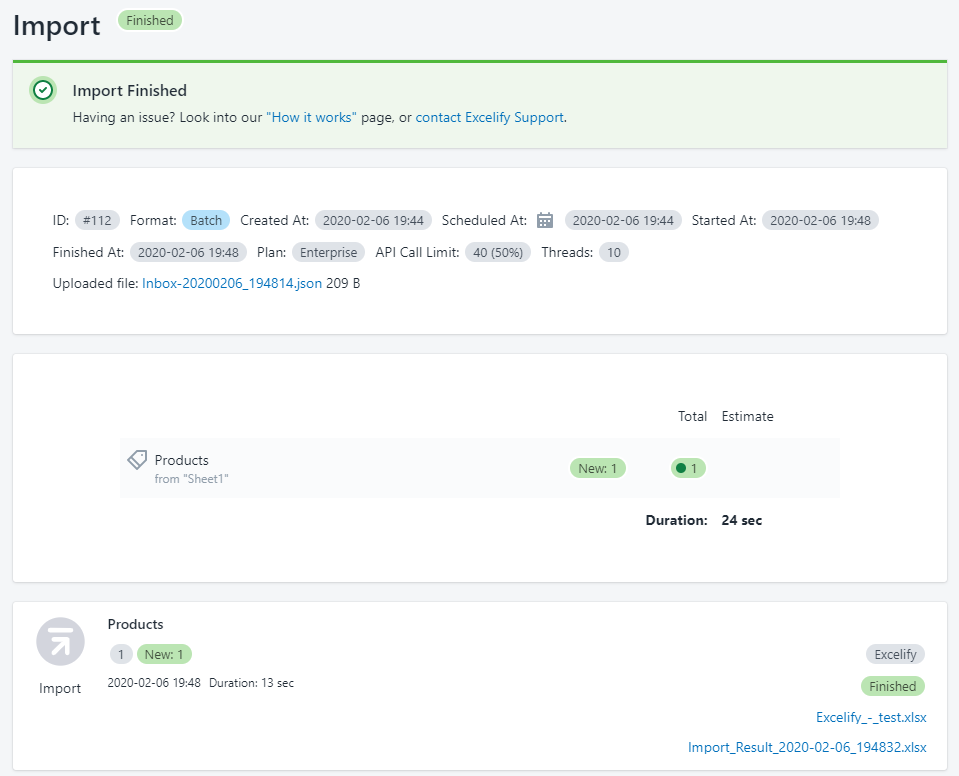
If the folder did not contain any files then the job will just finish.
6. Enjoy!
At the moment when you start this import, the app will already create the next one that should start after 1 minute.
If the current one will not yet be finished after 1 minute, then the next job will go automatically in the queue and start once currently running job finishes.
This will ensure that there are no multiple jobs running over each other and make a steady stream of imports.
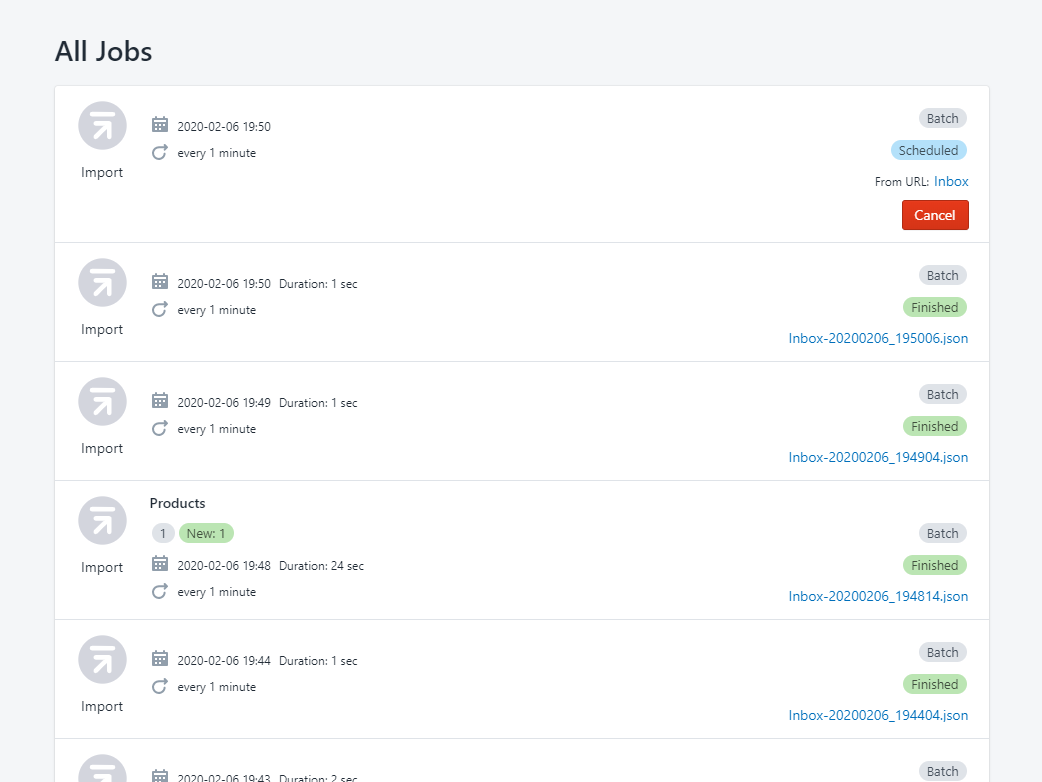
You can go back to the Matrixify app Home and go into “All Jobs” page where you should see the repeated batch import happening every 1 minute where the app checks your directory.
You will see the summary information about each job. Click on the Batch job to see more details about it.
To stop the repeated importing – just cancel that Scheduled job.
Good to know!
- If your directory contains multiple files, the app will import them in alphabetical order.
- In the batch job you can cancel each individual file import if there is a specific file that you do not wish to import, this can also be done while the files are importing.
- In Matrixify app Settings, you can set to receive notification emails about specific job statuses. Decide – in which cases you want to receive an e-mail, and when not, to not overload your mailbox.


