
Have you ever found yourself in a situation where you only need to partially fulfill a Shopify Order, not the whole Order? This feature has been available in Shopify for some time, but requires you to not enable automated fulfillment to make it possible.
Removing automation from your fulfillment process may mean you have to spend additional time manually updating your orders. And the situation requires even more time and effort if you need to manage this for not just one Order, but partially fulfill several Shopify Orders at once. This can be a very slow process if done manually in Shopify Admin fulfilling only certain line items in an Order one by one.
Luckily, with the Matrixify app you can partially fulfill Shopify Orders in bulk, making the process a lot easier and faster than doing it one at a time in the Shopify Admin console. This tutorial explains how.
Steps to partially fulfill Shopify Orders in bulk
- Export the Orders from Shopify into Excel with Basic columns, Line Type, Line Items and Fulfillments.
- Remove the rows you do not need from the Exported file.
- Update the necessary information to specify which parts of your Shopify order are fulfilled
- Save the Exported file and Import it back into Shopify with Matrixify app.
- All of the specified Shopify orders will now be updated to show they are partially fulfilled.
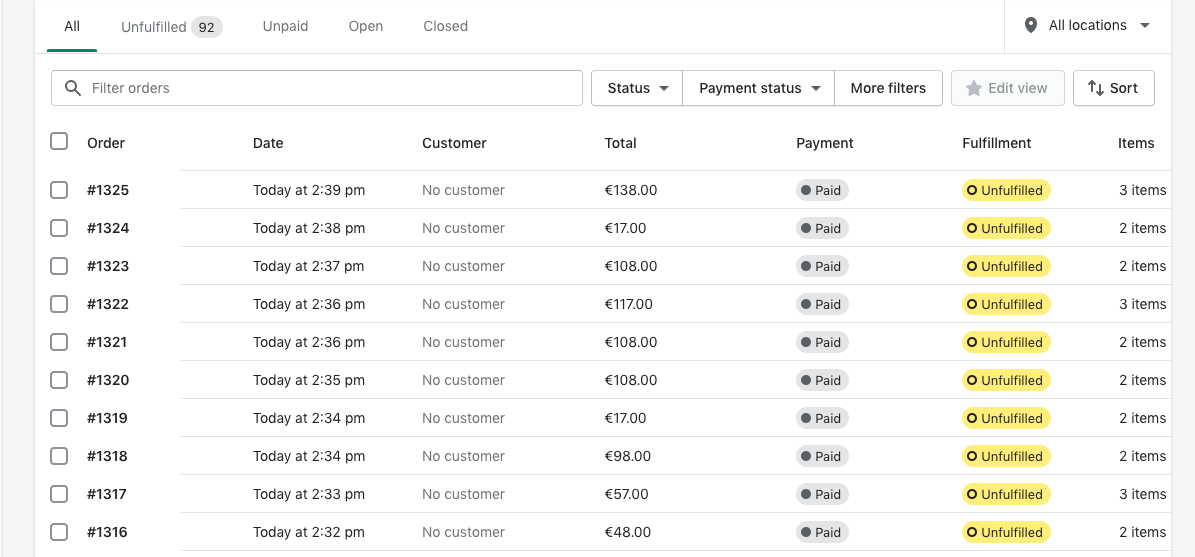
The example orders
In this tutorial, we will be partially fulfilling 10 Shopify Orders as an example so that the tutorial is easier to follow. But the Matrixify App can bulk fulfill thousands of orders with a single import!
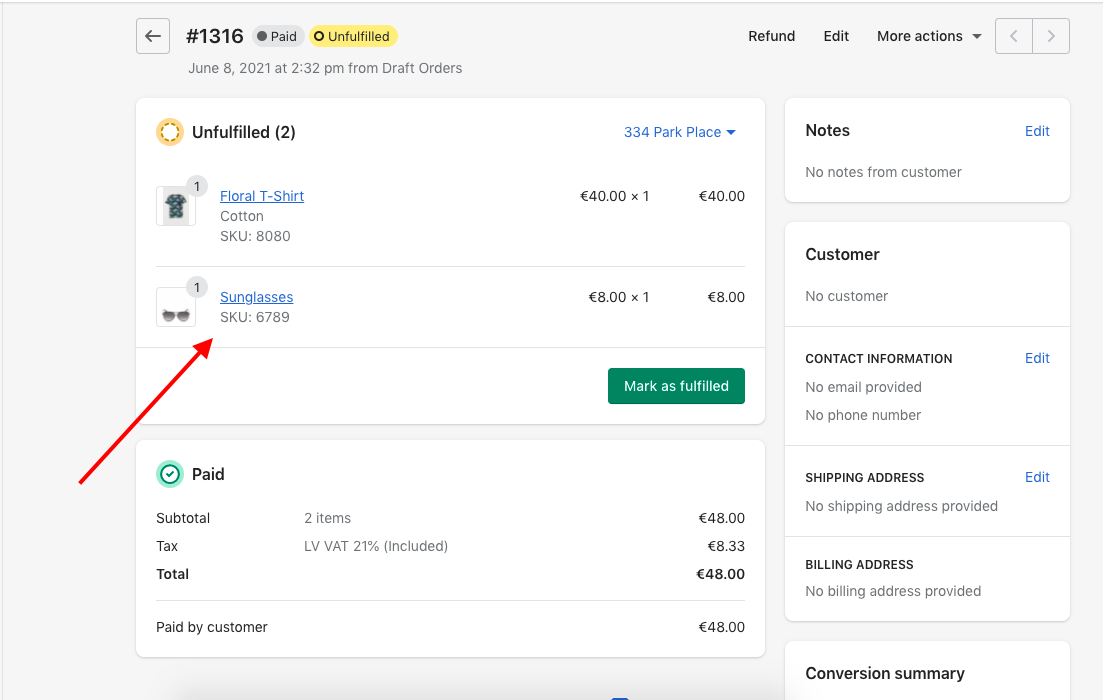
The Line Item in the Orders that we are going to fulfill is “Sunglasses” with the SKU 6789.
The line item we are going to fulfill:
1. Export the Orders
You can Export multiple Orders to partially fulfill, however, we do recommend testing the process out first with just one test Order to make sure you are doing everything exactly as you need.
Exporting your data via the Shopify platform does not provide the columns of data needed for this type of fulfillment.
So, first, you need to use Matrixify to export the data.
Go to the Matrixify app and press “New Export”. On the Export page, press the button “Select Sheets” and from there select “Orders”.
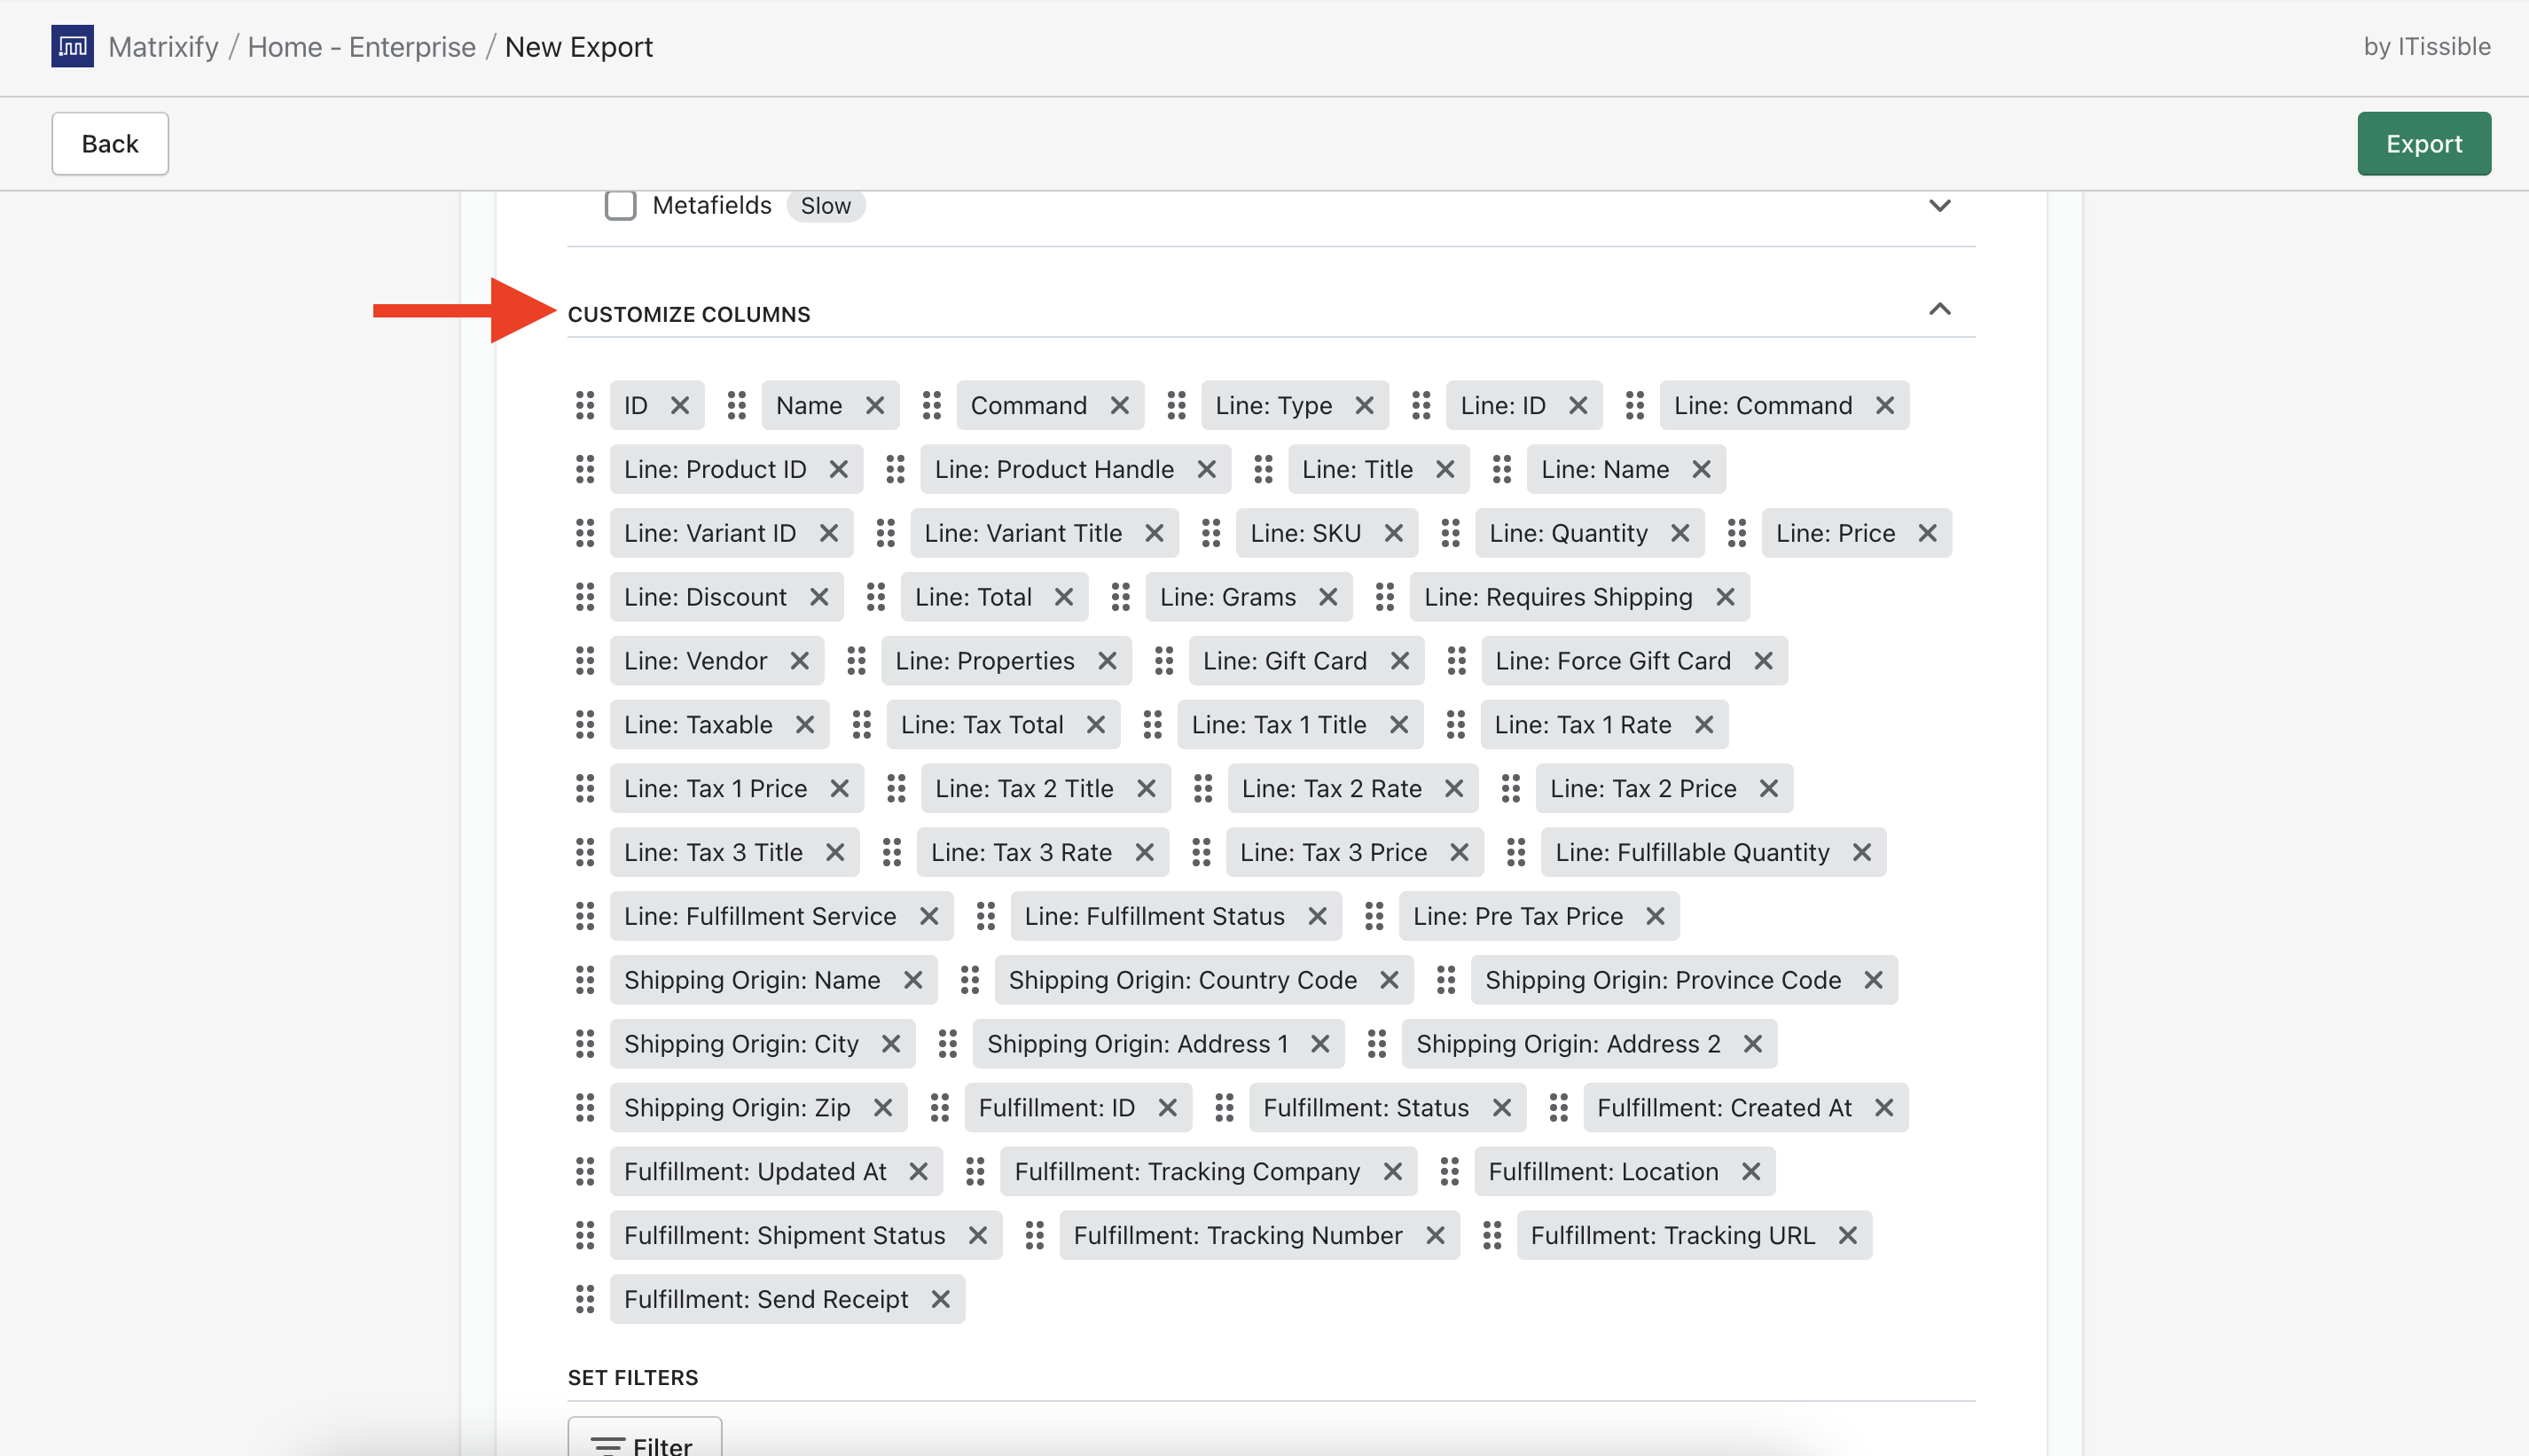
The checkboxes you need to check for the Export are: Basic Columns, Line Type, Line Items and Fulfillments. Your Export set up should look like this: 
Alternatively, you could go one step further and Export only the exact columns required to partially fulfill an Order. You can do this by going to the Customise Columns section and removing the columns that you do not need.
The only columns you need in the Exported file are:
- ID
- Name
- Command
- Line: Type
- Line: ID
- Line: … (all the other Line: columns of the line item you need to fulfill)
- Line: Quantity
- Fulfillment: ID
- Fulfillment: Status
- Fulfillment: Shipment Status
- Fulfillment: Location
- Fulfillment: Tracking Company
- Fulfillment: Tracking Number
- Fulfillment: Tracking URL
- Fulfillment: Send Receipt
If you do not need to partially fulfill all Orders, you can apply filters to the Export and export only the Orders that you need. In the example, we have used the “Created At” filter set to “on or after” to Export only the Orders created on or after 2021-06-06.
To make things easier, if you would only like to fulfill a specific SKU, you can use the Export filter Line: SKU and check the checkbox “Include only matching Line Items“. This means only the rows that have the SKU you require to fulfill will be Exported. 
You can set filters by pressing the “Filter” button when creating your export. Read more about Filters on our Matrixify “How it works” page
Go ahead and press the Export button and wait untill your data Exports.
Larger exports may take time to export. If your export takes a long time, then do not worry, you do not need to keep the app open while the export is running. You can always go into the app’s All Jobs page to see your past, running, or scheduled jobs
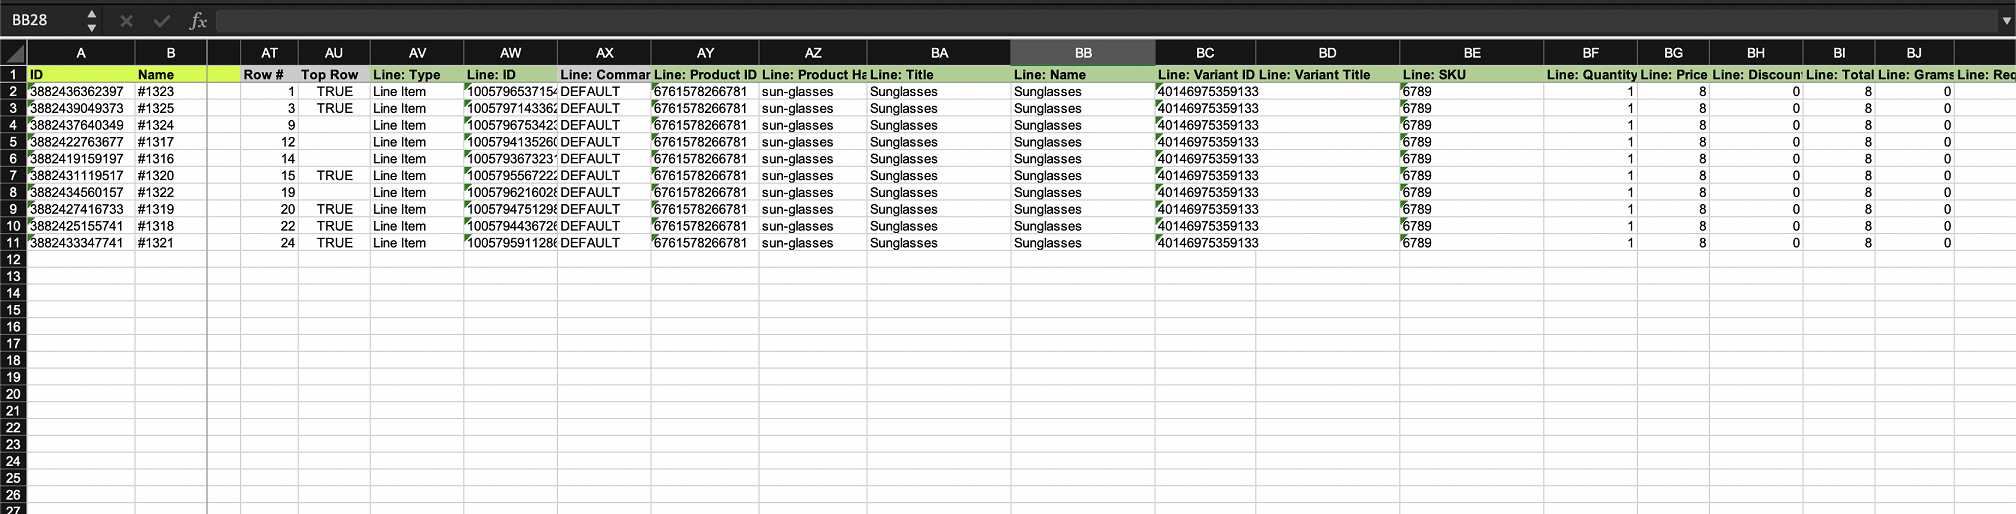
2. Remove the rows you do not need from the Exported file
Once the Export has finished you will be able to download the Exported file by clicking on the ”Download Exported File” button.
You can remove any duplicated rows from the file. In the Exported file you will have all of the Order line items (including the items you do not want to fulfill). Here in our example, we only need to fulfill one Line Item in all of the Orders which is ‘Sunglasses’ with the SKU 6789. That is also the only row we need to leave in the file for each Order.
Before:
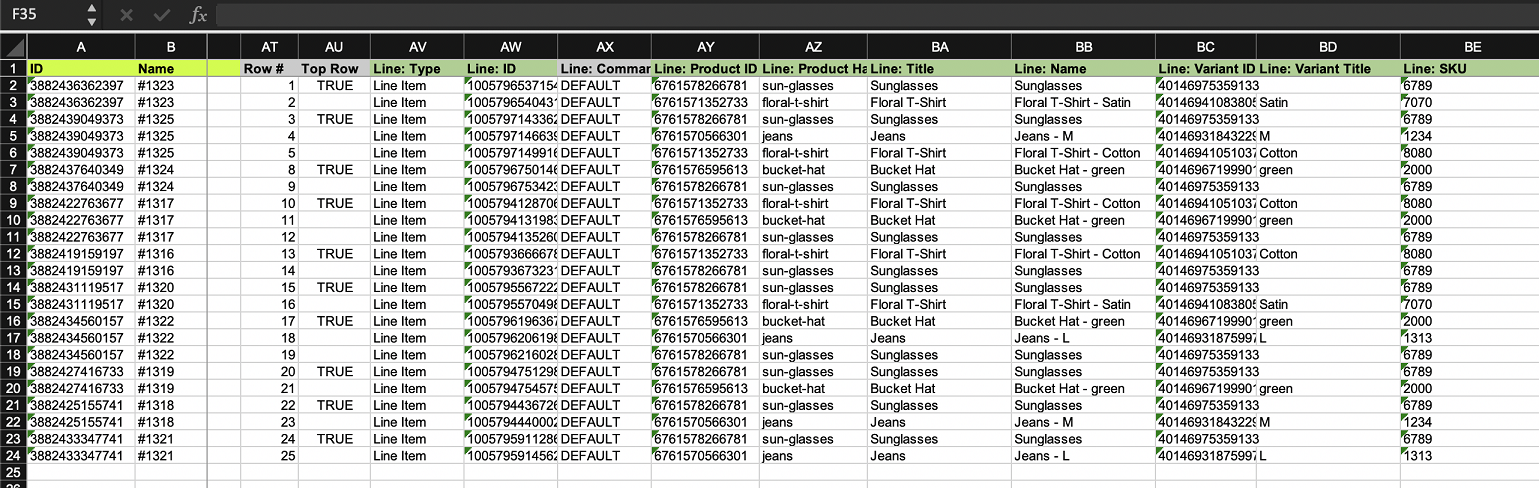
After:
3. Update the column values
There are quite a few column values to update, so let’s go through them all one by one:
| ID | The Order ID, this value stays as it is. |
| Name | The name of the Order you would like to partially fulfill, this value also stays as it is. |
| Command | This value should be updated from NEW to UPDATE. |
| Line: Type | The Line: Type value should be set to “Fulfillment Line“. |
| Line: ID | The Line: ID value of the line item you need to fulfill (this value is an exported value so you do not need to update it). |
| Line: Quantity | The quantity which you need to fulfill. If you wish to fulfill all quantity for this item you can leave “Line: Quantity” empty. |
| Fulfillment: ID | This value should be set to any number, which corresponds to a fulfillment where you need to put those line items. E.g. if you have to create two fulfillments in the same Order, set the number “1” for the first, and “2” for the second one. |
| Fulfillment: Status | Set this value to “success“. |
| Fulfillment: Shipment Status | Set this value to “delivered“. |
| Fulfillment: Location | The fulfillment location should be set to the location name (or custom fulfillment service name) from which you want to fulfill. You can leave it empty or skip this column – then it will fulfill from your default store location.
Important: If your inventory is managed by an external service, like Amazon or Oberlo – then using this location to create the fulfillment, will actually initiate fulfillment in that fulfillment service – meaning, it will ship those line items to the customer. So if you do not want any automatic fulfillment to happen, please, disable the fulfillment services on your store. |
| Fulfillment: Tracking Company | The value of this column must be whatever tracking company you are using. The list of tracking companies can be found here in the Orders documentation. |
| Fulfillment: Tracking Number | The tracking number for this Order. |
| Fulfillment: Tracking URL | If you have the specific tracking URL, you can set it in this column. If no URL is set in the file then Shopify will generate one automatically from the Tracking Company and Tracking Number. |
It is not mandatory to fill all of the “Fulfillment: ...” columns. If you do not have a value for certain column that is okay! The main column you must have filled is “Fulfillment: Status” set to success.
If you do not need to fulfill some Line Items, then delete that row from the import file, so that it’s not mentioned among the new fulfillment rows.

4. Save the Exported file and Import back into Shopify with Matrixify app
Now that you have all of the values updated you can now save the file and Import it back into Shopify with Matrixify. If you are using a CSV file format, then be sure to include the word “Orders” in the file name so that the app knows you are Importing Orders.
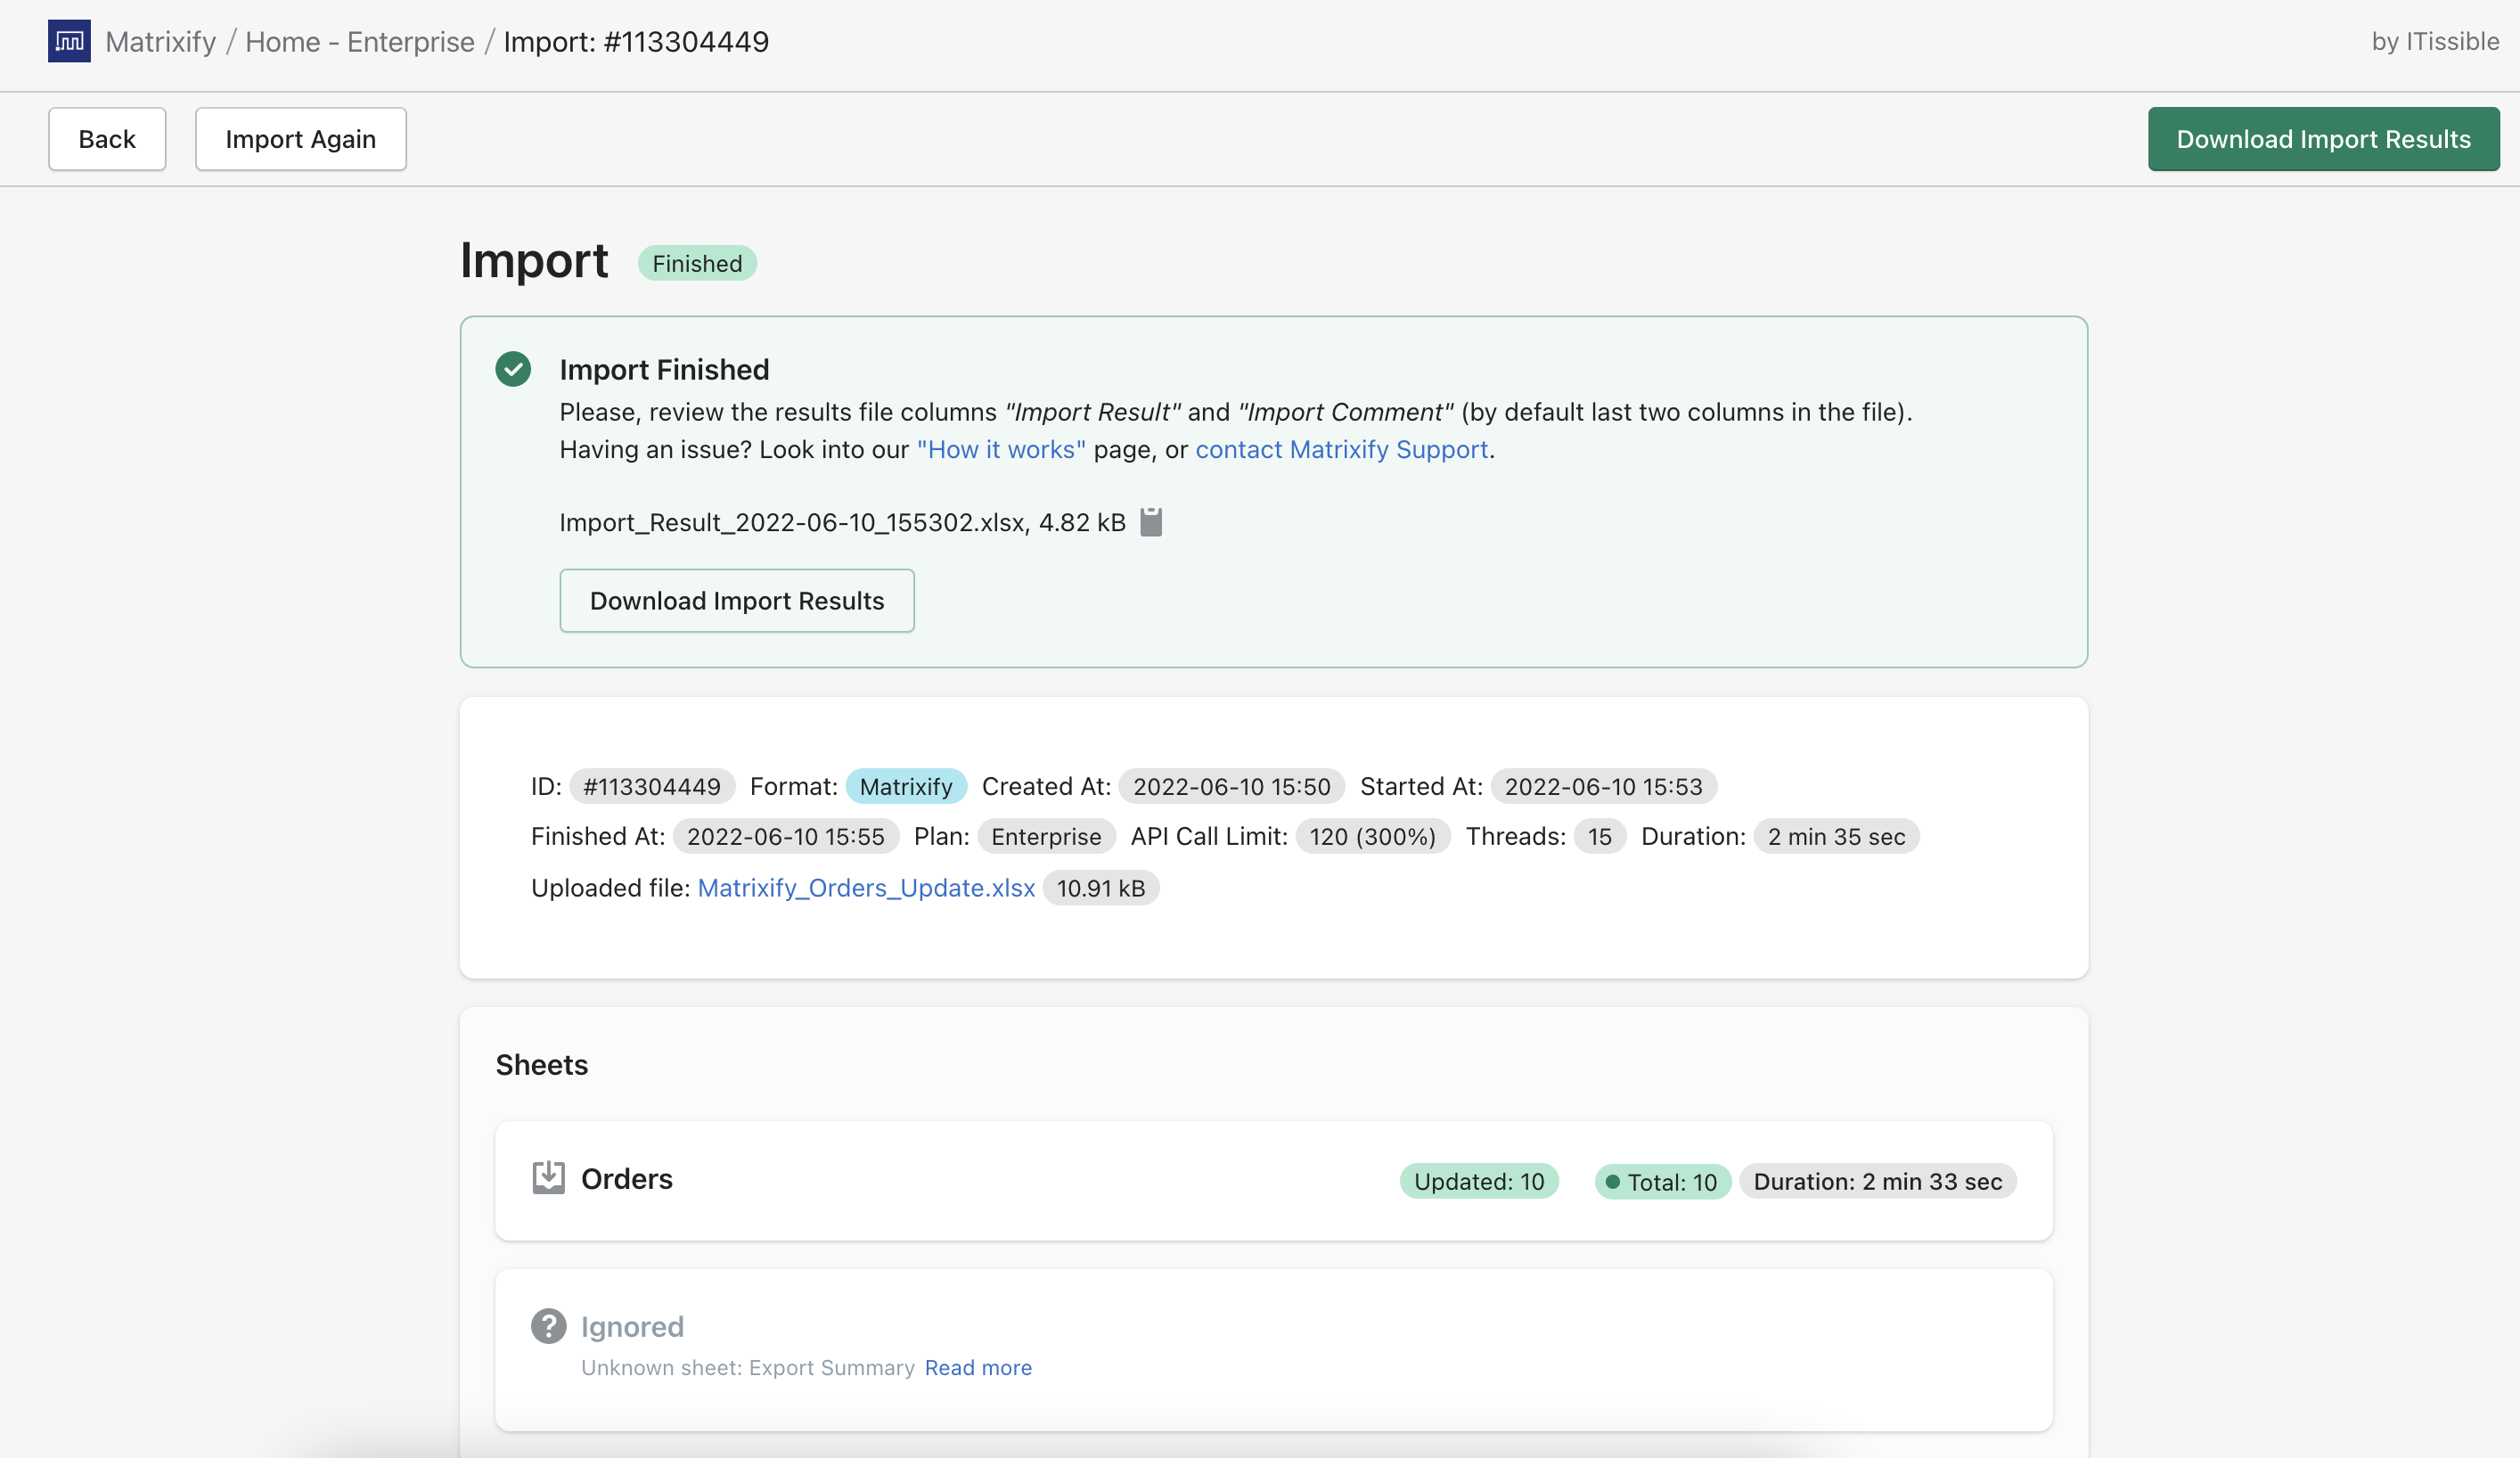
Go back into the Matrixify app and in the Home page Import section, you can upload the file. First, the file will be analyzed by the app. Once the file is analyzed you need to check that the app has recognized the file correctly as Orders and that the Order count in the file looks correct.
You do not need to adjust any Import Options, default ones will work fine.

Then press the “Import” button in the top right-hand corner and the file will start Importing.
Once the import has started, you can follow its progress in the app. You can close the app while the import is running as it is happening on our servers.
If you change your mind about something, you can press the “Cancel” button to cancel the import job, and start over. Thus far imported Orders will already have been partially fulfilled. Also, when canceling the import job, Matrixify will still generate the Import Results file for you for the items that were imported before canceling. So, if there are any failed errors for already imported Orders, you will see those in the Results file.
Enjoy your partially fulfilled Shopify Orders!
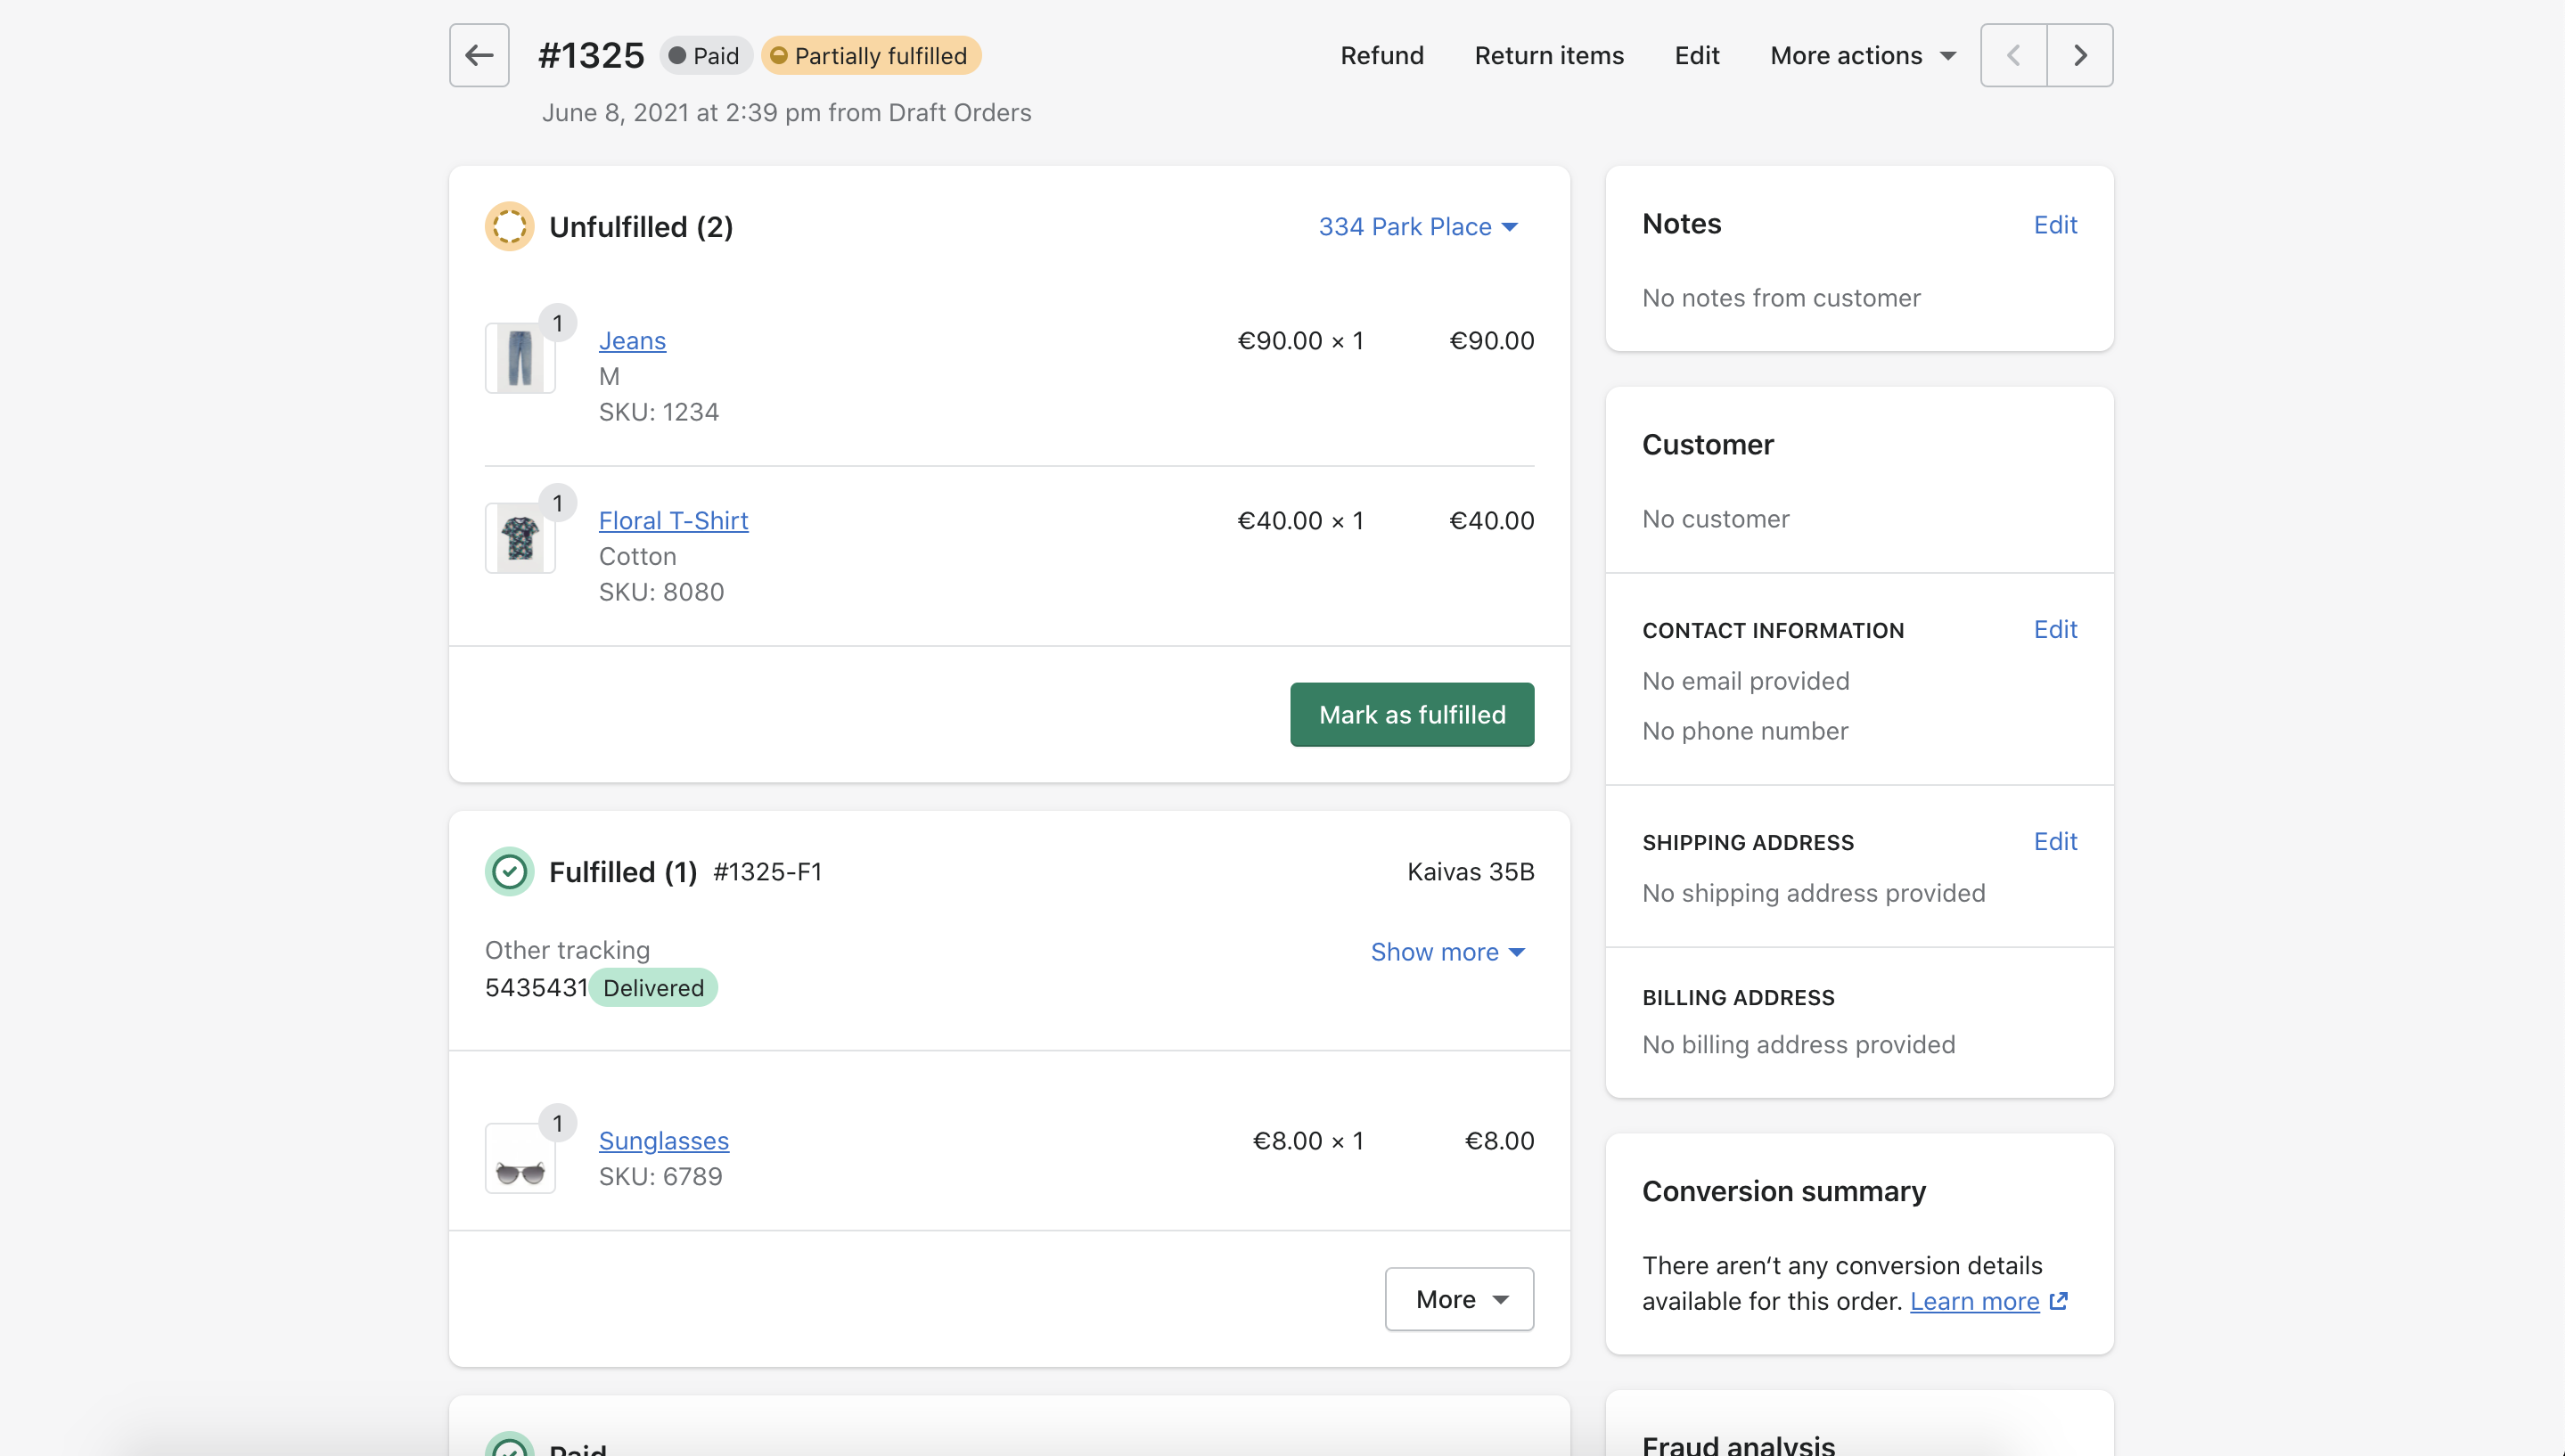
Head to the Orders section in Shopify Admin. The Imported Orders should show that they have been partially fulfilled, just like in the example below:
Good to know
- If you don’t have tracking numbers or any other tracking data, you can leave the columns blank, or even not include them in the import.
- Here is our tutorial on how to fulfill existing Shopify Orders in bulk which is more simple than partially fulfilling an Order.
- See the full list of fields you can fill for Orders import and update, and their possible values.
- Read more about manually fulfilling Shopify Orders.
- If you have any questions or queries, feel free to contact us!


