


Managing Customer Store Credit balances one at a time in Shopify Admin is fine for a handful of customers, but it quickly becomes impractical when you need to migrate balances from another platform, run a promotion that grants credit to many customers, or audit and adjust outstanding balances across your store.
With the Matrixify app, you can bulk add, subtract, or set a target balance for any number of Customer Store Credit accounts using a single Excel or CSV file. You can also issue credits that expire on a specific date, and optionally notify the Customer.

Steps in short
- Export Customers with Store Credit columns.
- Edit the file to add, subtract, or set store credit transactions.
- Save and Import the file.
- Enjoy your updated Customer Store Credits!
1. Export Customers with Store Credit columns
To work with existing Customer Store Credit accounts, start with a New Export.
Select to Export the Customers sheet, with the following column groups:
Basic Columns– for the customer identification, only select columns –IDandEmail.Store Credits– for current Store Credit account currency and balances.
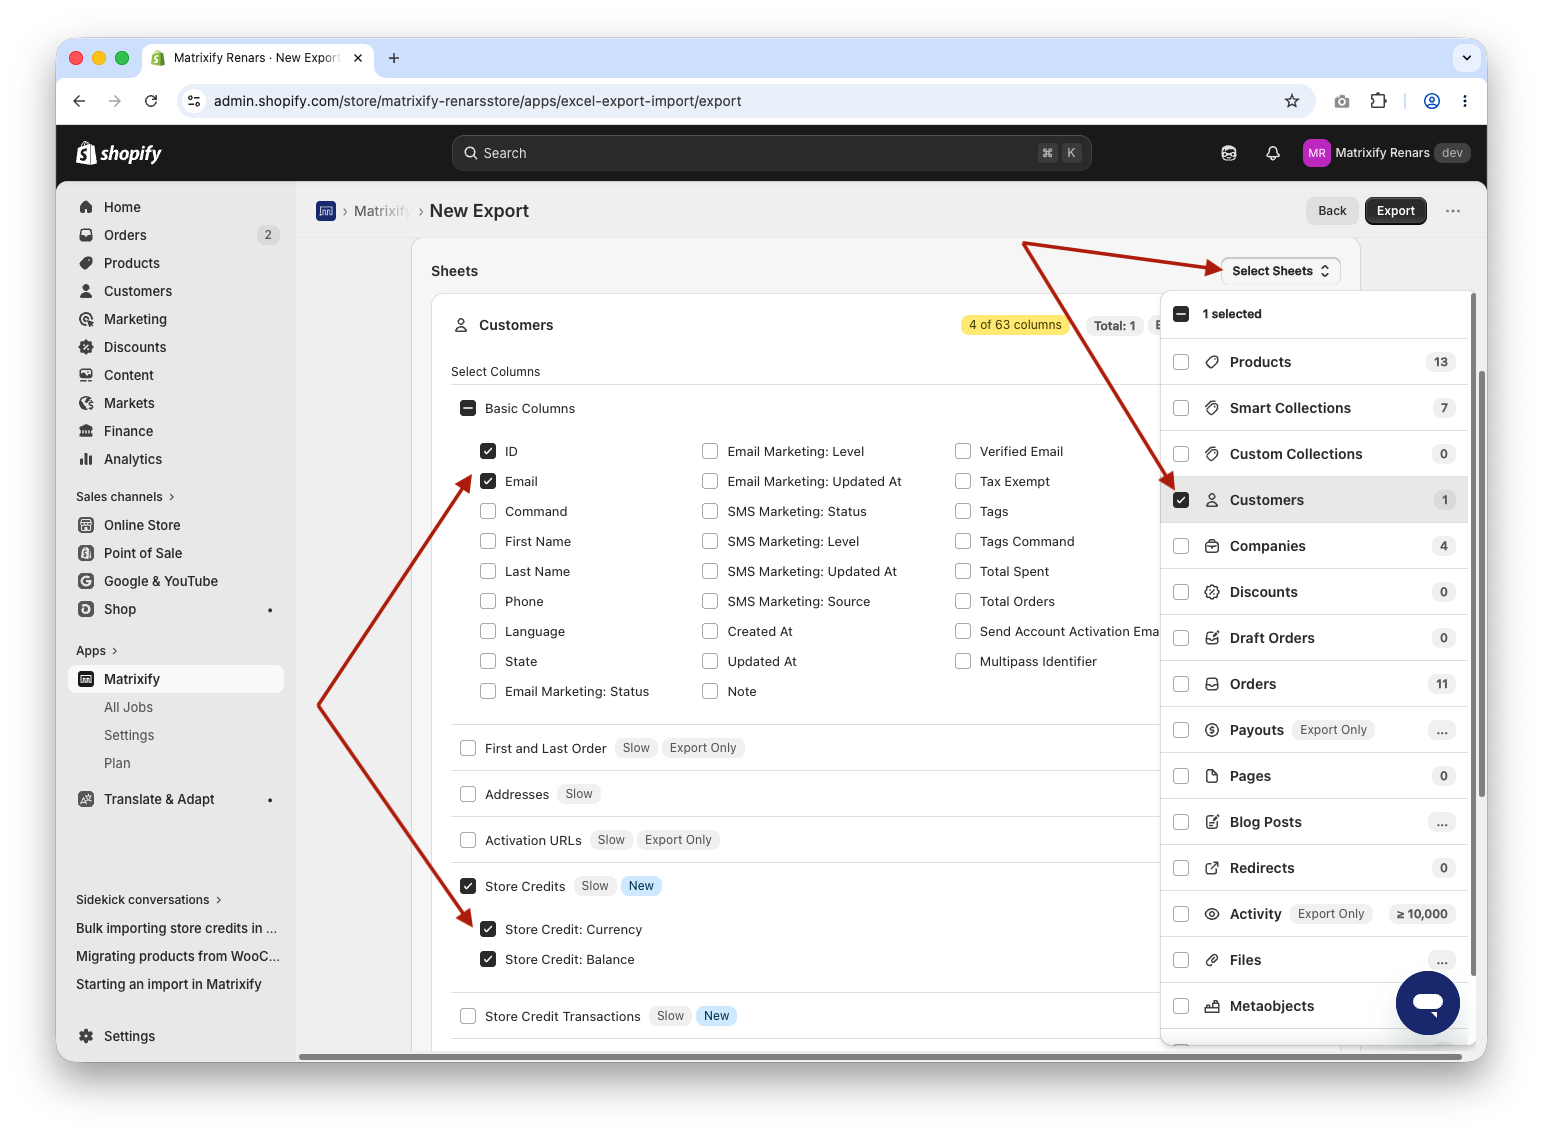
If you only need to export a subset of customers, use the filters to narrow down the results before starting the export. Click Filter in the Set Filters section and apply one or more criteria, such as Email, Tags, Created At, or Email Marketing Status.
Once the Export is configured, press the Export button to start the Export job.
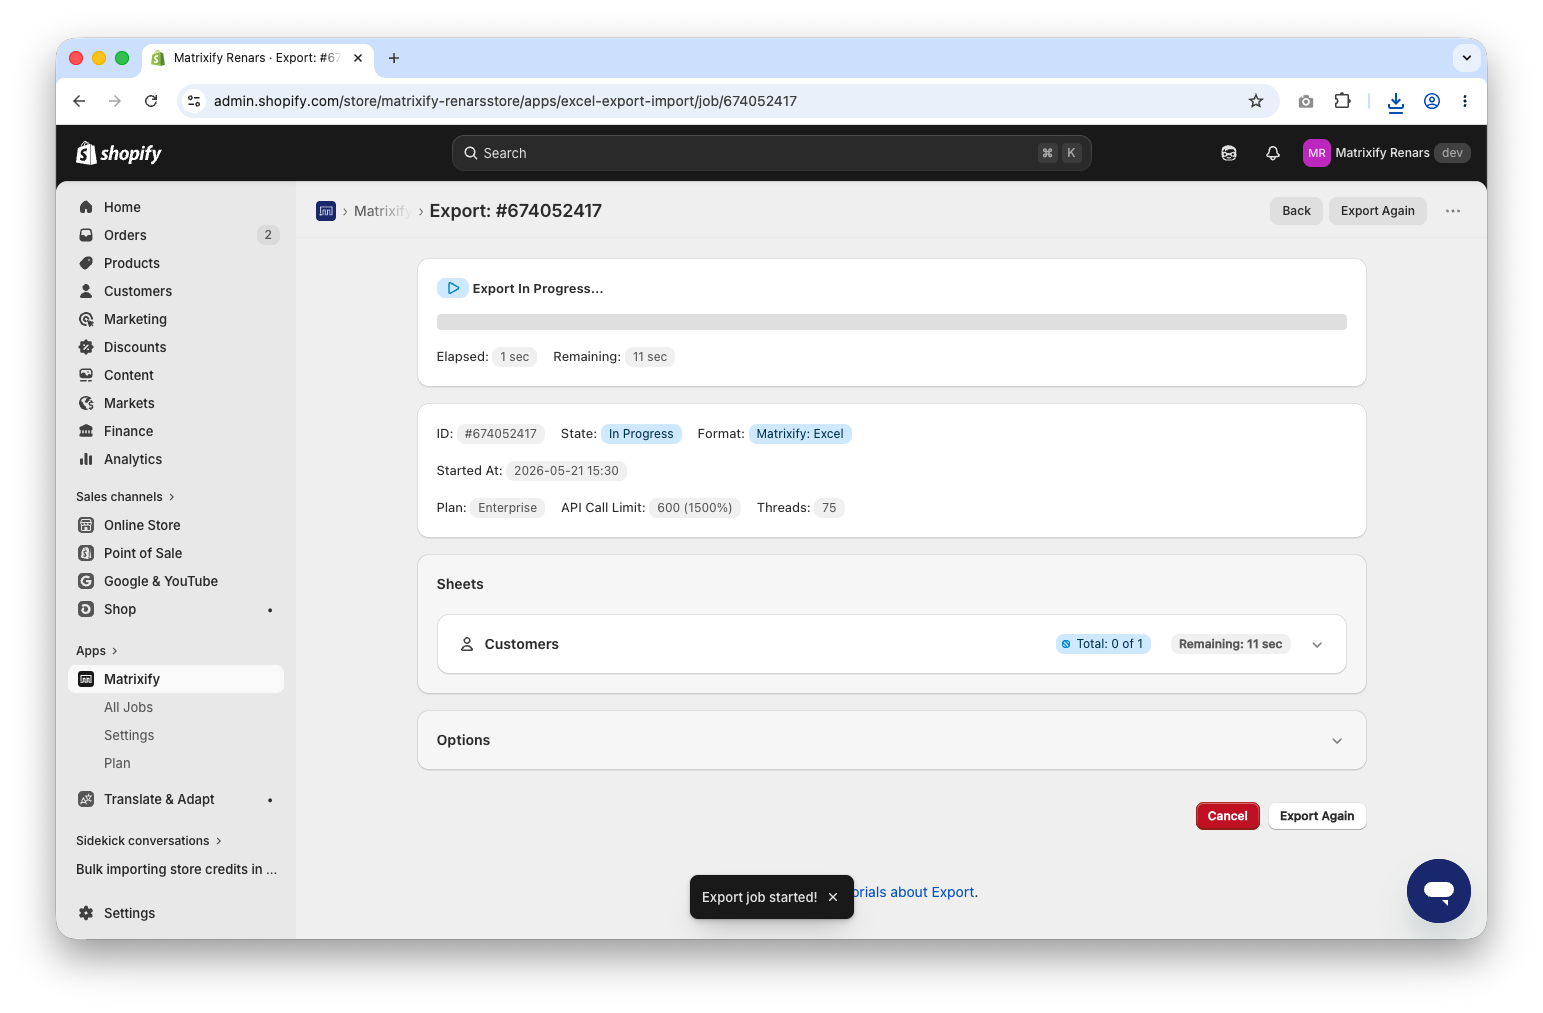
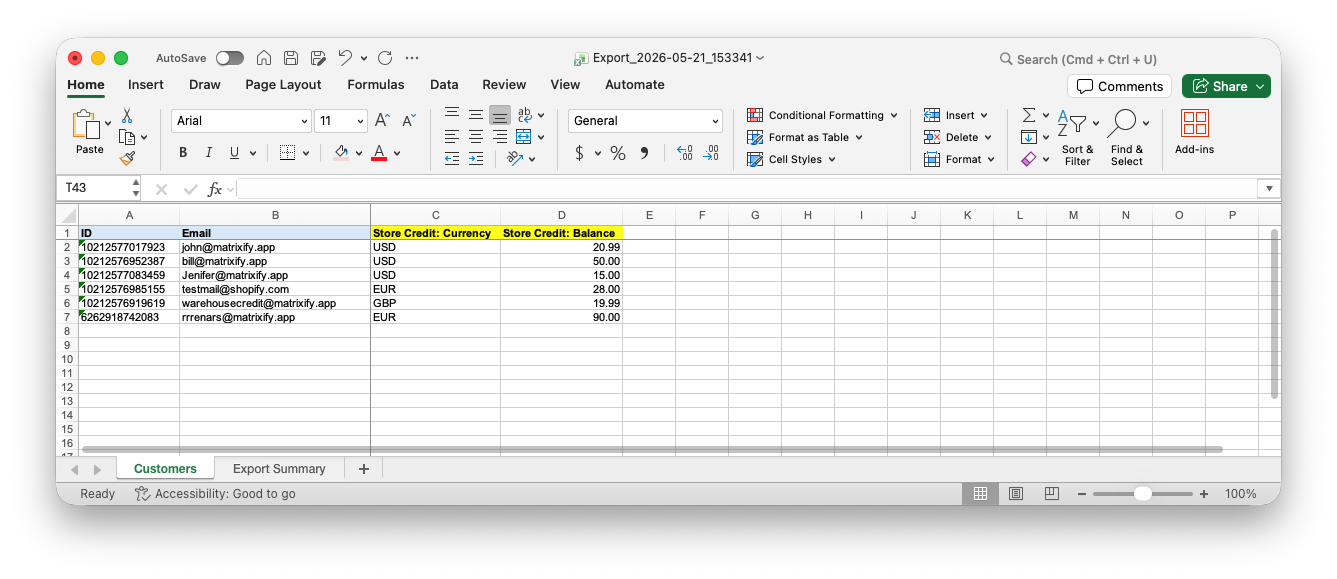
When the export finishes, click the Download Exported File button to download your file. In the file, you will see your Customers and their current Store Credit balances for each currency.
2. Edit the file to add, subtract, or set Store Credits
Store Credit changes are applied as transactions for a specific currency Store Credit account, not by setting the total balance amount.
From the exported file, the first two of the mandatory columns are:
IDand/orEmail– to identify the CustomerStore Credit: Currency– to specify the Store Credit account currency in which the transaction will be added.
But you can also keep other columns, such as Store Credit: Balance if it helps you to set up and manage data in the file.
Note that the app will update all importable data fields that are included in the Import file, so before uploading and importing the file, it is safer to remove data columns that you are not working with.
Add the following columns to your file, in which we will fill in the Store Credit transaction details:
Store Credit Transaction: Command– (mandatory) will specify to add credit by usingCREDIT, subtract from current balance by usingDEBITor allow the app to calculate the credit or debit transaction by using valueSET.Store Credit Transaction: Amount– (mandatory) the transaction amount as a decimal number.Store Credit Transaction: Send Receipt– (optional, can be used only forCREDITtransactions) used to trigger Customer notification about added Store Credit.Store Credit Transaction: Expire At– (optional, can be used only forCREDITtransactions) used to set the expiry date for the added Store Credit.
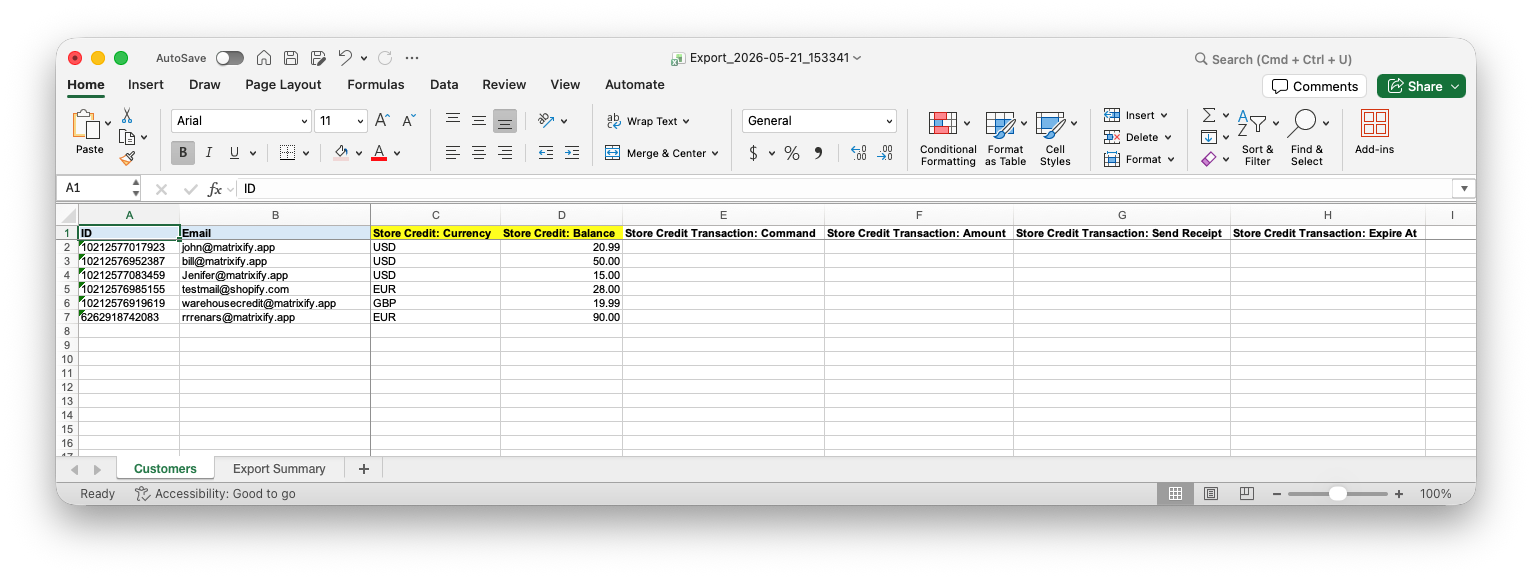
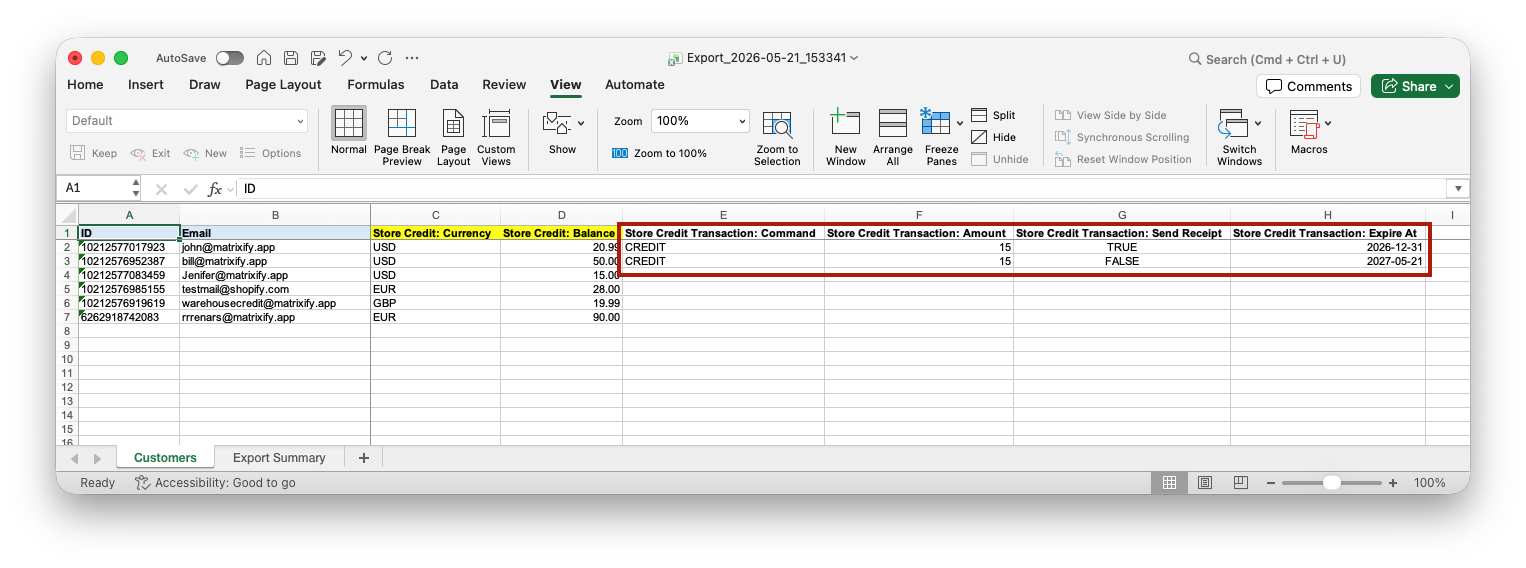
Add Store Credit (CREDIT transactions)
To add an amount to a Customer’s Store Credit account, set Store Credit Transaction: Command to a value CREDIT and put the amount in Store Credit Transaction: Amount.
Set Store Credit Transaction: Send Receipt to TRUE to send the Customer a notification when the credit is added.
And use Store Credit Transaction: Expire At with a valid date and time stamp to set the expiry date for added Store Credit. The date must be in the future – if you set a past date, Matrixify will still Import the transaction, but will ignore the date.
Subtract from Store Credit account (DEBIT transactions)
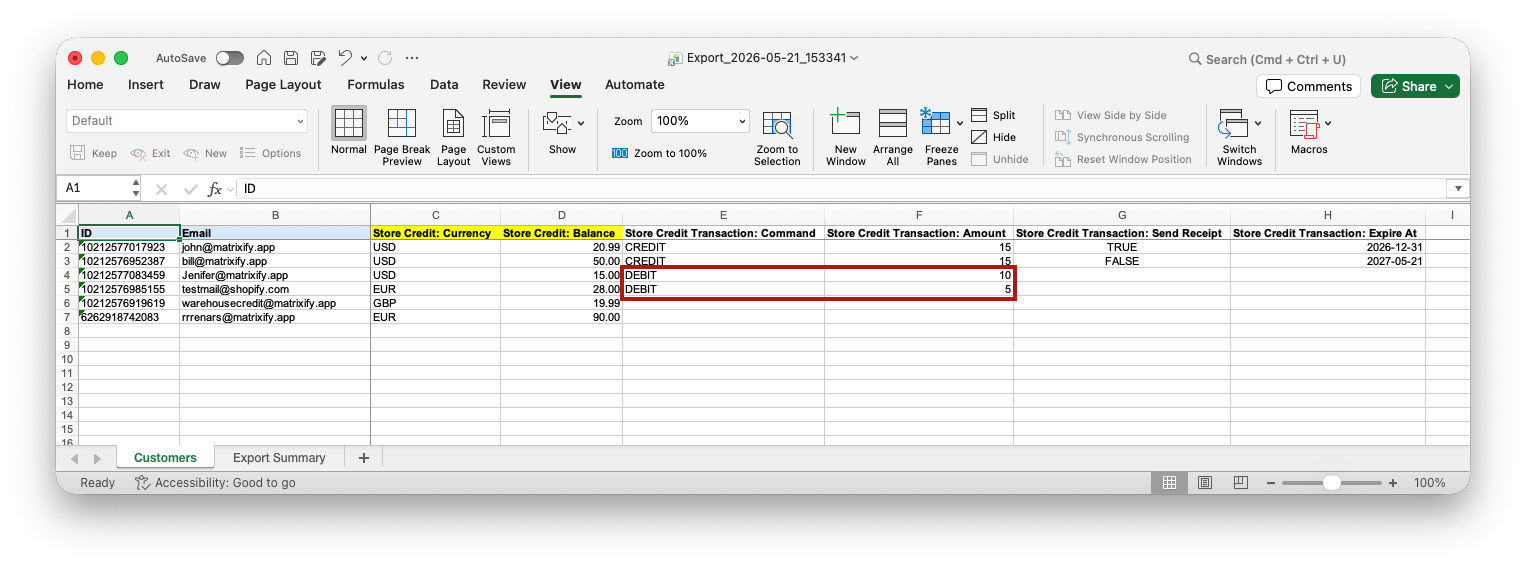
To subtract an amount, set Store Credit Transaction: Command to DEBIT. The amount listed in Store Credit Transaction: Amount will be deducted from the Customer’s current balance.
Set Store Credit to a specific amount (SET transactions)
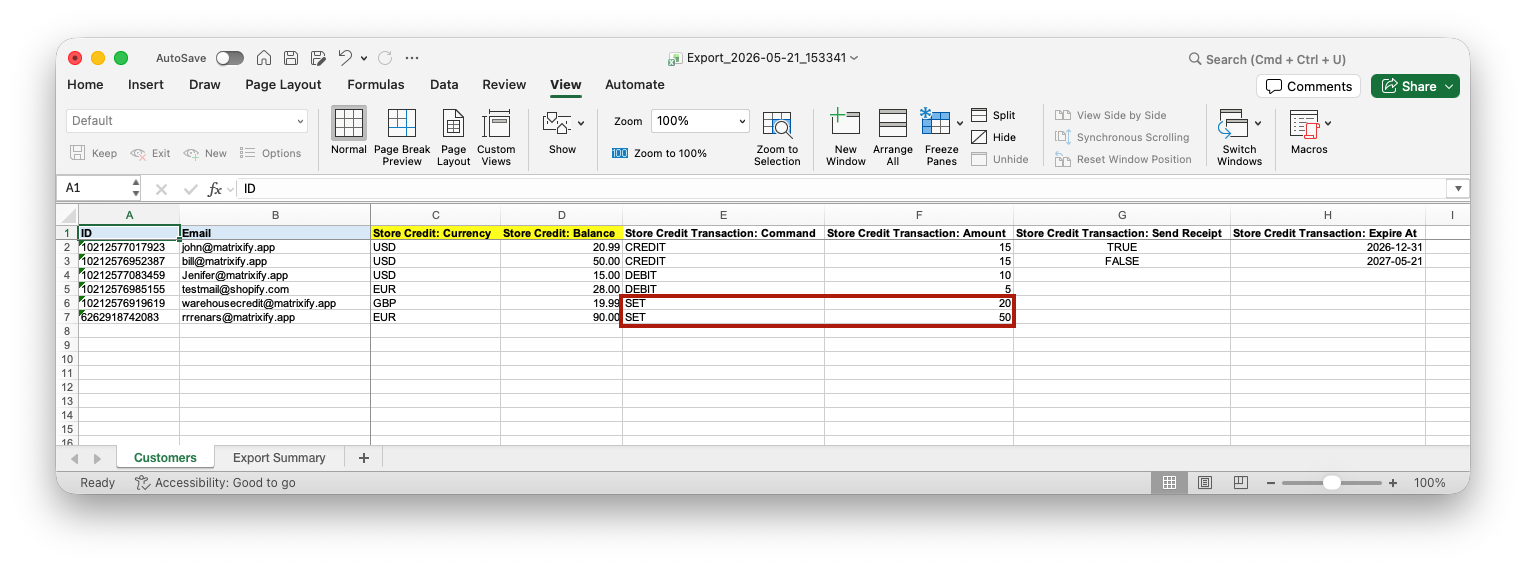
If you want a Customer’s Store Credit balance to land at a specific value regardless of what is currently there, use value SET in the Store Credit Transaction: Command column.
Matrixify will automatically calculate whether to apply a CREDIT or DEBIT transaction so that the final balance equals the Store Credit Transaction: Amount you specify.
This is useful when you have a target balance for each customer – for example, after reconciling balances from an external system – and you do not want to manually compute the difference for each one.
Multiple transactions per customer
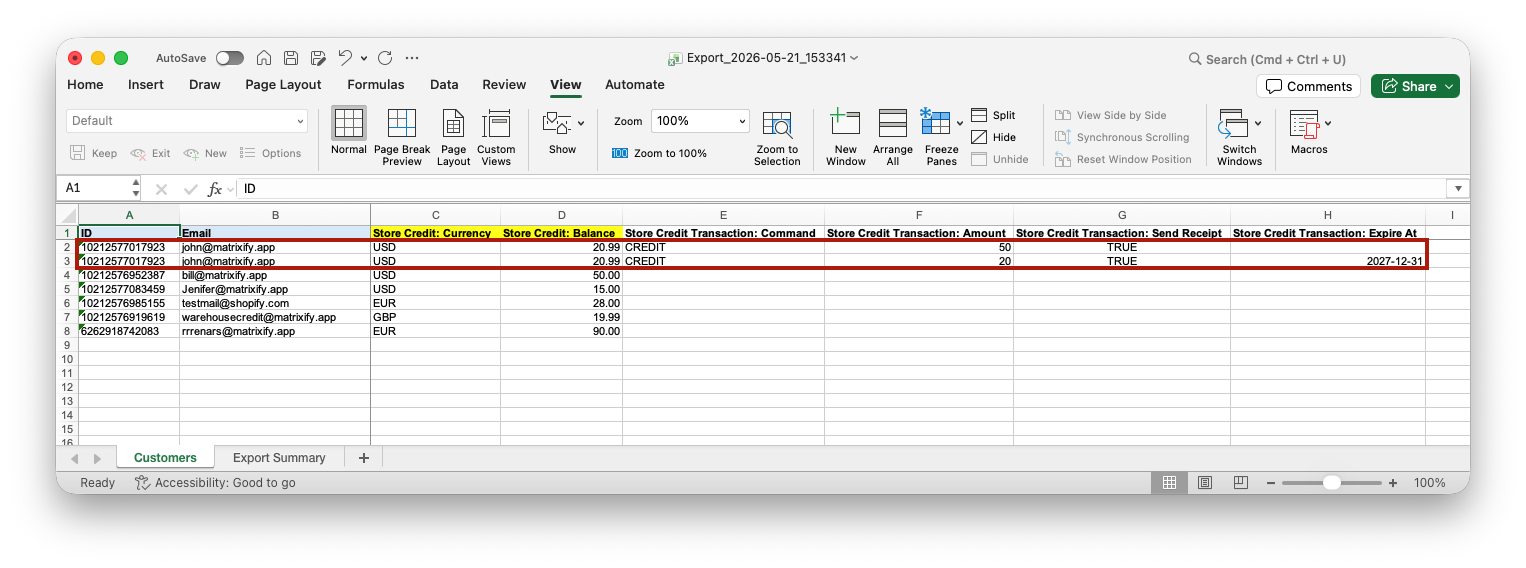
You can apply multiple transactions to the same Customer in one import by adding additional rows for that Customer. The customer identifier (ID or Email) needs to be present on each row.
Transactions are applied in the order they appear in the file.
For example, to give one Customer a non-expiring $50 credit and a separate $20 credit that expires at the end of the year:
Tracking transactions by ID
The Store Credit Transaction: ID column is optional. If you fill it in, Matrixify will check whether a transaction with that ID already exists for the Customer, or has been added previously. If it does, the Import will skip it instead of creating a duplicate.
This is useful for scheduled or recurring imports where the same file might be processed more than once. Matrixify stores previously imported transaction IDs in an app-owned metafield on the customer, so the deduplication works even for transactions that were originally created by an earlier Matrixify Import for the same Customer.
3. Save and import the file
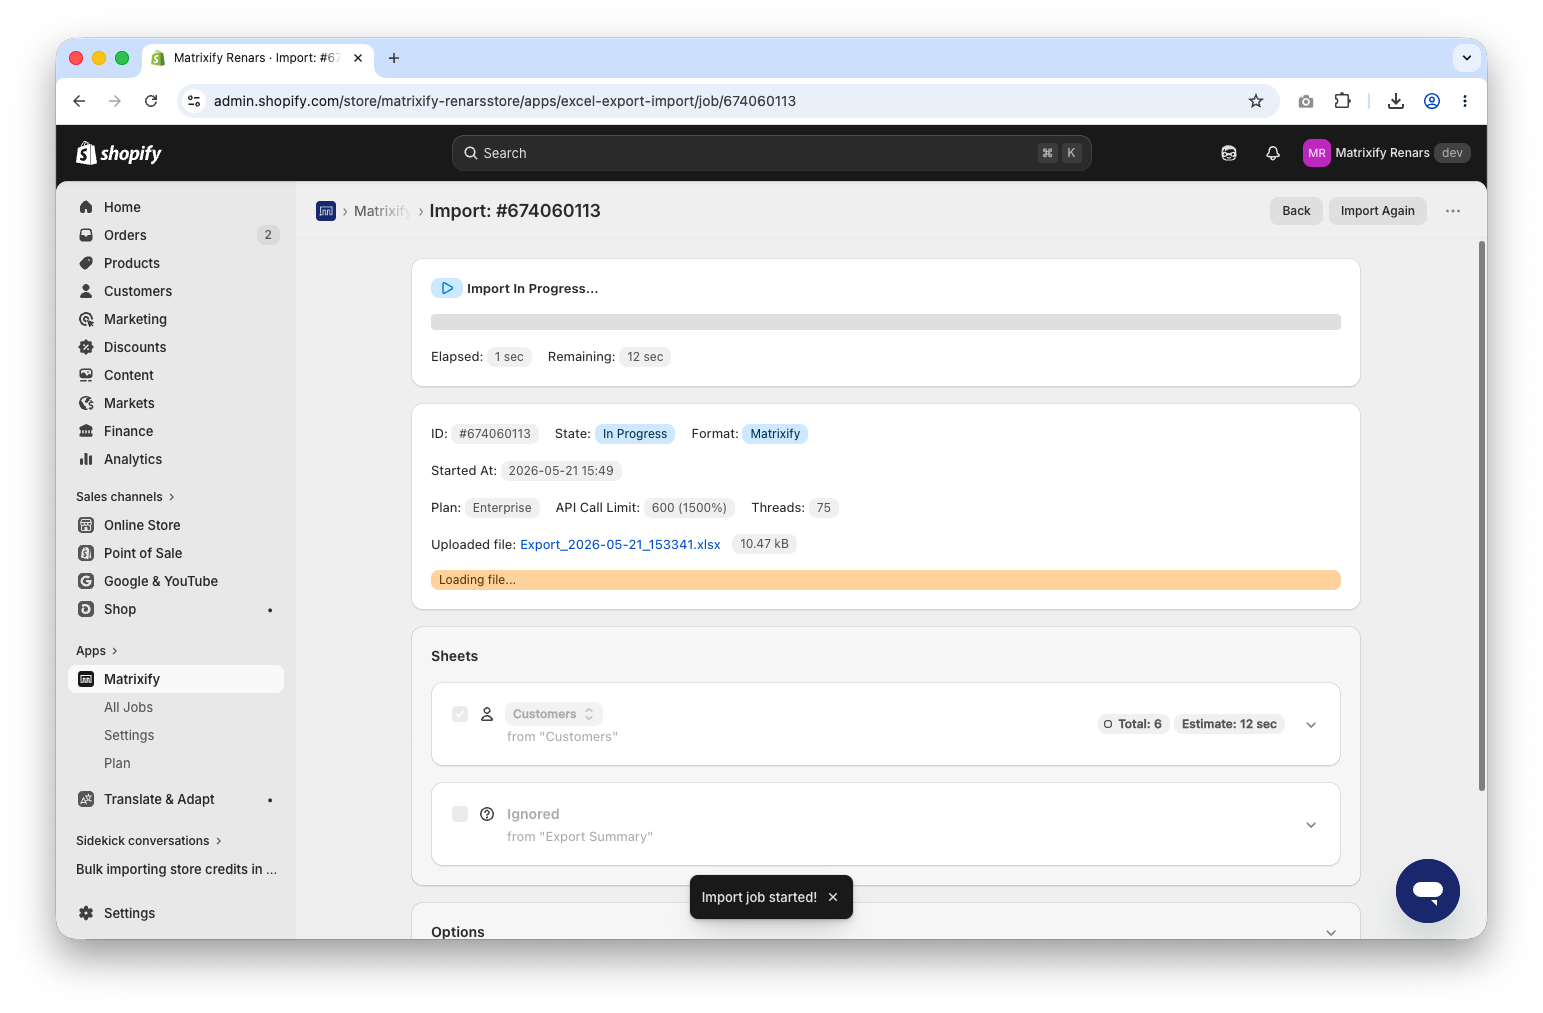
Save the file. Go back to the Matrixify app and upload it to the Import section.
Once uploaded, the app will analyze your Import file. Make sure that the job details and the Customer count look correct, and press the Import button to start the import.
4. Enjoy imported Customer Store Credit balances
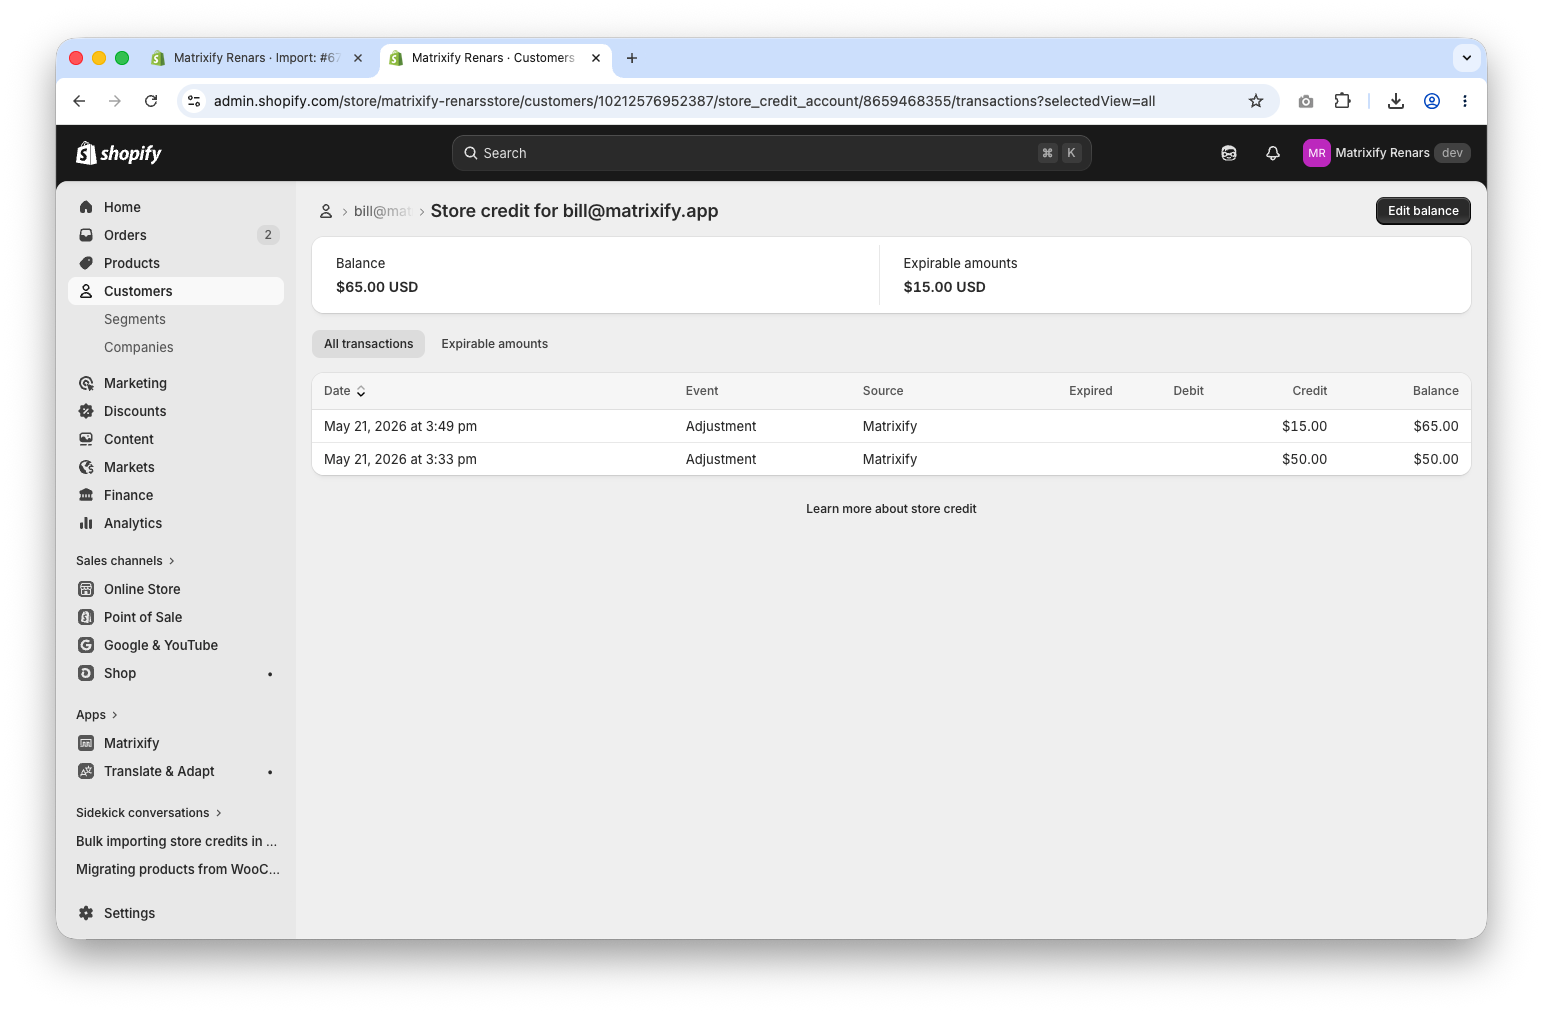
Once the Import is complete, you can verify the updated Store Credit balances in your Shopify Admin by opening individual customer profiles. If you’d like to review all customer balances at once, Export your Customers using Matrixify. The Export will include each customer’s Store Credit balance in a single spreadsheet, making it easy to audit and confirm the imported data.
Create Customer Store Credit Imports from scratch
If you are migrating balances from another platform, running a promotion that grants credits to a list of Customers, or processing a batch of refund credits, you do not have to start from an Export. You can build the Import file directly.
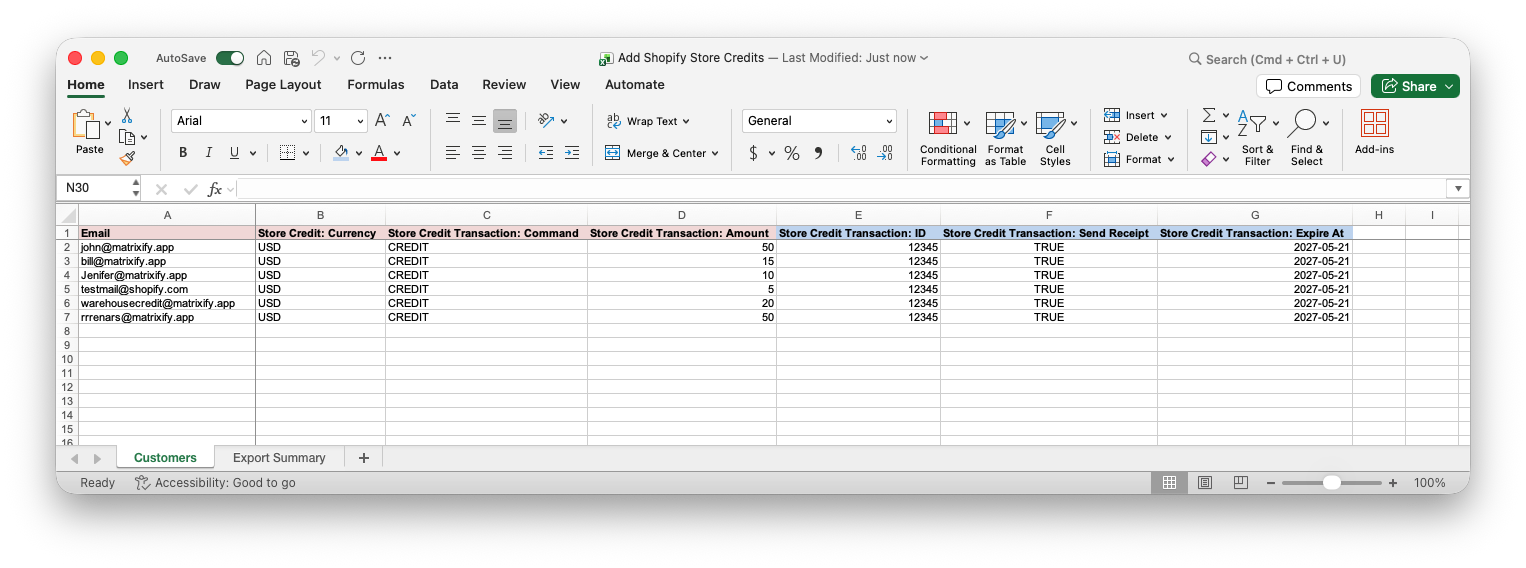
The minimum mandatory columns you need are:
Email(orID)Store Credit: CurrencyStore Credit Transaction: CommandStore Credit Transaction: Amount
You can also add the following related optional columns:
Store Credit Transaction: Send Receipt– used to trigger Customer notification about added Store Credit. Can be used only forCREDITtransactions.Store Credit Transaction: Expire At– used to set the expiry date for the added Store Credit. Can be used only forCREDITtransactions.Store Credit Transaction: ID– any integer number, useful if running repeated Imports. The app will not add Transactions which already exist or have been previously imported with the same credit transaction ID for the same Customer.
What to do next?
- Install the Matrixify App.
- Check out the documentation for our Customers sheet template.
- Read other Customer-related tutorials.
- Contact Matrixify support if you run into any issues or have additional questions.


