Matrixify provides various settings and options you can apply and change to your import/export job before starting it.
On this page we will look into what each option means and when you should or should not apply them.
Import Options
Scheduling
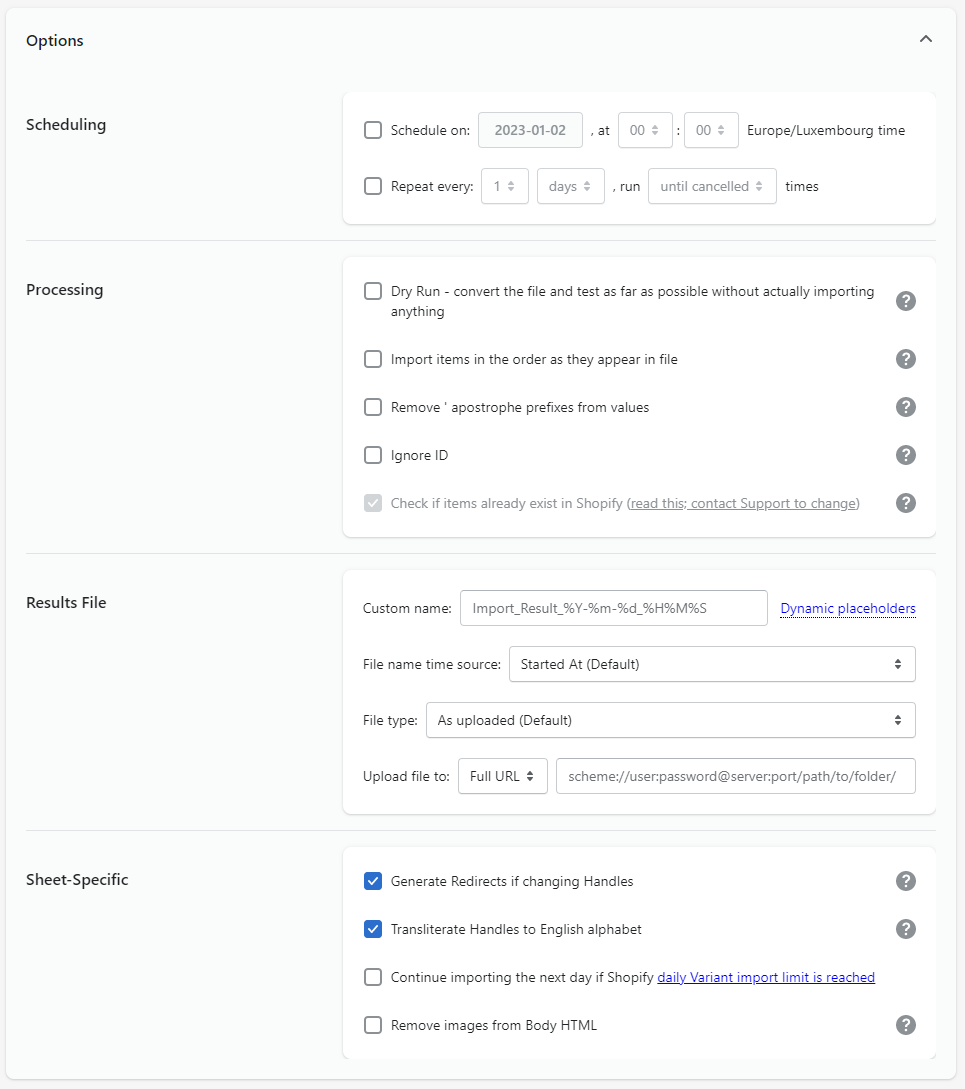
Scheduling Options allow you to set up the import to run automatically by specifying when it should start and how often it should repeat.
| Option | Description |
|---|---|
| Schedule on | Choose the date and time when to actually do this import. Date and time is listed in the stores time-zone, and will follow daylight savings time.Check out Matrixify tutorials about scheduling imports.Default value – disabled. |
| Repeat every | Choose the time interval, when to repeat this same import. If used together with Schedule on option then will repeat after it runs first time based on Schedule on date and time.For example, if you set Schedule on to be exactly at midnight and this setting to repeat every 1 day, then job will repeat every day at midnight.Check out Matrixify tutorials about scheduling imports.Default value – disabled. |
Processing
| Option | Description |
|---|---|
| Dry Run | For cases when you need to check what Matrixify will tell about your items, or you need to convert some other format to Matrixify format, and review your file before doing the actual import.
A dry run primarily checks the basic structure and format of the data, and simulates the import process without actually importing anything. It helps to catch basic errors and issues in the file. Default value – disabled. |
| Import items in the order as they appear in file | If you have Big or Enterprise subscription plan then the app uses its resources to import multiple items at the same time to best leverage import speed in Shopify because of this the app does not guarantee the order in which the items are imported.
You can select this option to force your items to be created in the same order as they are in the file you are importing, but since this will force to create Products one by one then the app will not use its full offered Enterprise or Big plan speed. The most common use case for this would be when you are importing Products that will be added to the Collection which is sorted by the creation date. Default value – disabled. |
| Remove ‘ apostrophe prefixes from values | Helpful if you exported a file with apostrophe prefixes, and now need to import it back. Or maybe your Excel or Google Sheets data simply has apostrophe prefixes for values to force them to be interpreted as text.
Default value – disabled. |
| Ignore ID | Will ignore the ID values of the imported file items. This makes import run faster if importing an export file from another store. Don’t ignore ID if you import data from the same store – then the app will use ID values to identify items very fast.
Default value – disabled. |
| Check if items already exist in Shopify On by default Disabled by default |
Usually, you should leave this on, as the default – that is the safest way to import. So remove that checkbox, only if you are absolutely sure, what you are doing.
This import option can only be enabled by contacting Matrixify support. If you are absolutely sure that your import is just creating new items, and they don’t exist in Shopify, you can force the app not to load any of the existing items by any of method. Just be aware that if items do exist, then there might be failed imports, errors, duplicates, or any other unexpected updates or errors if those items exist. Default value – enabled. |
Results File
| Option | Description |
|---|---|
| Custom Name | Each import will return the Import Result file and here you can set a custom file name for the returned Import Result file. You can also include dynamic placeholders in the custom file name.
Default value – |
| File name time source | Time source used in the Results file name.
Default value – |
| File type | You are able to specify the files typer for the results file. This could be useful if you are processing the results file programmatically so that you can force the results file to always be a specific file type.
Default value – |
| Upload file to | You can set the app to upload the Import Result file to your set up server or custom specified FTP/SFTP Full URL. The Import Result file will always anyway be available in the app and stored on our servers.
Default value – disabled. |
Sheet-Specific
| Option | Description |
|---|---|
| Generate Redirects if changing Handles
On by default |
In case if your import will change Handles for any of the items, we will automatically generate redirect from the old Handle to the new one. Enabling this makes the import run a bit slower, but at least you don’t have to worry about redirects. If you need to improve the import speed, then you can uncheck this box, but then we will not generate any redirects.
Default value – enabled. |
| Transliterate Handles to English alphabet
On by default |
If you import any Handles that are with non-English characters (e.g. Japanese or any other language) then we will generate Handles with English characters, but such that reading them aloud it sounds like you are speaking that language. Neat trick, called transliteration! ? It’s because Handle is used in URLs, and URLs usually need to have English characters. In special cases, if you really need your Handles to be with non-English characters, then you can remove this checkbox. Read more in the tutorial.
Default value – enabled. |
| Continue importing the next day if Shopify daily Variant import limit is reached | If you hit the Shopify daily variant limit, then you can enable this checkbox so that we automatically continue importing the rest of the file the next day. And continue every day until all your Products are imported. Read more in the tutorial.
Default value – disabled. |
| Remove images from Body HTML | If you are in the situation that your Shopify Products have Body HTML with images, then here’s how you remove images from product descriptions in bulk. Read more in the tutorial more about removing images from Body HTML.
Default value – disabled. |
Export Options
Scheduling
Scheduling Options allow you to set up the export to run automatically by specifying when it should start and how often it should repeat.
| Option | Description |
|---|---|
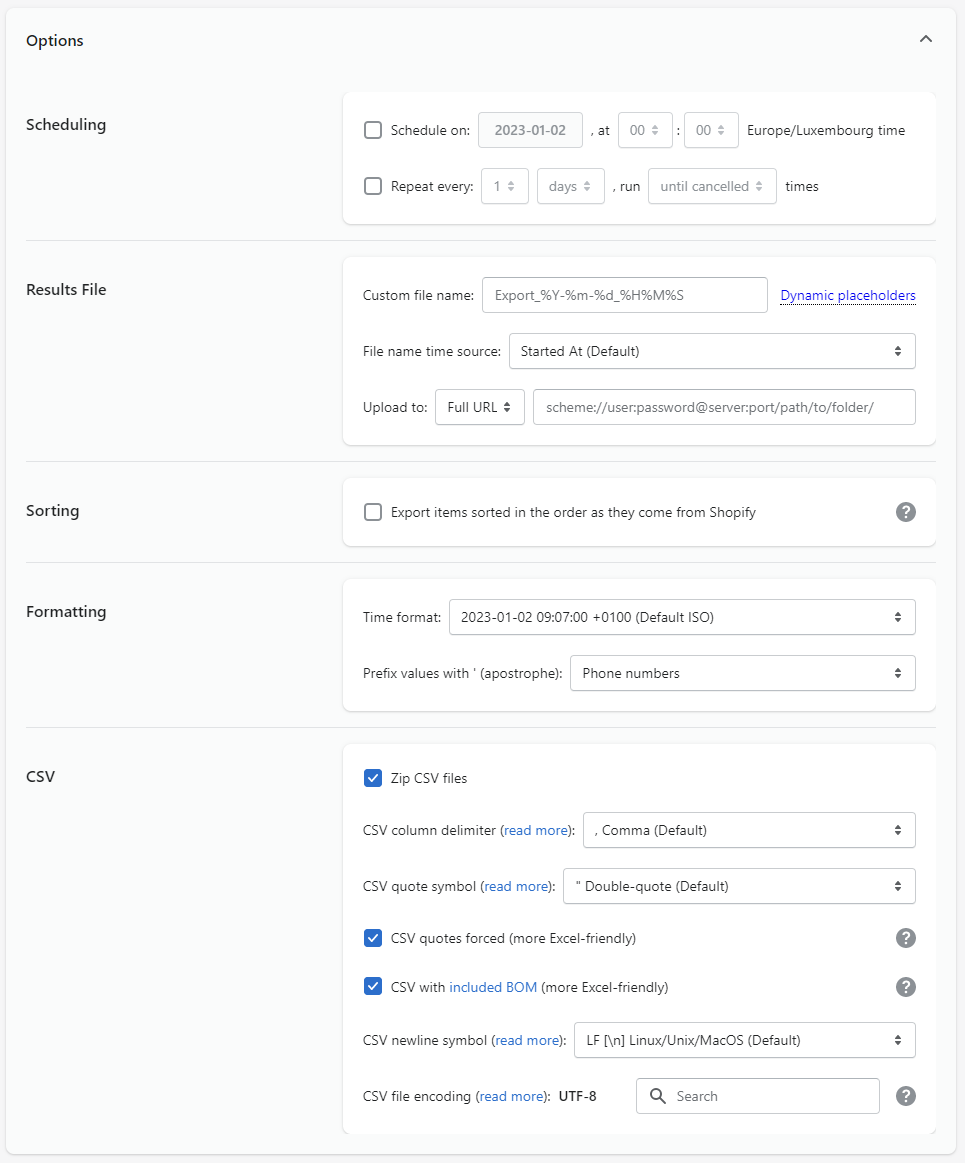
| Schedule on | Choose the date and time when to actually do this export (in your shop time zone). Check out Matrixify tutorials about scheduling exports.
Default value – disabled. |
| Repeat every | Choose the time interval, how often to repeat this same export.
Default value – disabled. |
Results File
| Option | Description |
|---|---|
| Custom file name | Each export will return the exported file and here you can set a custom file name for the returned file. You can also include dynamic placeholders in the custom file name.Default format – Export_%Y-%m-%d_%H%M%S. |
| File name time source | Time source used in the file name.
Default value – |
| Upload file to | You can set the app to upload the exported file to your set up server or custom specified FTP/SFTP Full URL. The Exported file will always anyway be available in the app and stored on our servers.
Default value – disabled. |
Sorting
| Option | Description |
|---|---|
| Export items sorted in the order as they come from Shopify |
If you have Big or Enterprise Plan, then we export several items in parallel. That changes the order in which they get processed because of some export faster, some slower. If you absolutely need to export items in the same order as Shopify API returns them, then check this checkbox. Note that this will make your export slower than you would normally have with Big or Enterprise plans.Default value – disabled. |
Formatting
| Option | Description |
|---|---|
| Time format | Change the time format used for date fields in the exported file. Such as in Created At or Updated At columns.
Default format – |
| Prefix values with ‘ (apostrophe) | Specify if you wish to add apostrophes to specific column types such as Number or Phone columns. This is useful if using Excel or Google Sheets when managing data to force them to handle the cell values as text.For example, in Excel exported phone number +61-123456 might show as -123395 because Excel does not see it as a phone number but as a mathematical formula, but with an apostrophe, it will just show the exported value as it sees it as text not a mathematical equation.Default value – Phone numbers. |
CSV
These options only show up when you have selected export to a CSV file format.
| Option | Description |
|---|---|
| Zip CSV files
On by default |
When exporting to a CSV file, by default it will be compressed into a ZIP file. If you do not need to compress the CSV files, you can uncheck this option.
If exporting multiple sheets/entities, then this option must be selected as each entity generates a different sheet. If the option is unselected when exporting to CSV format, then the app will assume just the first entity and drop others. Default value – enabled. |
| Prefix CSV file names inside the zip with the “Custom file name” | When exporting to a CSV file with Zip CSV files option selected, by default the files within the ZIP will be named as the selected sheet entities, for example, “Products.csv”. Selecting this option, will add value from Custom file name option as prefix to each files name, for example, “Midnight-Export_Products.csv”.
Default value – disabled. |
| CSV column delimiter | You can select other standard delimiters or any custom delimiter you wish.
Default value – |
| CSV quote symbol | CSV file cells are enclosed in quotes for programs such as Excel to be able to understand where the new cell starts and not to take the new line in e.g. description as a new row in the file.
Default value – |
| CSV quotes forced
On by default |
Makes the exported file more Excel-friendly by enclosing all cells with the quote symbol. If not selected, only cells that need to be enclosed will be.
Default value – enabled. |
| CSV with included BOM
On by default |
When opening a CSV file in Excel – if that CSV file contains special non-English language characters encoded in UTF-8, then those characters are shown as corrupted. To tell Excel that the file is in UTF-8 encoding, and thus have those non-English characters show correctly, the CSV file needs to start with the BOM characters (Byte order mark). However, if processing the CSV files with automation scripts, then the BOM characters might not be interpreted correctly, so it’s better to not include them if you process CSV files with scripts or other automation services. Unselecting this option will not include the BOM characters in your export.Default value – enabled. |
| CSV newline symbol | Specify CSV files newline symbol.
Default value – |
| CSV file encoding | Select file encoding format.
Default value – |
Good to know
- Options marked with the “On by default” tag are switched on by default.
- For most imports and export, you do not need to adjust any options.
- If selecting an option, make sure that you understand what the option means.
- If you have any questions or issues, contact us by any means listed in Matrixify “Contact Us” page.


