
Keeping your Products organized is essential for running a smooth Shopify store. Whether you’re preparing new items, managing seasonal collections, or cleaning up outdated listings, being able to update Product status in bulk can save hours of manual work.
With Matrixify, you can easily bulk update the status of Shopify Products using a spreadsheet – no need to open each Product one at a time. In this tutorial, you’ll learn how to export your Product data, adjust the status field as needed, and import the changes back into Shopify quickly and accurately.
Steps to bulk update Shopify Product Status
- Export your Shopify Products with their current status value using the Matrixify app.
- In the exported file, update the
Statuscolumn values. - Upload and import your edited file.
- Enjoy your updated Products!
1. Export Shopify Product status with Matrixify
On the Matrixify app Home page, find the Export section and press the New Export button.
This will open a New Export page where you can configure what data you wish to export.
Select export Format
At the top of the new export page, you can select the format you wish to export to.
We recommend choosing the Matrixify: Excel format to export to an Excel XLSX file, which is most human-editable and user-friendly.
You can also work with a CSV file by selecting the Matrixify: CSV format.
Configure to export Products
After selecting the format, you can select what items to export.
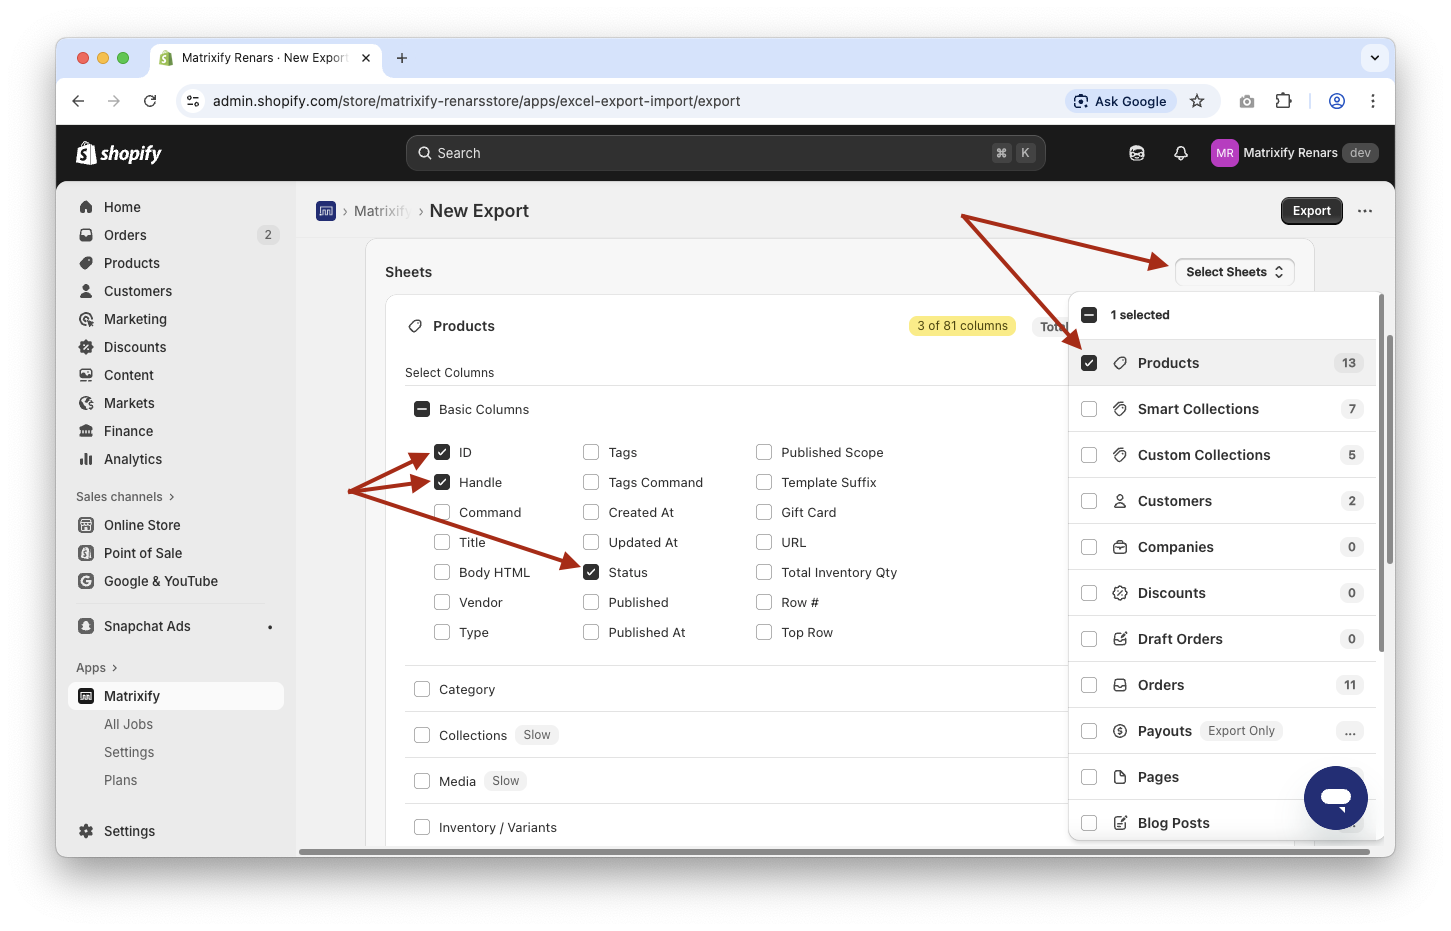
Under the Select Sheets dropdown select Products sheet.
Click on Products sheet to expand it and see all the column groups you can manage for Products.
To bulk update Shopify Product status, you need to select only the following columns from Basic Columns column group.
IDHandleStatus
If necessary, you can also add other columns to your export, but note that when importing your data, the app will update any field in Shopify from the columns you have in the import file. So make sure that the values in the additionally exported columns represent what you want to import. Or you can remove those extra columns completely from the file before importing.
Apply filters to your Export
In most cases, you would only need to update the Status for some products. For this, you can use filters for your export.
To apply filters, click on the Filter button.
Then you can select various filters that you can apply to your export. You can apply and combine any Product filters for your export.
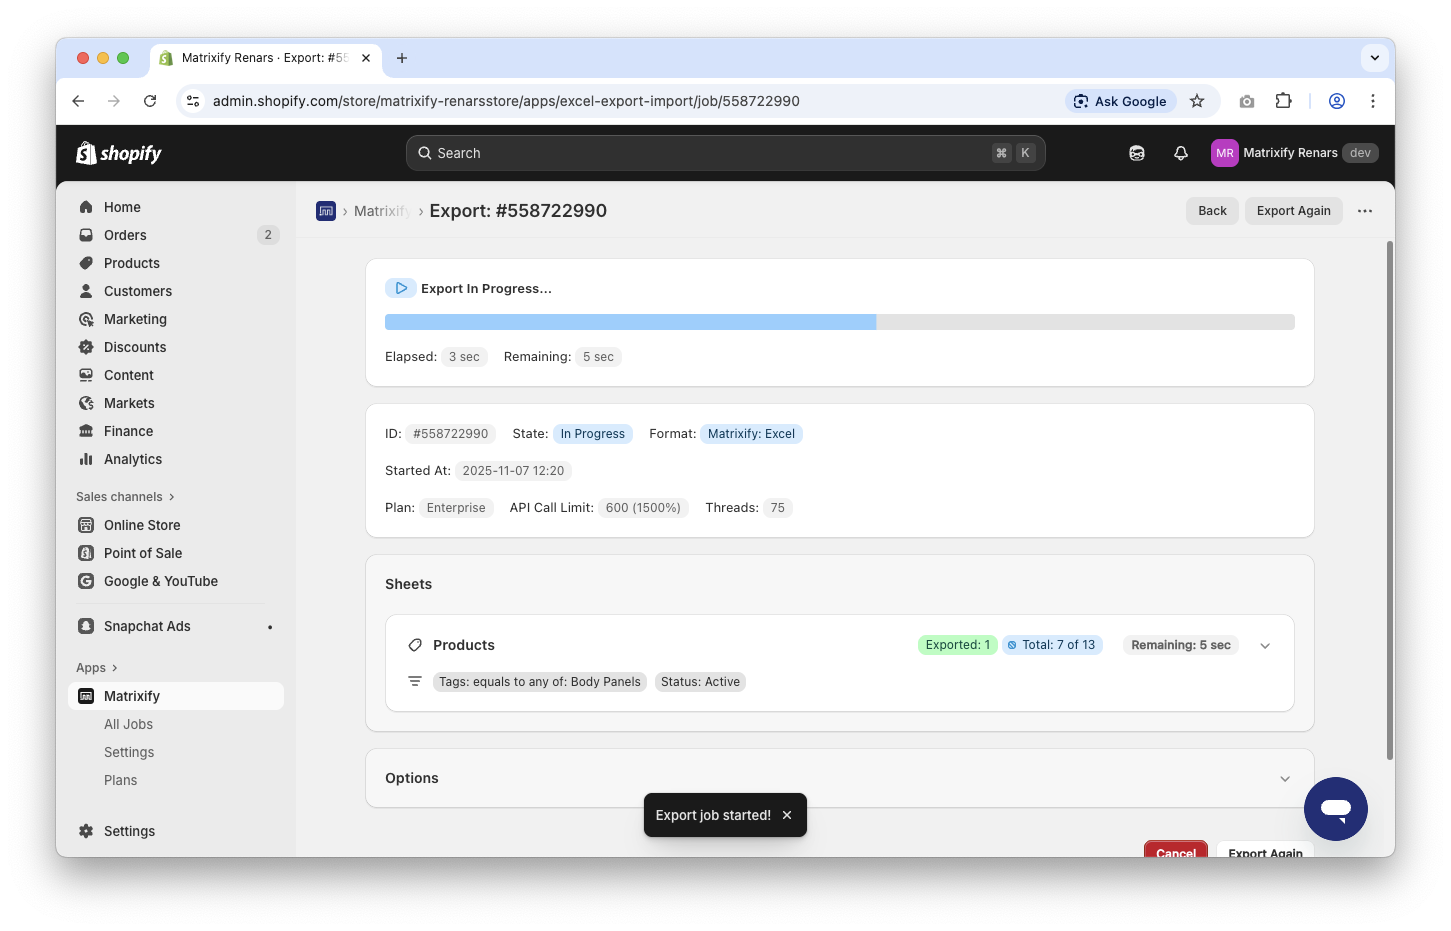
In my example, I will export only active Products with a specific tag by applying filters:
Statusset to valueActiveTags–equals to any of–Body Panels

Read Matrixify Filters documentation for more details about using filters for your data exports.
Start the Export
Once you have constructed the export details, you can click on the Export button at the top or bottom of the page to start the actual export process.
2. Edit Product status in exported file
Once your export is finished, you can click on the Download Exported File button to download your file.
In the file, you should see the columns that you selected to export and only the products that match your applied filters.
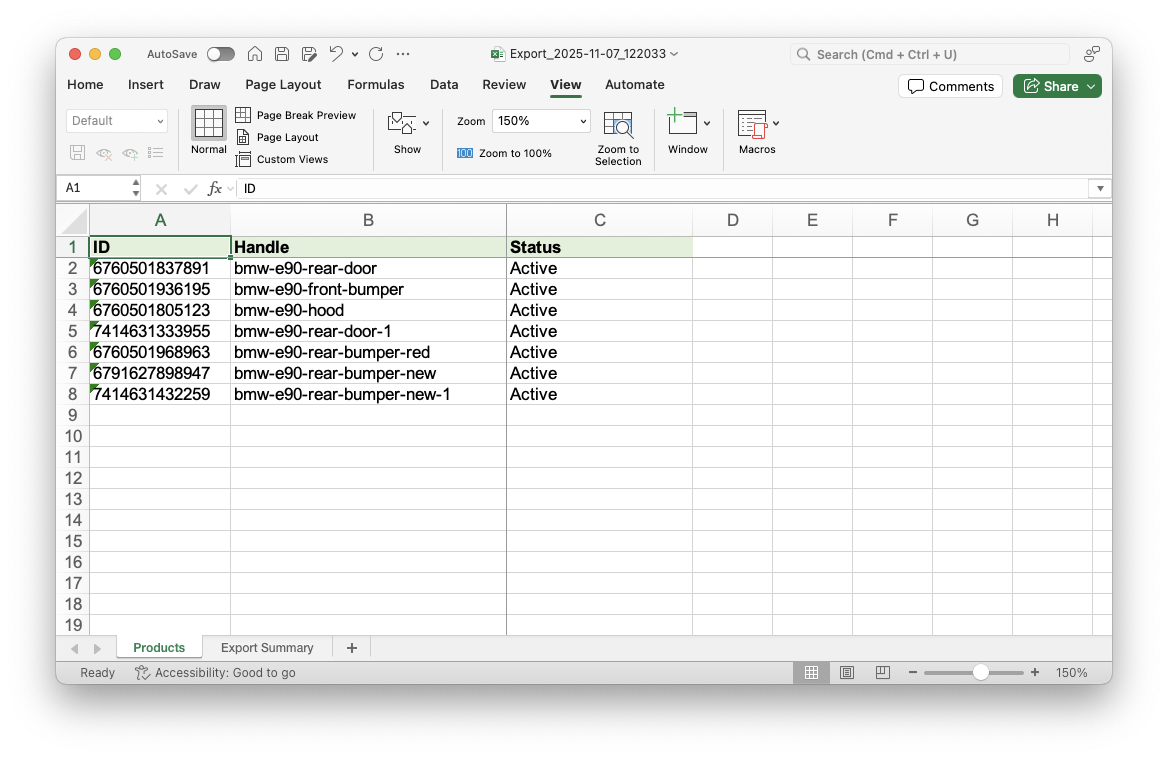
Now you can edit the Status column in your exported file to set and adjust the Shopify Product status.
Lets go over what values can be set in the Status column and their best use-cases:
Active
Status value Active means that the product is available and ready to sell. It will appear in your online store, apps, and any connected sales channels.
Use cases:
- Launching new Products that are fully set up and ready for customers
- Making existing Products visible again after edits or updates
- Restoring availability after temporarily hiding a Product
Draft
With the status value Draft the product still exists in your Shopify Admin but is not visible to customers in your store or on sales channels.
Use cases:
- Adding new Products that aren’t fully completed yet
- Temporarily disabling the Product while updating product details such as pricing, description or others.
Archived
Using Archived value the product is no longer for sale and is hidden from customers, but its data remains in your Shopify Admin for reference or reactivation without permanently deleting it.
Use cases:
- Retiring seasonal or discontinued Products without deleting them
- Keeping your Product list organized while preserving past records
- Hiding out-of-stock Products that won’t be restocked
Unlisted
The Unlisted value means that the Product is active, but hidden from store navigation, search, and seo sitemap. It’s only accessible via a direct URL link.
Use cases:
- Creating hidden or exclusive Products for VIP customers or pre-orders
- Testing Product pages before fully listing them
- Offering special Products only through email or private campaigns
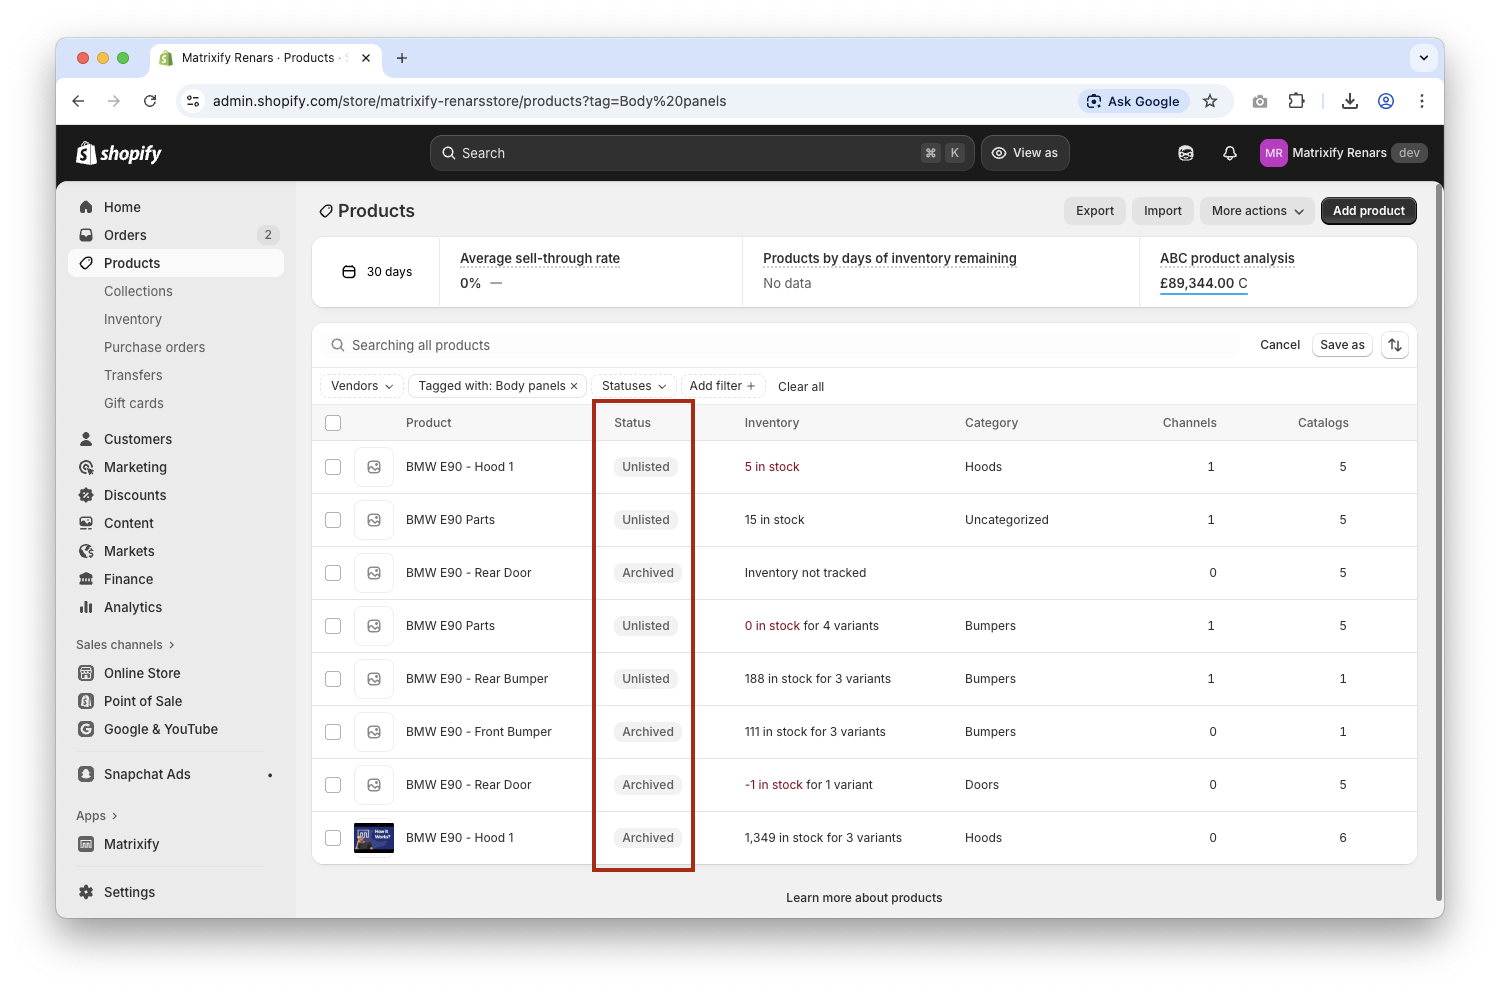
In my example, I will change 4 Products to Status Archived as they will no longer be sold and change 3 other Products to Unlisted as they will no longer be publicly available for all, but still purchasable for those who have a direct store link to the Product.

3. Import your updated file
Once the Status column values in the Excel file are set as you need, you can save the file and head back into the Matrixify app.
Upload the saved file to the Matrixify app Import section.
The app will create a new import job and start to analyze the uploaded file.
Once the file has been analyzed, check that all item counts are correct and start the import by pressing the Import button at the top or bottom of the page.

4. Enjoy your updated Products!
Once the import is completed, you can go to your Shopify Admin and check your updated Products!
Good to know!
- You can also bulk publish and unpublish your Shopify Products from the Online Store sales channel within the same import – by just adding the respective columns.
- See our Products sheet documentation to learn what each column means in our template.
- Check out other Product-related Matrixify tutorials.
- Have any questions or issues? Let us know!


