Use the Matrixify app in your Shopify store to migrate BigCommerce Products, Collections, Discounts, Customers and Orders to Shopify in just a few simple steps.
This import will use your BigCommerce store’s API to get the most detailed data:
- convert your BigCommerce Products into Shopify Products,
- create Custom Collections that your Products are in,
- create Redirects from the old BigCommerce Product and Collection URLs to the Shopify URL,
- migrate BigCommerce Customers to Shopify, including Customer Store Credits,
- migrate Orders from BigCommerce to Shopify,
- convert BigConnerce Coupons and Promotions to Shopify Discounts.

Let’s dig into the process of migrating the BigCommerce store to Shopify.
Steps to migrate from BigCommerce to Shopify:
- Create BigCommerce API credentials.
- Upload the credentials text file to Matrixify.
- Under Options, choose “Dry Run” – to not import just yet.
- Download the generated Import Results file and check that data is as you need, make corrections if needed.
- Import your edited Excel spreadsheet file.
- Enjoy your BigCommerce data in your Shopify store.
1. Create BigCommerce API credentials
In your BigCommerce admin, go into Settings -> Store-level API Accounts and click the “Create API Account” button.
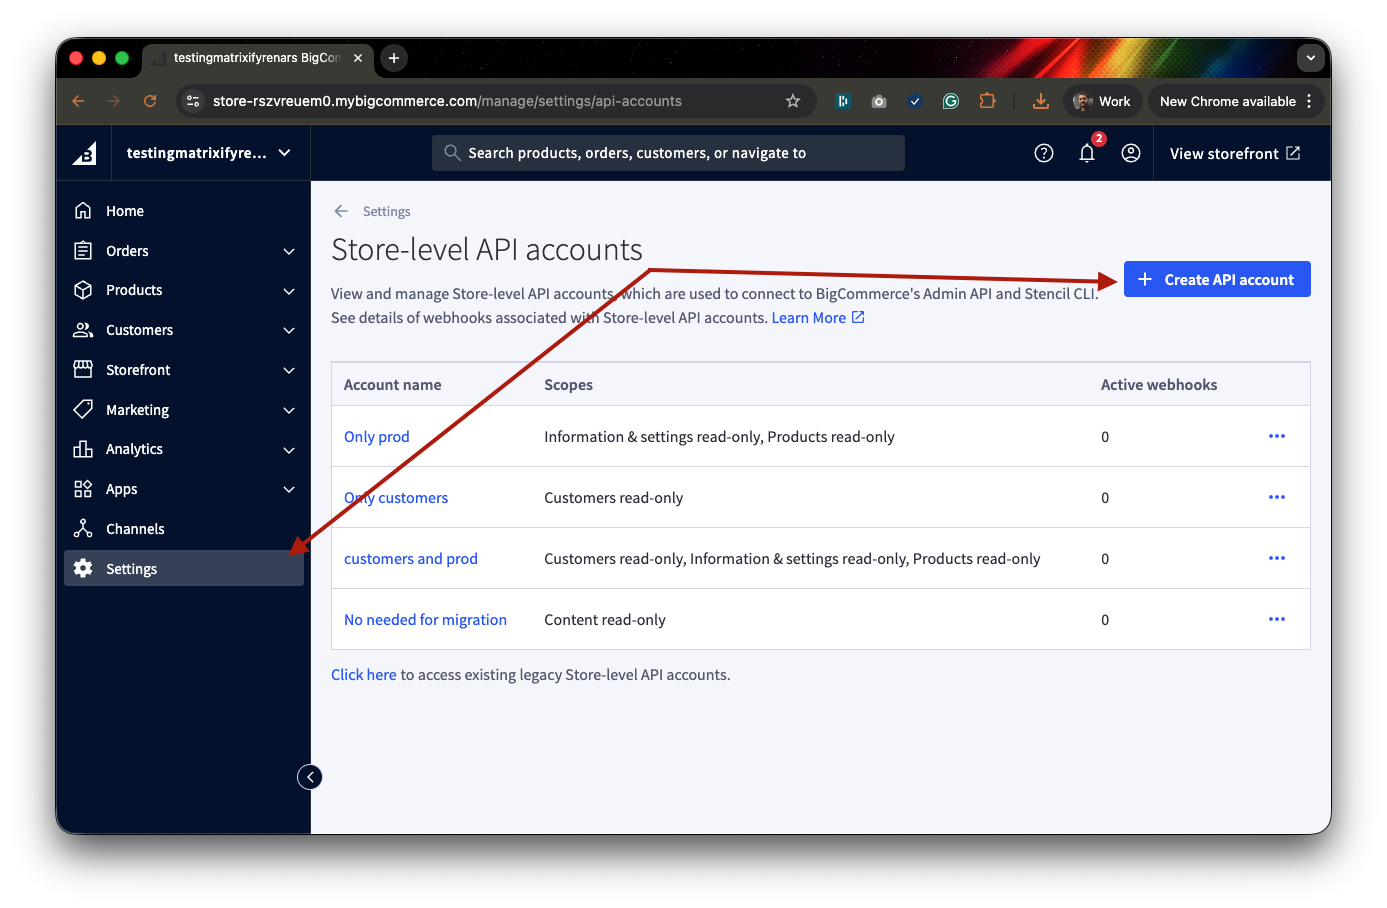
A new page will open where you can give a name to the API Account and select permissions.
Set Token Type to V2/V3 API Token.
You can set any Name to the API Account, for example, “Matrixify Migration“.
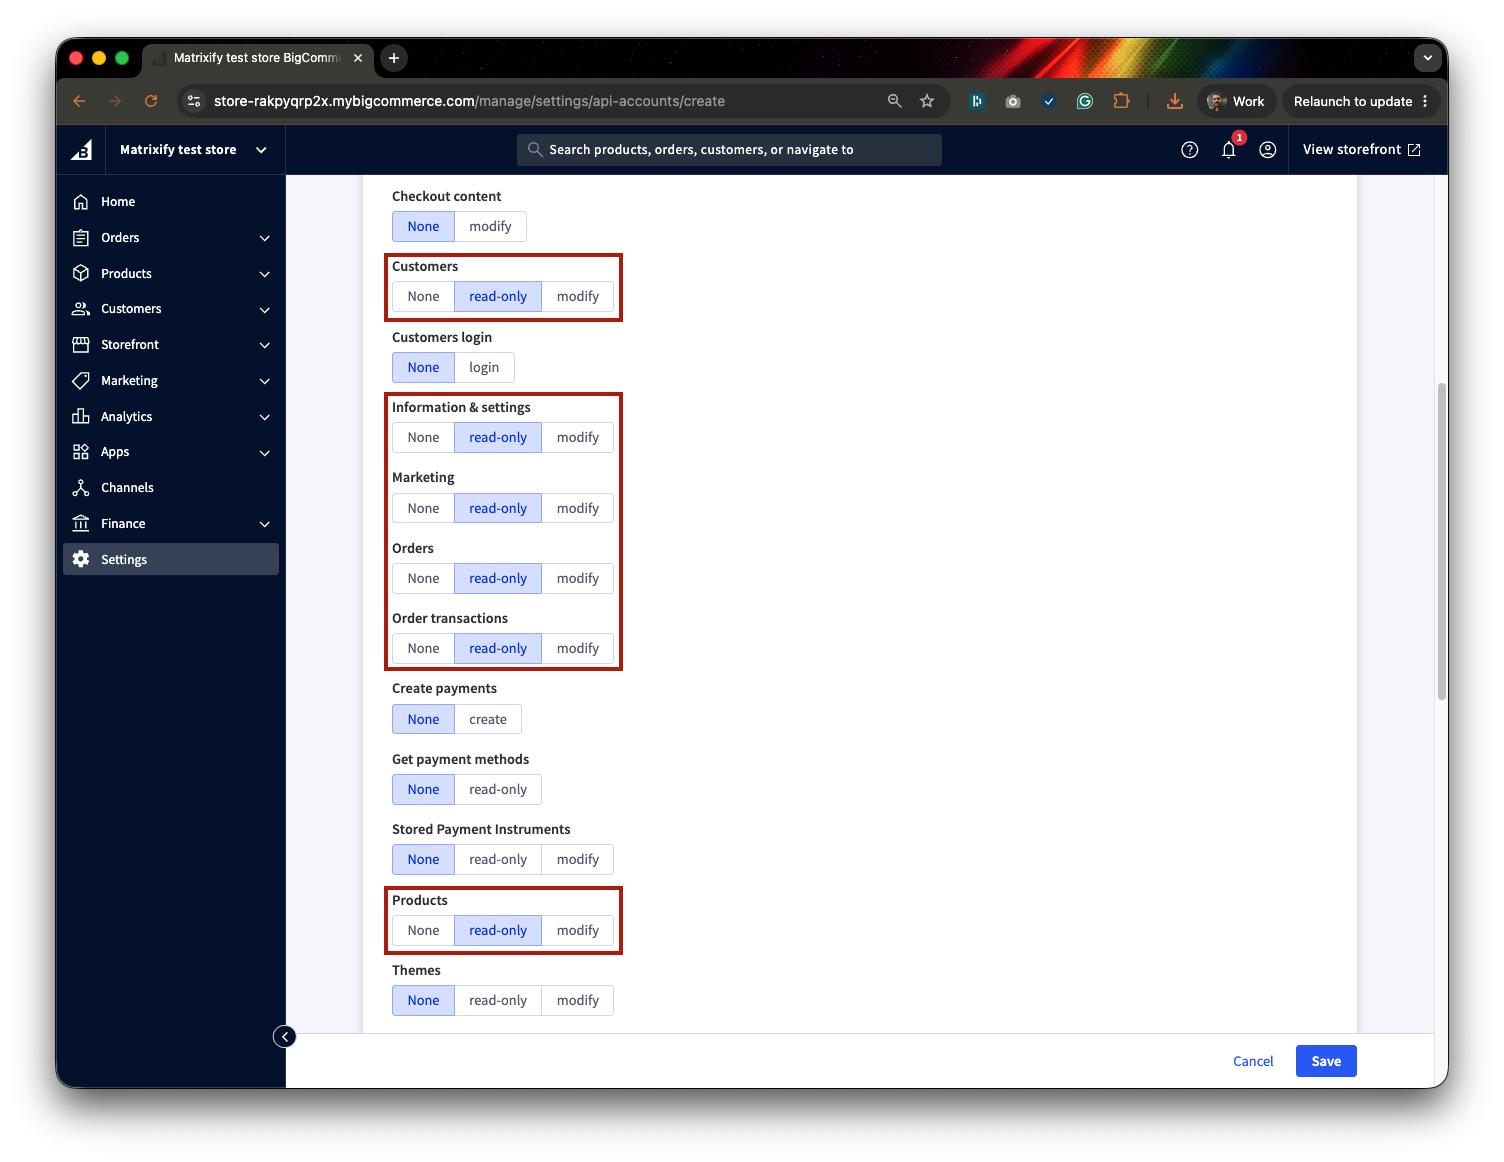
In permissions, you must set the following scopes to read-only permission, depending on what data you are migrating:
- Products:
Products– to access Product details,Information & settings– for BigCommerce stores’ settings and store units,
- Collections:
Products– to access Collections and their Products data,Information & settings– for BigCommerce stores’ settings and store units,
- Customers:
Customers– to access BigCommerce Customers’ data,
- Orders:
Orders– to access Orders data,Order transactionsto access the historic Transactions data,
- Discounts:
Marketing– to get actual coupon and promotion data,Information & settings– for BigCommerce stores’ settings and currency data,Products– to get product data when a Discount applies to specific Products,Customers– for BigCommerce Customer groups data when a Discount applies to specific Customer groups.
Any other permissions can stay on their default values.
Click the “Save” button once you are finished.
A TXT file should download automatically to your computer. That contains your API credentials.
The credentials txt file name is like this:
BigCommerceAPI-credentials-h87k1m5ck1voo0q85fus4wbj6ifdq1n-.txt
(and you should keep it that way).
2. Upload the credentials text file to Matrixify
Now you can head into your Shopify store and open the Matrixify app.
On the app Home page, you can see the Import section. Click on it to select the credentials text file from your computer, or drag and drop it in the import area.
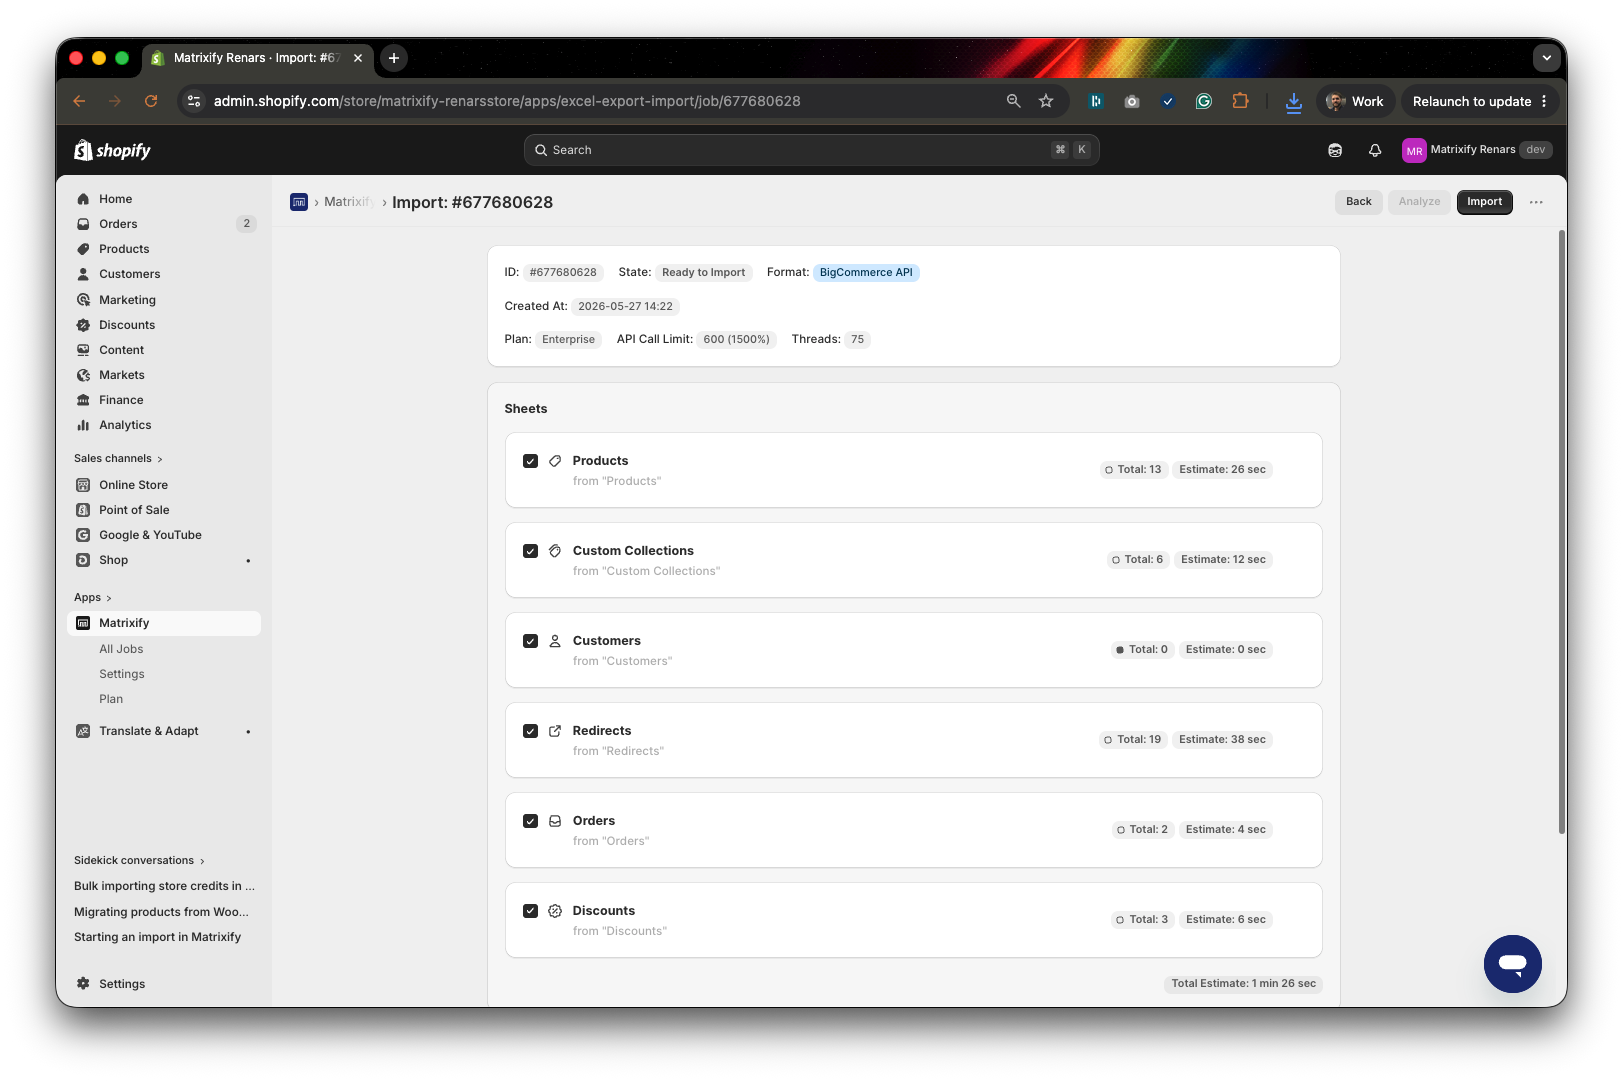
You should see that the app detects the import format as “BigCommerce API“.
As the app analyzes BigCommerce data, a count will be returned for number of Products, Collections, Customers, Redirects, Orders and Discounts.
If a scope permission is missing from BigCommerce API credentials, then that specific entity sheet will show as not selected with a message about what BigCommerce scopes are missing from the API credentials.
3. Select the “Dry Run” option to generate an Excel file
Once you have confirmed that details about the job look correct, you can scroll down to the “Options” section of the import job.
In the Options, you would need to select the “” option.
Leave all other options as they are by default.
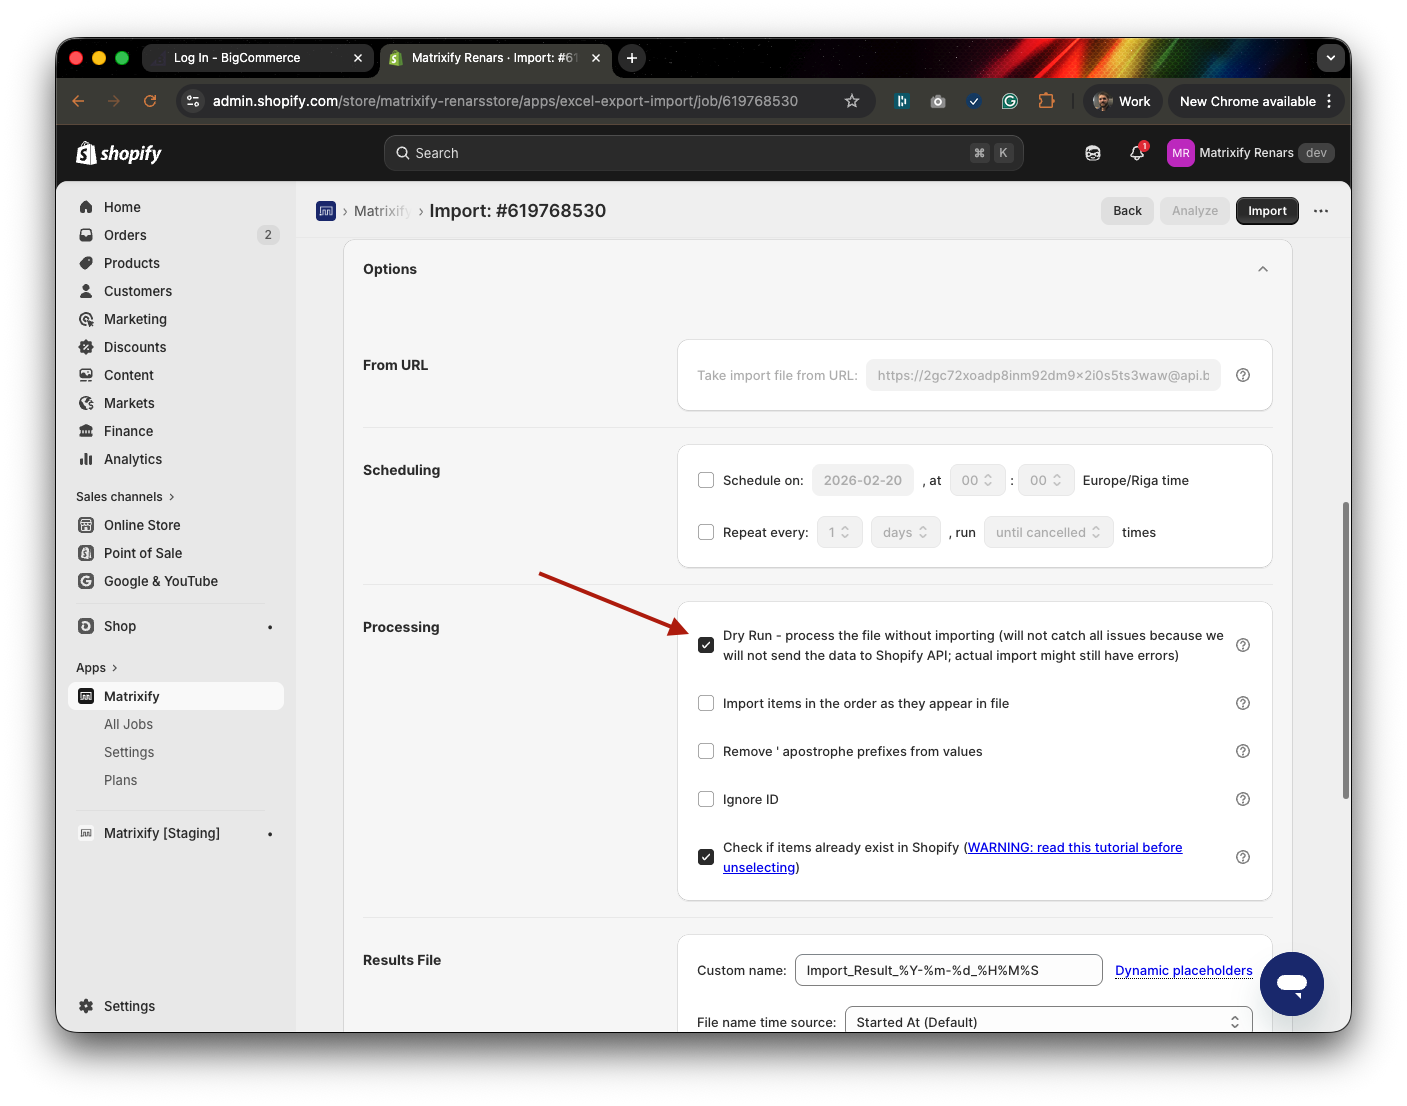
With Dry Run, the app will take data from the BigCommerce API and only generate an Excel file according to the Matrixify template without actually importing any data.
Now you can click the “Import” button and the app will generate the dry-run file.
4. Download generated Import Results file and check data
Once the dry-run has completed, which should be relatively quick, you can press the “Download Import Results file” button to download the generated file.
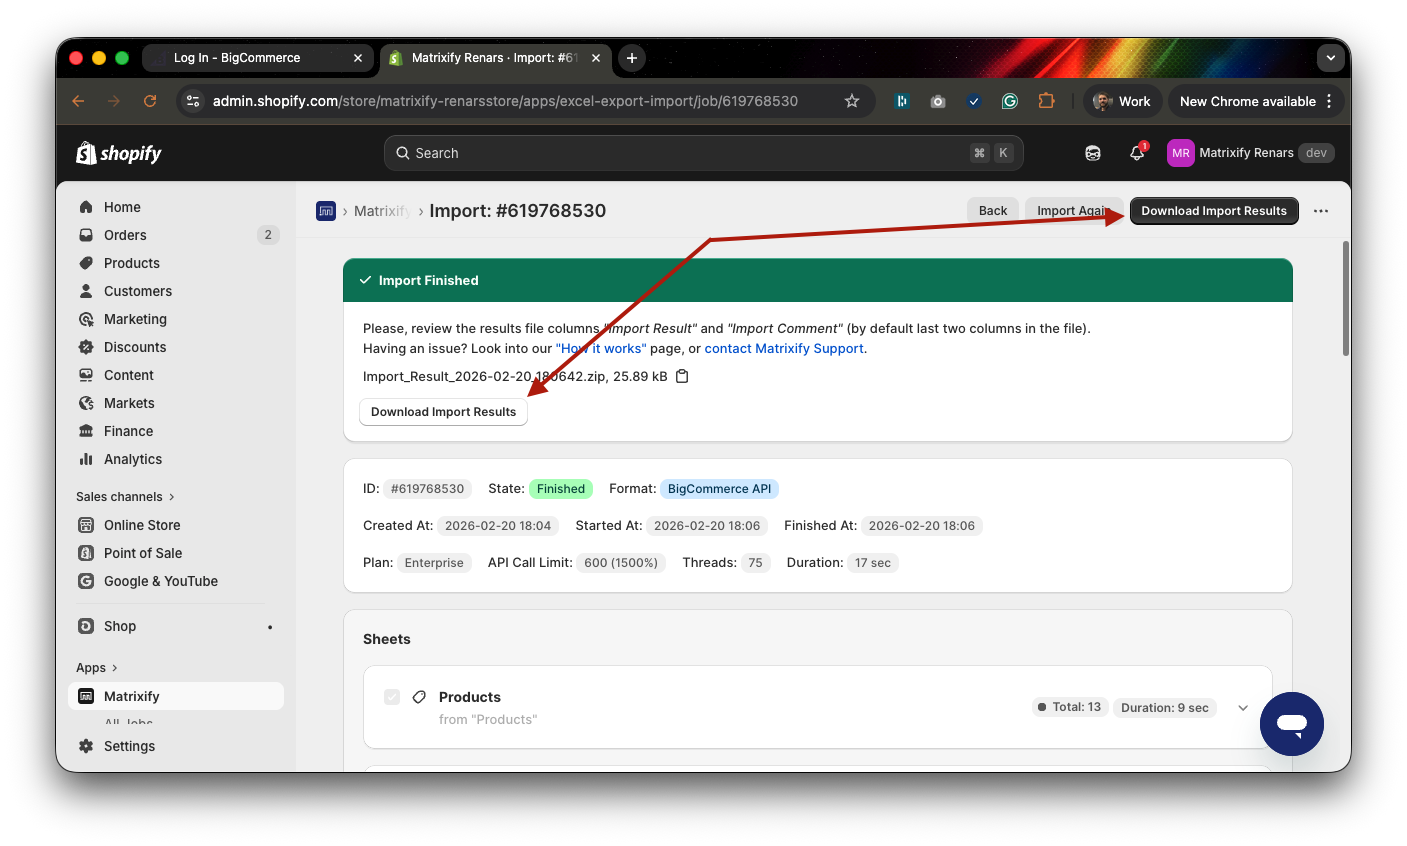
You will get the zip file with your data prepared for the migration.
In the zip file, you should see the folder “Images” and Excel file “Import_Result.xlsx“.
The Images folder is generated with image files if products or collections in your store contain images in their description HTML code.
The app will change for image links in HTML code to point to Shopify Files so that they no longer point to the BigCommerce site.
You would need to unzip the zip file and upload all image files in your Shopify Admin -> Settings -> Files.
If there are no Image files, do not worry – it means that your description HTML does not have any images in the HTML code. Actual Product images still will be migrated.
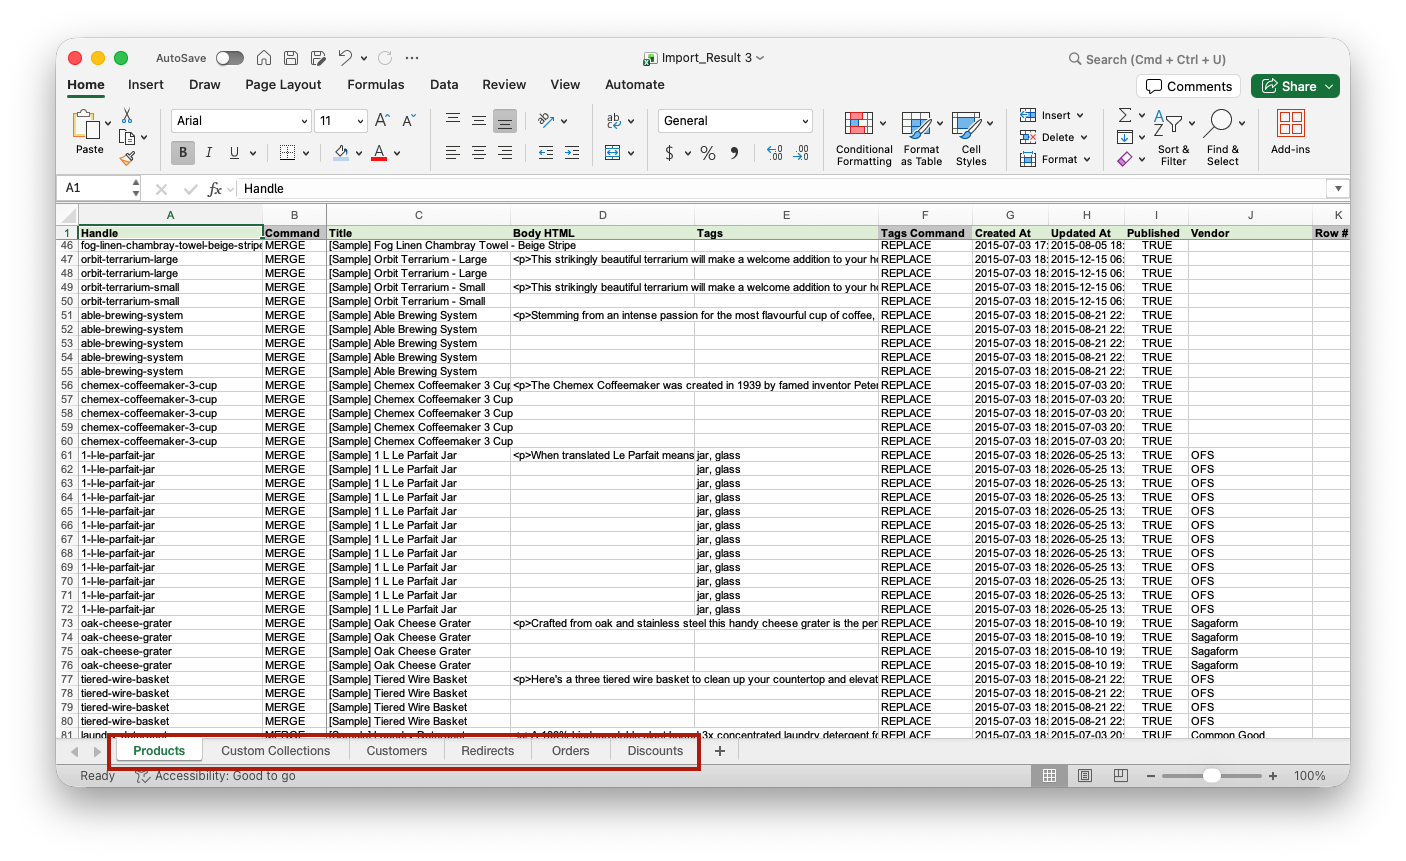
Once images are imported in Shopify Files, you can check the “Import_Result.xlsx” file.
If you need to check your data before importing or clean it up – you can open that file and work your changes in it.
Data in this file is organized according to the Matrixify template.
Note that the Excel file contains multiple sheets/tabs all of which will be imported:
- Products
- Custom Collections
- Customers
- Redirects
- Orders
- Discounts
Each column from Matrixify template sheets is explained in those documentation pages:
- Products template documentation
- Custom Collections template documentation
- Customer template documentation
- Order template documentation
- Discounts template documentation
- Redirects template documentation
In that Excel file – feel free to clean up and update any data that you need to change, before importing to Shopify. And, of course, if you don’t need to change anything, then you don’t have to – you can just import that Excel file as it is.
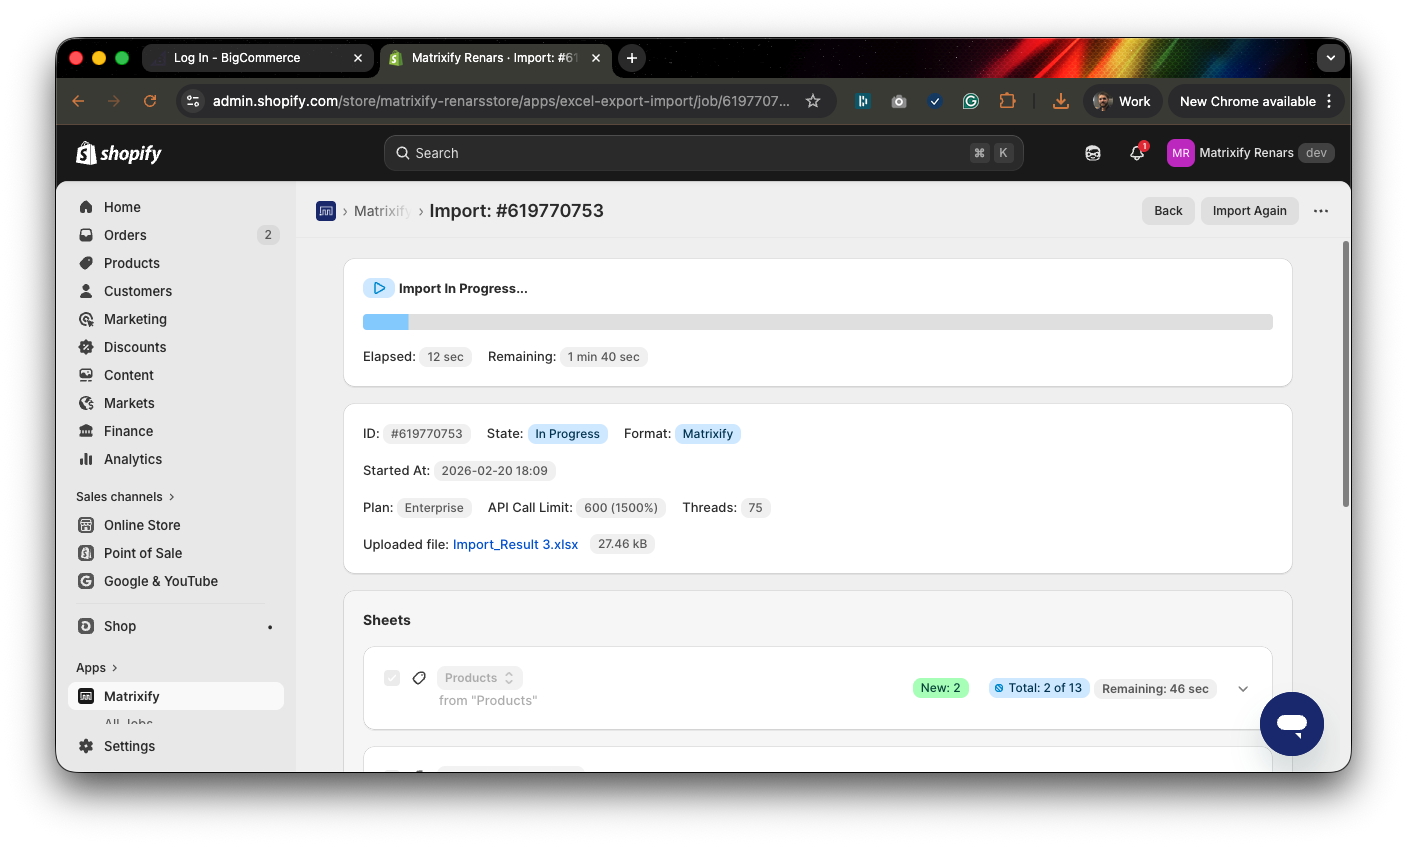
5. Import your Excel file
Once you have checked that all data matches your needs you can finally import the file.
Head back to the Matrixify app and on the Home page, Import section upload your corrected Excel file.
Now you should see that the import format shows as “Matrixify”.
Make sure that item counts are correct and that there are no unexpected warnings showing.
This time, you do not need to select or change any options.
If there are any inconsistencies, please contact Matrixify support, before importing your data.
Check that everything is correct and then press the “Import” button to start actually importing data into Shopify.
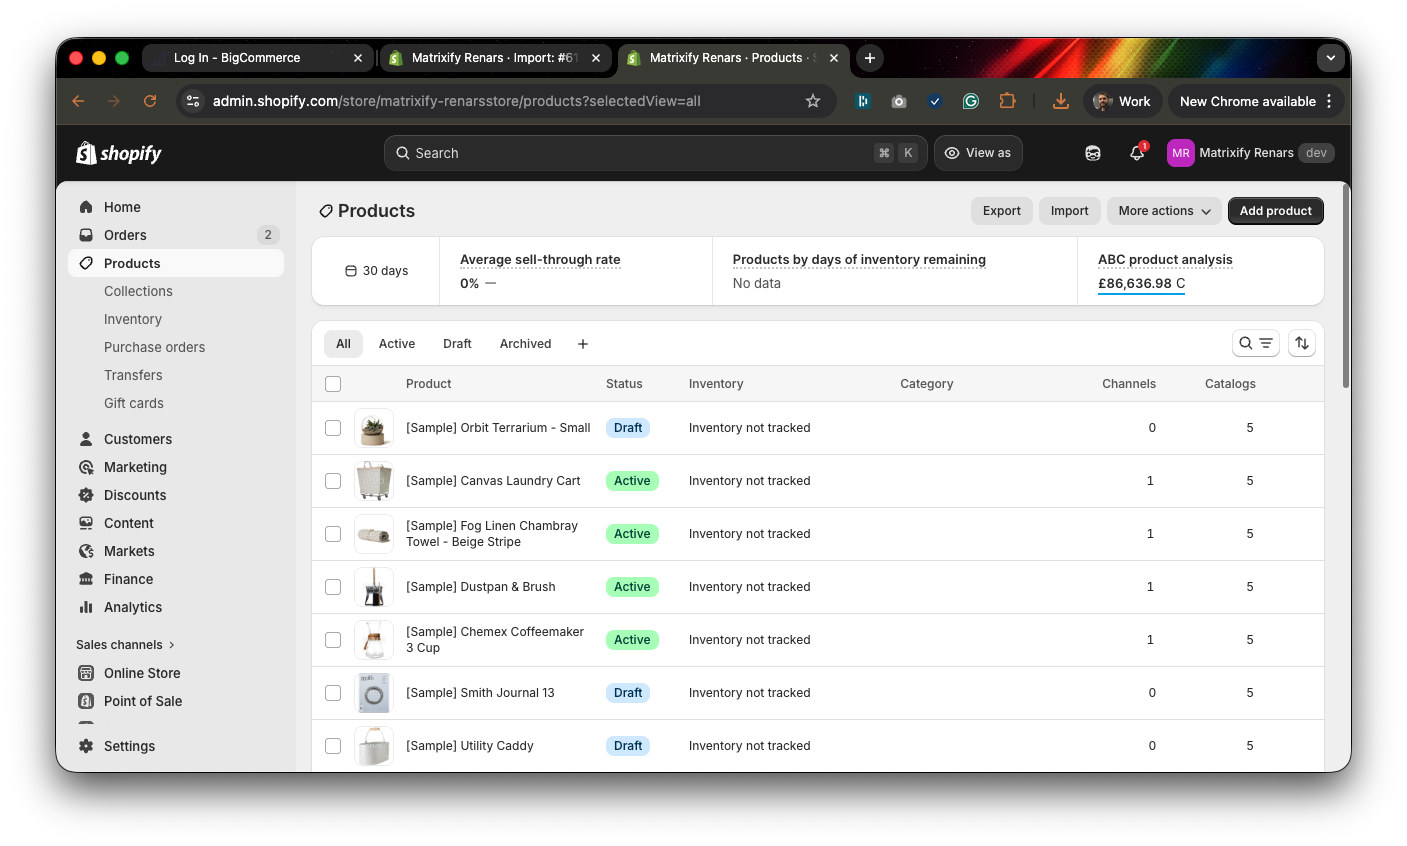
6. Enjoy your BigCommerce data in Shopify
After the Import has finished, you can check and enjoy your Products, Collections, Customers, Orders and Discounts migrated from BigCommerce to Shopify!
Good to know!
- Create your Shopify store.
- Install the Matrixify app.
- If you have any questions or issues during the migration, do not hesitate to contact Matrixify support.
- Using the method in this tutorial, you can also migrate BigCommerce Store Credits to Shopify. This is included as part of the Customer’s sheet.
- Do not have access to the BigCommerce API for Products migration? Check out our tutorial on how to migrate Products to Shopify using the BigCommerce CSV file.
- All the migrated data is really yours – it stays on your Shopify store even after you have uninstalled the Matrixify app (but you can also continue using Matrixify for other data exports, imports, and updates).


