Everything you need to know about the Matrixify format template. The template works in Excel, CSV and Google Sheets to manage your Shopify data in bulk.
Matrixify template Demo files and documentation
Here you can download Matrixify template Demo files and go to the related documentation page.
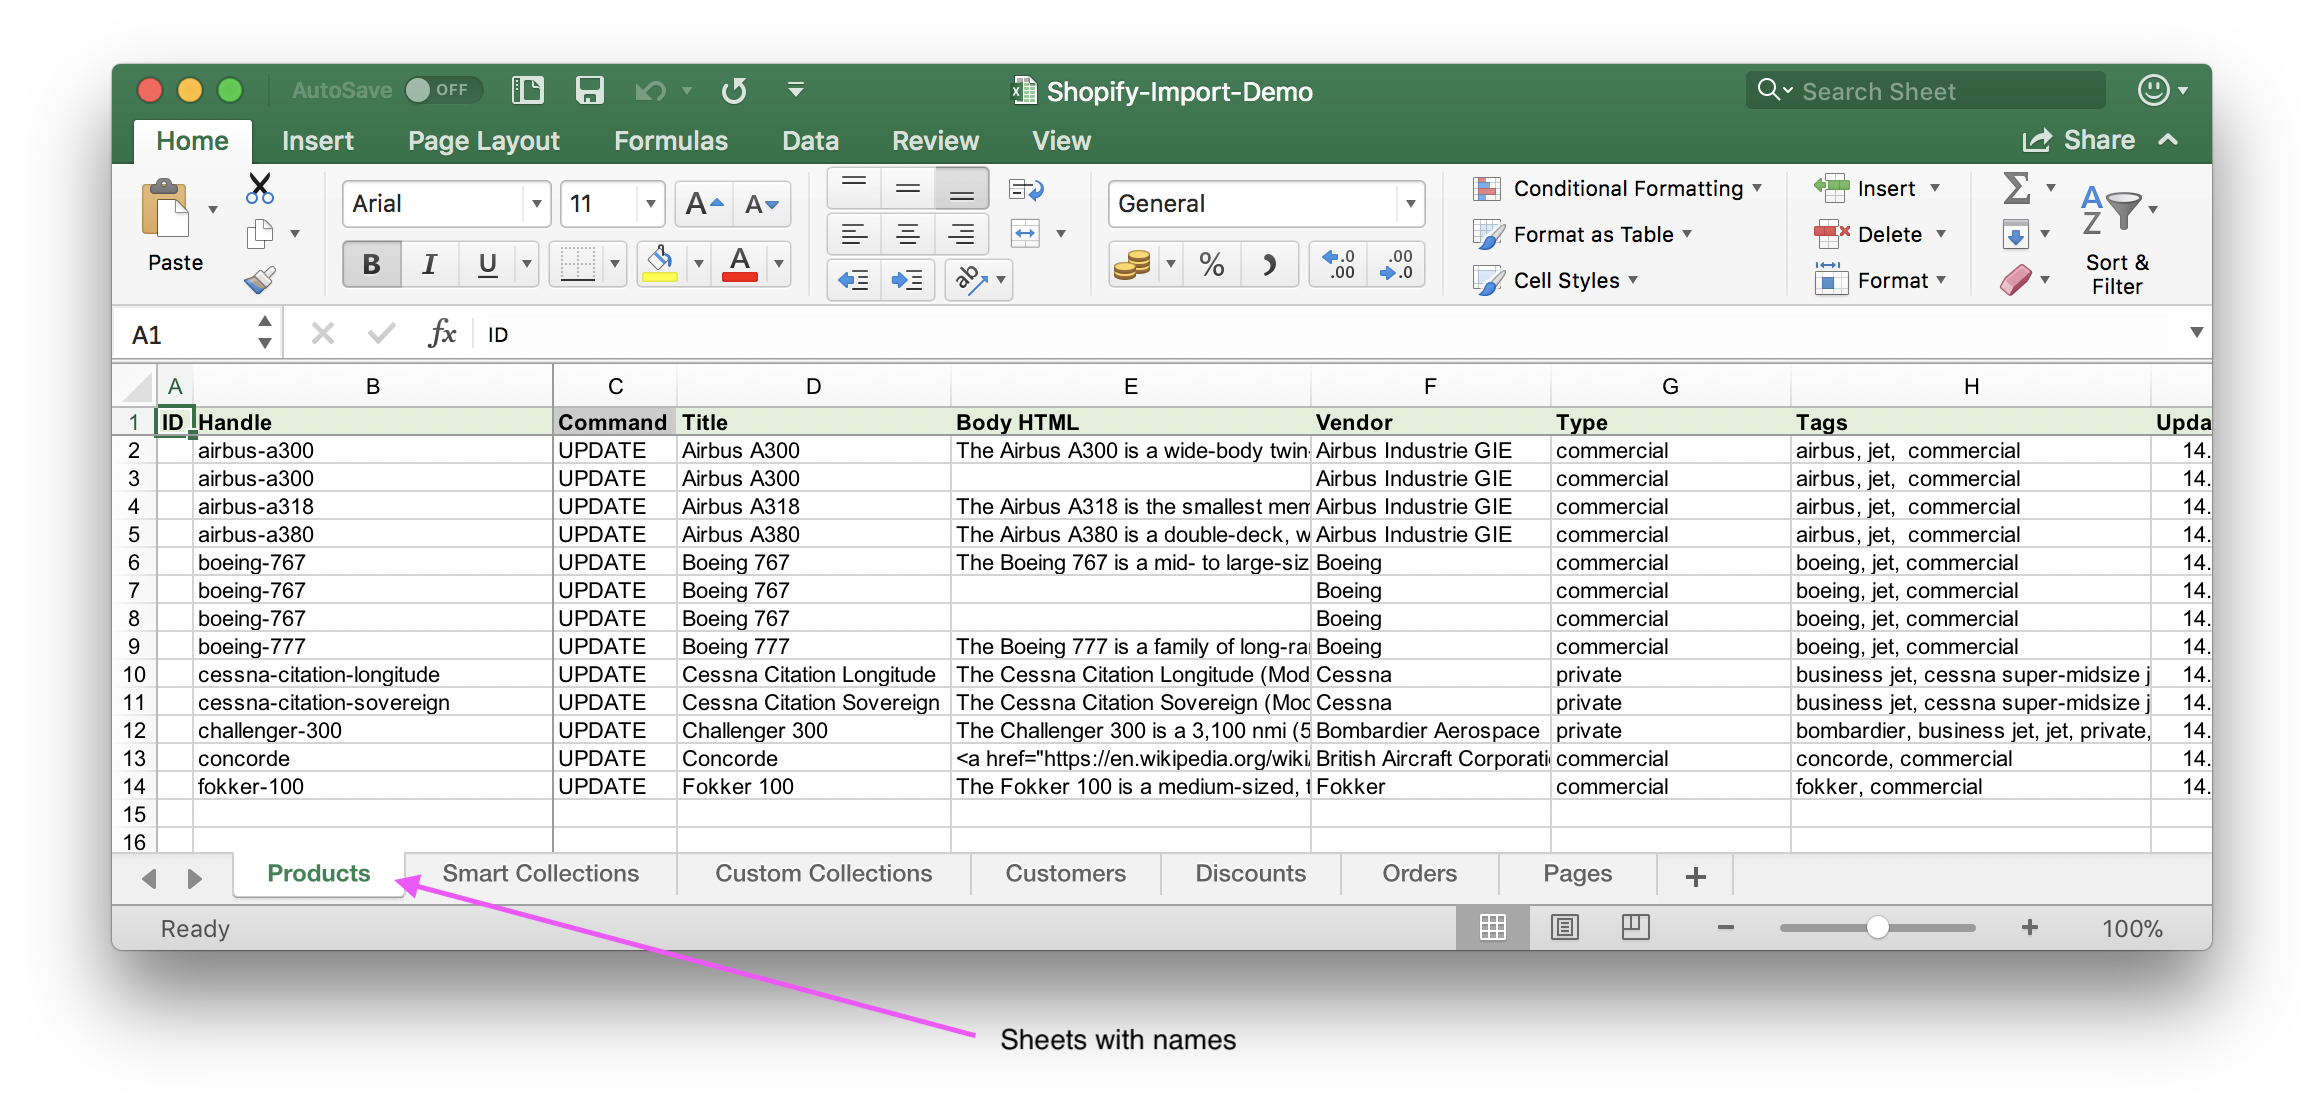
Each entity that can be imported is a separate sheet.
Using Matrixify: Excel format you can combine them into a single Excel file with multiple sheets.
| Sheet Name | Demo File | Documentation |
|---|---|---|
| Products | ||
| Smart Collections | ||
| Custom Collections | ||
| Customers | ||
| Companies | ||
| Discounts | ||
| Draft Orders | ||
| Orders | ||
| Payouts | Exported only | |
| Pages | ||
| Blog Posts | ||
| Redirects | ||
| Activity | Exported only | |
| Files | ||
| Metaobjects | ||
| Menus | ||
| Shop | ||
| Translations |
Supported formats
The formats that can be imported:
- Matrixify: Excel (zipped or not zipped)
- Matrixify: CSV (zipped or not zipped)
- Matrixify: Google Sheets (from Google Sheets shared public link)
Other external formats that can be imported:
“Matrixify: Excel” Format
Using the Matrixify app you can import and export Excel XLSX file with multiple sheets in it!
That data is organized in clear and human-readable tables, as several sheets.
The same file can be exported and imported.
One Excel file can hold several kinds of Shopify data items like Products, Customers, and so on.
Inside the Excel file, there are sheets (tabs at the bottom). Sheet names tell the app what kind of data is inside each sheet.
Excel sheet name
In XLSX file you can import multiple sheets at the same time so the file name does not matter.
The sheet/tab names will help the app to pre-select and understand what data entity you are importing but are not mandatory as you can select and change the data entity you are importing when creating an import job in the app.
Columns and rows
In each sheet, the data is arranged in columns and rows.
Values
Values in cells correspond to appropriate field value for that item. Sometimes values are text, sometimes numbers, sometimes TRUE or FALSE (which means yes or no).
Usually, when you enter that data into Excel, it will automatically understand, what is a text, what is a number, and what is TRUE or FALSE.
Columns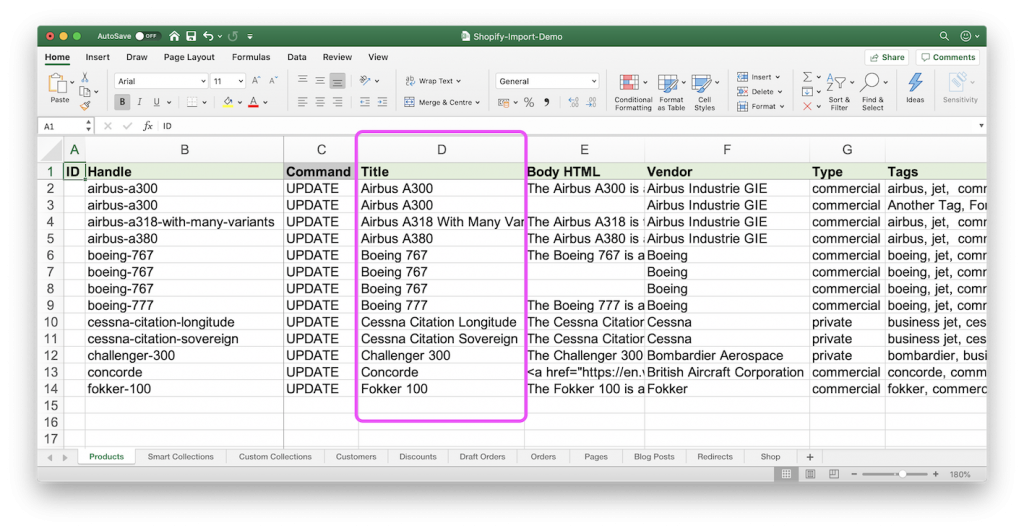

Those columns are basically the same data fields as you fill through Shopify Admin. For example, Product columns would be Handle, Title, Vendor, and so on.
Imports don’t need to have all columns – the app will update only those fields, which columns you are importing. If you have the column with an empty value, the app will set that field value to empty. So if you don’t want to change a field value, then remove the column from the import.
When you are updating data, sometimes you want to update just one field, like for example, product price. In that case, you can remove all the other columns, and the app will update only this one field, and leave other fields unchanged.
Column order doesn’t matter and column headers/names are not case sensitive.
You can have your own additional columns – the app will just ignore the columns it doesn’t know.
Column colors
Columns have colors, and those are visual indicators for you how those columns group logically together. When importing, the column colors are ignored.
When viewing import results, it will also color those columns. The columns that have white color means that those were ignored, the app didn’t know what that is.
Rows
Rows correspond to items in Shopify. Basically, one row is one item in Shopify (except, when you need more rows for one item).
Using Formulas in Excel import file
The Matrixify app can import XLSX files that contain Excel formulas.
Matrixify does not import the formula itself — it imports the value that the formula returns (the calculated cell result). This lets you use formulas to generate or transform import-ready data (e.g., building Handles, calculating Variant Price updates, mapping values from another sheet, etc.) while keeping one “working” spreadsheet for ongoing updates.
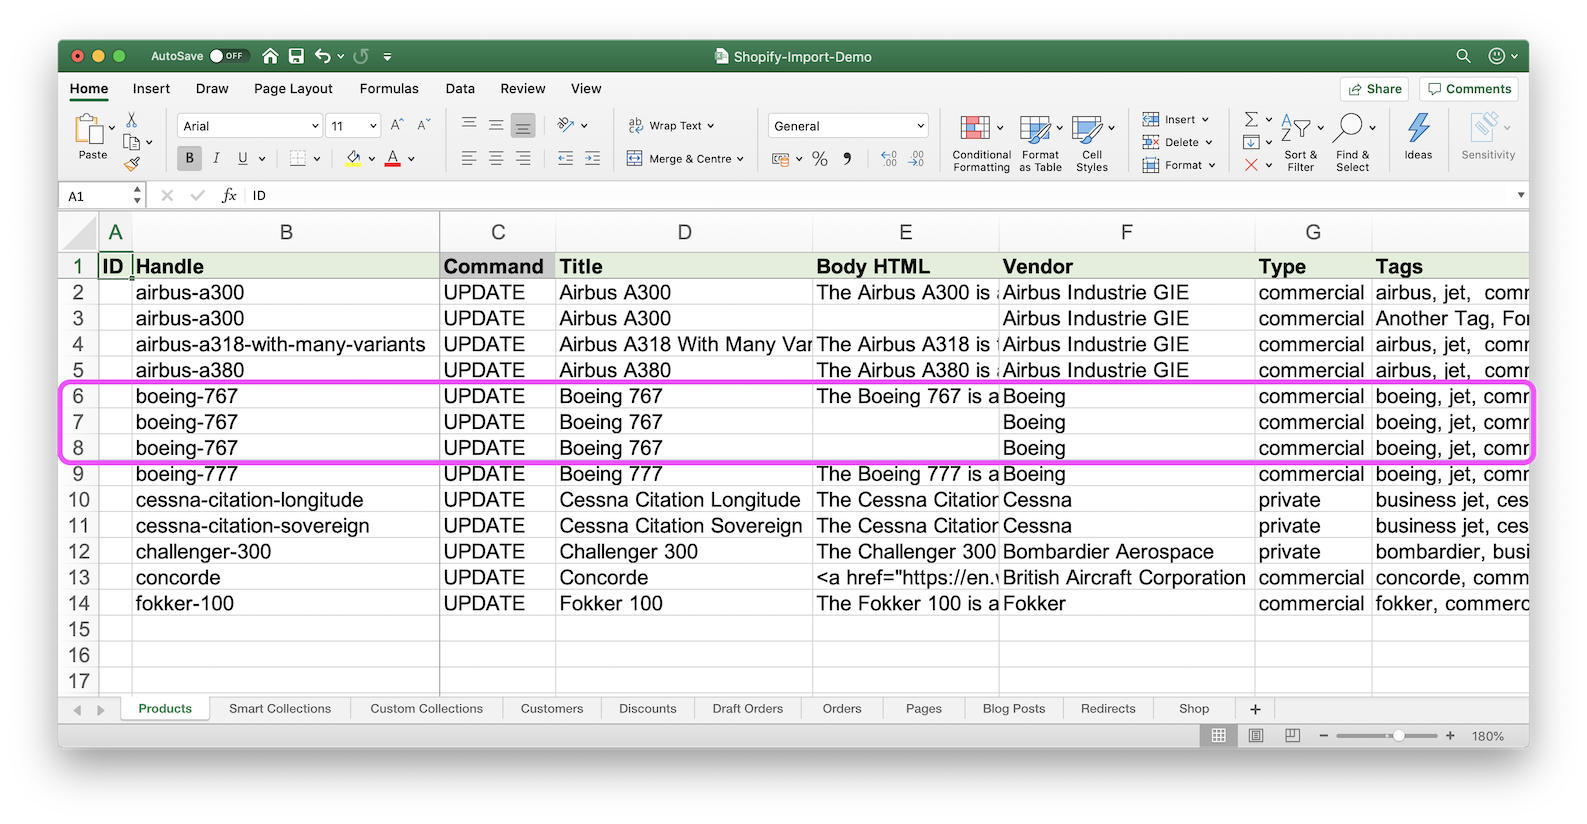
Items that need several rows
For example, for Products, you might need several rows per product, if the product has several images or several variants. For Customers, you can have several rows, because one Customer can have several addresses. Smart Collections can have several Rules. And so on.
In case of Products, each new variant and each exported image will go in its own row. However, you can import several images by splitting them with the semicolon (;).
For the app to know that the row belongs to the same item, it needs to have either the same ID value, or the same Handle value (if ID is empty), or the same Title (if Handle is empty).
The ID is the unique number that Shopify generates for each item. When you create new items, leave it empty – Shopify will generate them for you. The ID is used when you need to update existing items – this ID will allow the app to identify which item you need to update.
When you repeat rows, you can just copy them down with all the values also for those columns, where only one value per item is needed. For example, if you will copy the same Title value for all the Variants rows, the app will use the only value from the first row and will ignore the rest.
You can tell by the column color and by its starting name that it belongs to repeated row. For example, all variant columns start with “Variant …” and are the same color.
When importing, the file must be sorted so that repeated rows for the same item are together (sorted by ID, Handle, or Title). Because, as soon as ID or Handle, or Title will change, it will be treated as next item.
Don’t have Excel?
If you don’t have Excel, you can use Google Sheets, and then go to File -> Download as -> Microsoft Excel (.xlsx).
Or you can just import directly from the Google Sheets URL – like in this tutorial: Schedule import to Shopify from Google Sheets.
Or you can edit the Excel file in other apps, like, Numbers (for MacOS), OpenOffice, LibreOffice, etc.
Excel automatically changed to CSV
When making an Export, if you have selected the “Matrixify: Excel” file format but your data is over Excel limits, then the Matrixify app will automatically switch the Export to “Matrixify: CSV” format.
Matrixify will switch format from Excel file to CSV if any of the following limits are reached:
- Row count – 500’000 or more rows.
- Column count – 10’000 or more columns.
- Cell size – any single cell contains 32’767 or more characters.
XLSX in a ZIP file
Compressing an Excel XLSX file in a ZIP does not provide any size benefits. XLSX files are already compressed, as in their data structure, they are essentially ZIP archives with XML content.
But some migrations and other tools might return Excel XLSX file compressed within a ZIP file, and with the Matrixify app, the Excel XLSX file can also be imported via a ZIP file.
As a single XLSX file can already contain multiple sheets, importing via a ZIP file supports one XLSX file at a time.
To import multiple Excel XLSX files, use separate Imports.
If the ZIP file also contains CSV files, then the app will ignore the Excel XLSX file/s and import them as a zipped CSV file import reading only the CSV files from it.
“Matrixify: CSV” Format
If your store is so large that Excel file doesn’t fit all the data and might exceed Excel limitations, you can use the “Matrixify: CSV” format, which has no size limitation at all – it can hold data well exceeding several millions of rows.
The most notable Excel limitations that exported data can break are:
- Total number of rows: 1’048’576 rows – can be exceeded if exporting really large sets of data, for example, above 500’000 Products as single product can use multiple rows.
- Total number of columns: 16’384 columns – usually broken only if you have an exceptionally large amount of Metafields.
- Total number of characters that a cell can contain: 32’767 characters – this can be broken by exporting long Metafields or Body HTML (descriptions)
Here you can find an official list of all Excel limitations.
If the CSV file is within Excel limits, you can still open it in the Excel program.
If the file is over Excel limits, then Excel can ask to repair the file and if opened it will only display data within the Excel limits. Re-saving such a file in Excel will result in all data that is not loaded to be lost.
To work on CSV files larger than Excel limits look into other spreadsheet tools with different higher limitations (for example Google Sheets).

This format is organized the same way as Matrixify Excel file, with the following differences:
- It is a zip file that contains CSV files.
- Each sheet inside the zip file is a separate CSV file. For example “Products.csv”, “Smart Collections.csv”, and so on.
- CSV file column delimiter is the comma (,), and all text values are in double-quotes (“). Files are UTF-8 encoded. That ensures that Excel will always open them correctly without any special conversion.
- When importing, it is best that you zip the CSV file(s). That way they become more than 10x smaller and as a result – your upload is 10x faster. But you can import also plain CSV files.
When exporting multiple data sheets to “Matrixify: CSV” file format, make sure that the Export Option “Zip CSV files” is selected as each selected export sheet generates a different CSV file and requires compressing the files into a single ZIP file.
CSV file name
The CSV file name will help the app to pre-select and understand what data entity you are importing but are not mandatory as you can select and change the data entity you are importing when creating an import job in the app.
CSV file encoding
The app will auto-detect CSV file encoding and automatically convert to UTF-8 as needed for Shopify.
Currently supported CSV file encodings:
UTF-8UTF-16BEUTF-16LEUTF-32BEUTF-32LEShift_JIS– JapaneseISO-2022-JP– JapaneseISO-2022-CN– Simplified ChineseISO-2022-KR– KoreanGB18030– ChineseBig5– Traditional ChineseEUC-JP– JapaneseEUC-KR– KoreanISO-8859-1– Danish, Dutch, English, French, German, Italian, Norwegian, Portuguese, SwedishISO-8859-2– Czech, Hungarian, Polish, RomanianISO-8859-5– RussianISO-8859-6– ArabicISO-8859-7– GreekISO-8859-8– HebrewISO-8859-9– Turkishwindows-1250– Czech, Hungarian, Polish, Romanianwindows-1251– Russianwindows-1252– Danish, Dutch, English, French, German, Italian, Norwegian, Portuguese, Swedishwindows-1253– Greekwindows-1254– Turkishwindows-1255– Hebrewwindows-1256– ArabicKOI8-R– RussianIBM420– ArabicIBM424– Hebrew
“Shopify: CSV” Format
The app can import the Shopify Products CSV and Customers CSV which you can export from the Admin.
To make it smaller, you can zip it and upload the zipped file.
The app will read data from these files same as from Matrixify CSV file so the file naming would need to be the same.
CSV file column delimiter is the comma (,), and all text values are in double-quotes (“).
“Shopify Transporter” Format
You can also import Shopify Transporter CSV files for Products, Customers and Orders.
See the page on How to import Shopify Transporter CSV files.
“Matrixify: Google Sheets” Format
You can prepare your Google Sheets file in the exact way as you prepare the “Matrixify: Excel” file.
Then share this sheet to be accessible as view only by the public. And paste that URL in the app.
Read more in this tutorial: Schedule import to Shopify from Google Sheets.


