
The Shopify e-commerce platform has a number of built-in features to help businesses like yours better serve customers, stay organized and manage and fulfill orders. Marking which of your orders have been fulfilled is just one of the many features available.
However, when trying to manage large numbers of orders at once, you don’t want to have to spend lots of time fulfilling each of them one at a time.
The Matrixify App (formerly Excelify), offers an easy-to-use solution to carrying out repetitive Shopify tasks in bulk.
This tutorial explains how you can use Matrixify to bulk fulfill your Shopify orders, saving you considerable time and effort to focus on serving your customers instead.
Watch the video below or read on to find out how.

*In the video (0:30) Maris says to include Line Items checkbox at the export, but this is not needed anymore if you wish to fulfill the whole order. You only need to include Fulfillments checkbox. You also need to include the Basic columns checkbox when Exporting!
Note – If the Unfulfilled Line Item/s are set in a Location which is a Fulfillment Service, then it depends on that Fulfillment Service if the Line Items can be fulfilled only through their system or also by other apps, such as importing with Matrixify.
This can be seen by the Unfulfilled Line Items in the Shopify Admin showing action “Request Fulfillment” which indicates that the fulfillment can only be requested to the Fulfillment Service. If the Line Items say “Fulfill item” then such can also be bulk fulfilled as per rest of the tutorial.
To bulk fulfill Shopify Orders, do the following steps:
- Export the Orders you want to fulfill from Shopify.
- Update the fulfillment data.
- Import the updated Excel file with the Matrixify App.
Note that this will not replace the orders – this will truly update the existing ones to mark them as Fulfilled.
This will fulfill the Order fully, including all of its Line Items. Read our tutorial on how to partially fulfill your Shopify Orders in bulk.
1. Export the Orders you want to fulfill.
Create new export in the Matrixify app and add it to export Orders.
For Orders select to export Basic Columns, Line Type and Fulfillments.
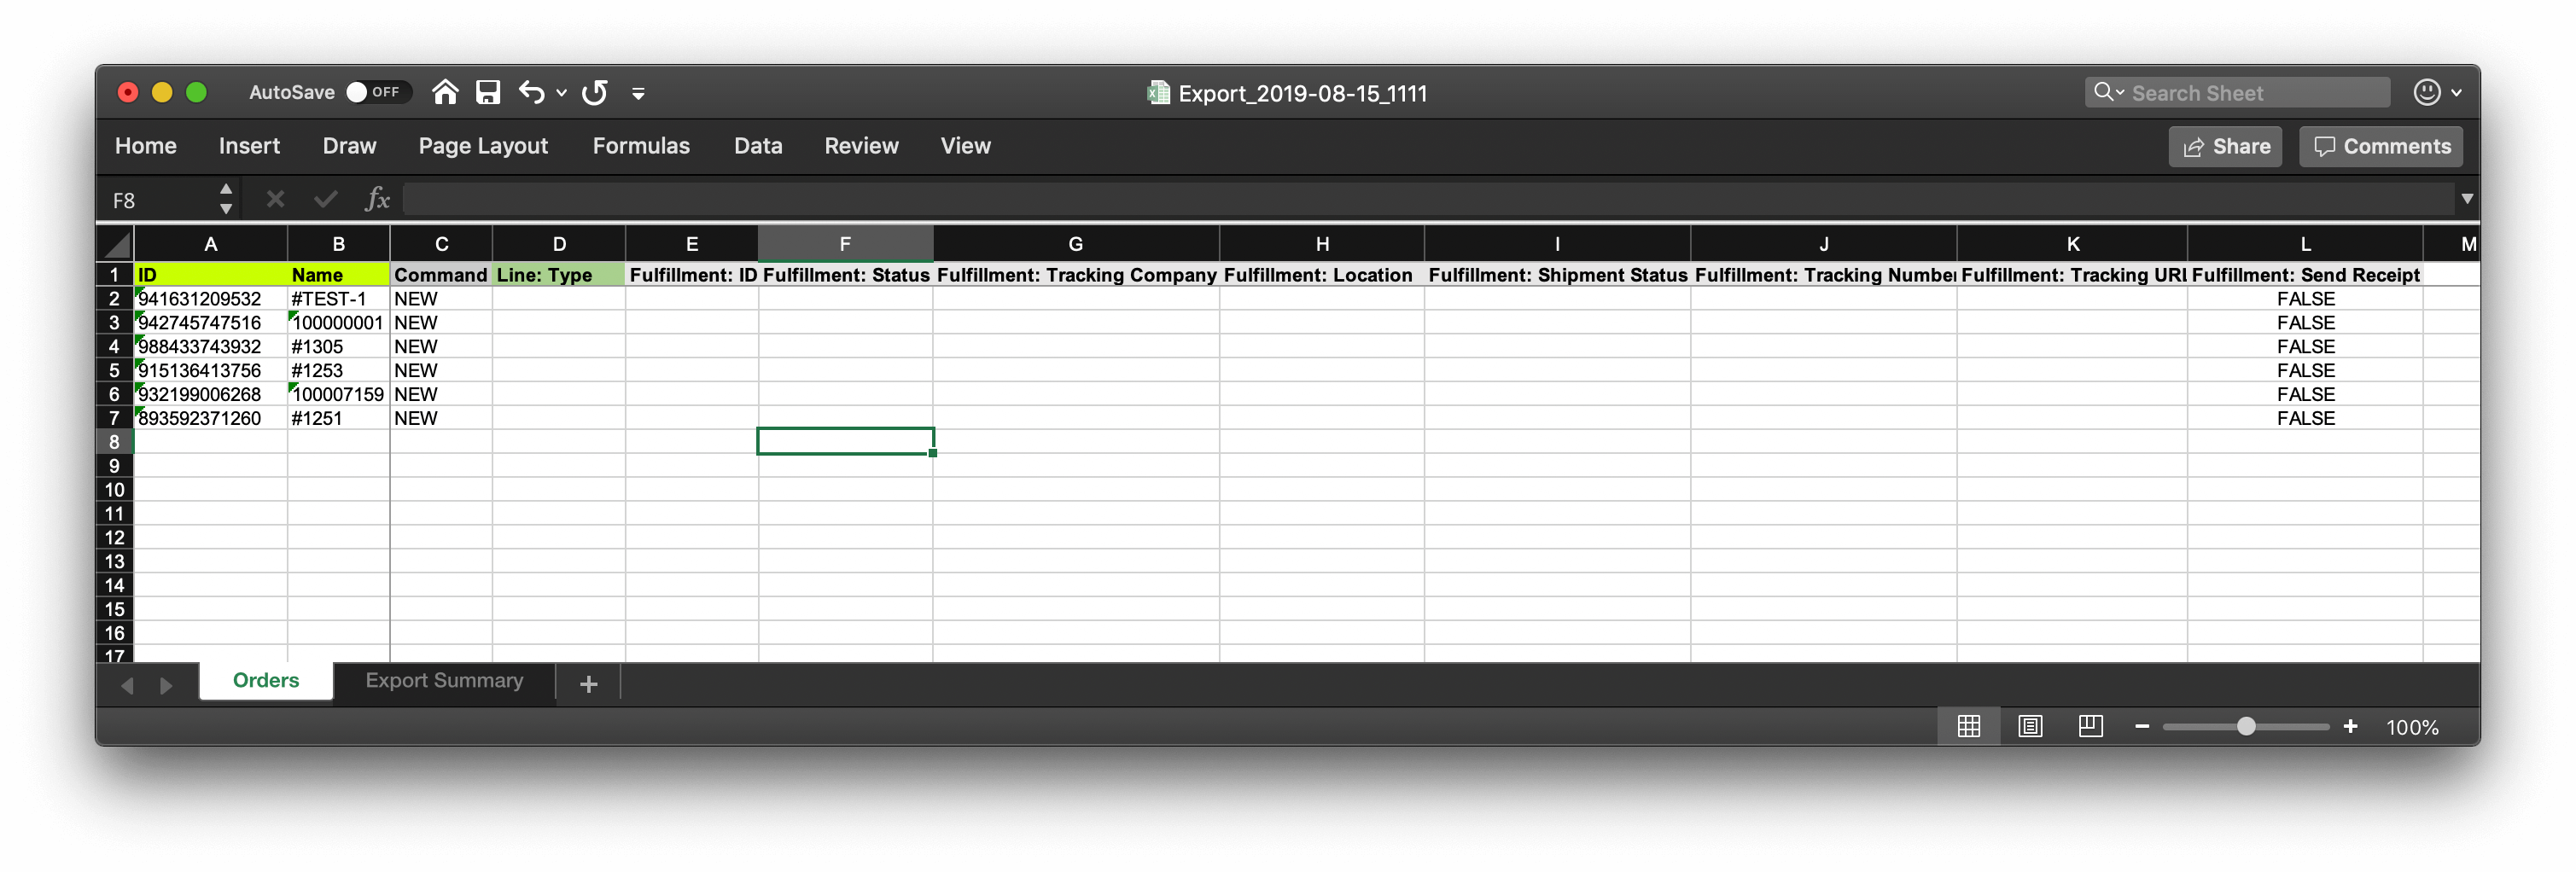
As you do not need to import and update all the basic Order details then select to export just the following columns:
- ID
- Name
- Command
- Line: Type
- Fulfillment: ID
- Fulfillment: Status
- Fulfillment: Tracking Company
- Fulfillment: Location
- Fulfillment: Shipment Status
- Fulfillment: Tracking Number
- Fulfillment: Tracking URL
- Fulfillment: Send Receipt
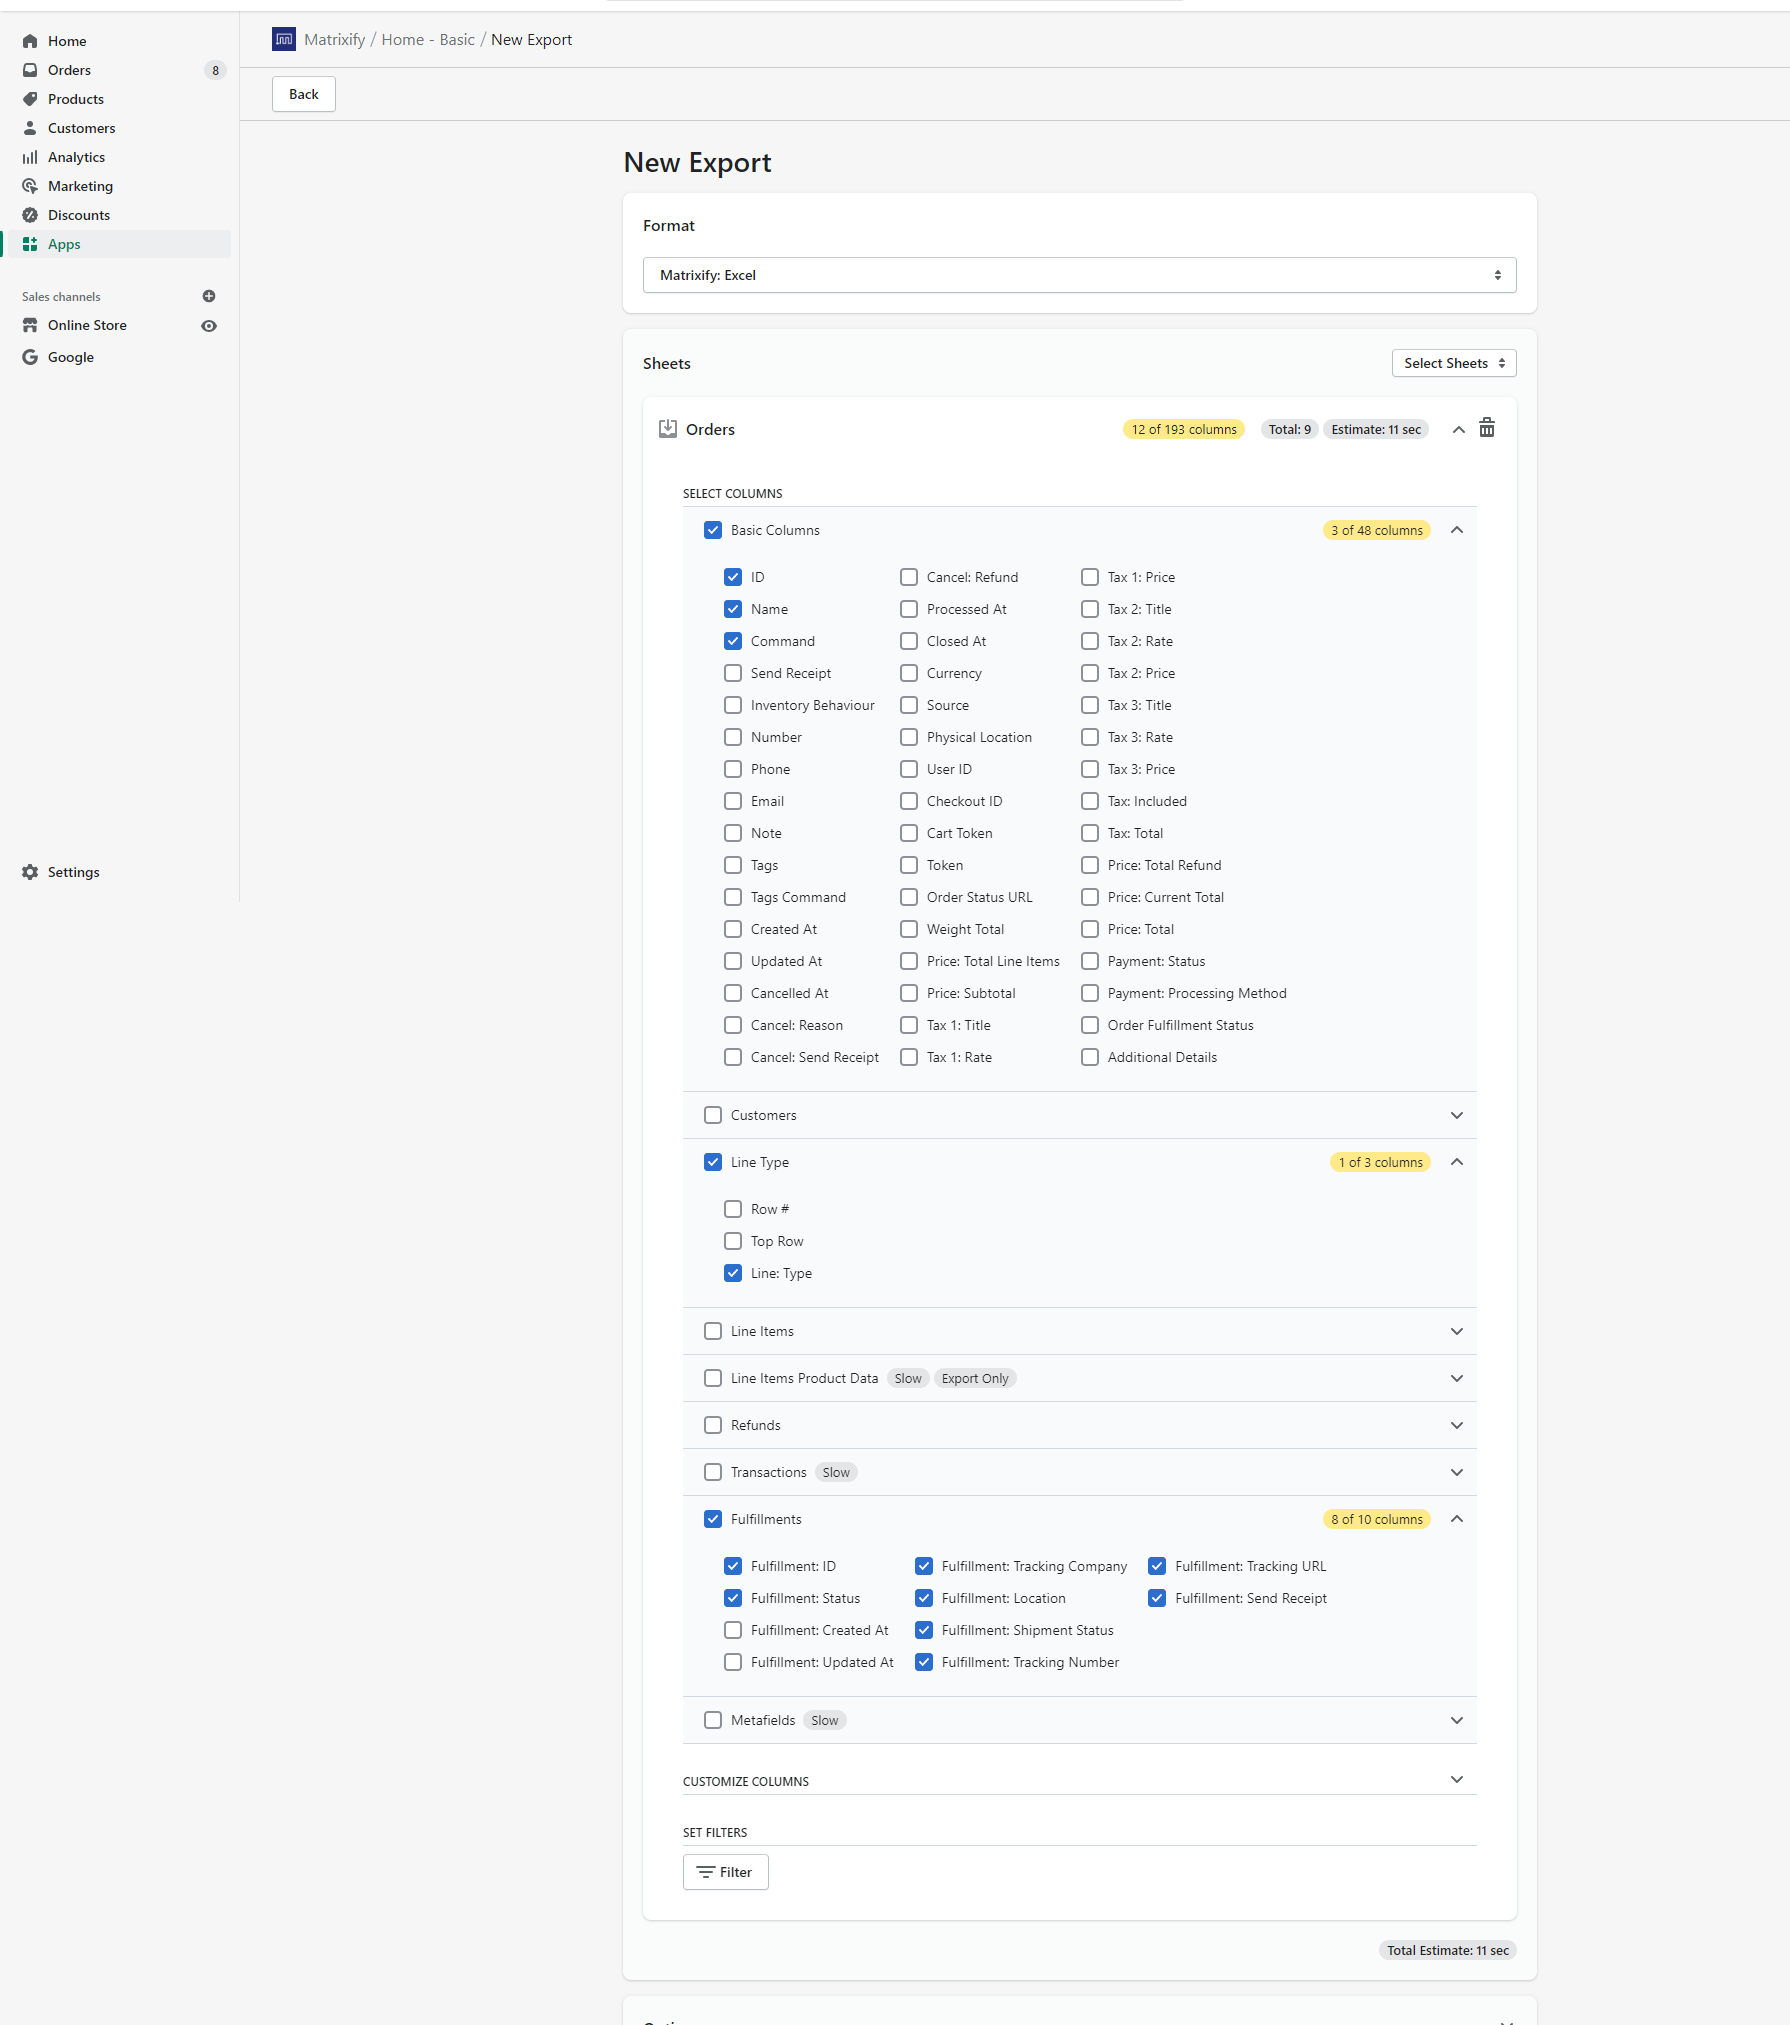
Start the export by pressing the Export button and once finished download the order export file and open it.
2. Update the Excel file columns with data
- Set the “Command” column values to “UPDATE“.
- Set the “Line: Type” column values to “Fulfillment Line“.
- Leave the “Fulfillment: ID” empty – because you will be creating new fulfillments.
- Set the “Fulfillment: Status” to “success“.
- Set the “Fulfillment: Tracking Company” to whatever tracking company you are using. The list of tracking companies can be found here in the Orders documentation.
- Set the “Fulfillment: Location” to the location name (or custom fulfillment service name) from which you want to fulfill. You can leave it empty or skip this column – then it will fulfill from your default store location.
- Important: If your inventory is managed by an external service, like Amazon or Oberlo – then using this location to create the fulfillment, will actually initiate fulfillment in that fulfillment service – meaning, it will ship those line items to the customer.
- Set the “Fulfillment: Shipment Status” to “delivered“.
- Set the “Fulfillment: Tracking Number” to your tracking number for this Order. To set multiple tracking numbers for the same Fulfillment, list them in the same cell separated by a semi-colon.
- If you have the specific tracking URL, you can set it in the column “Fulfillment: Tracking URL“.
- If you want to send the e-mail to your customer about this fulfillment, set the “Fulfillment: Send Receipt” values to “TRUE”.
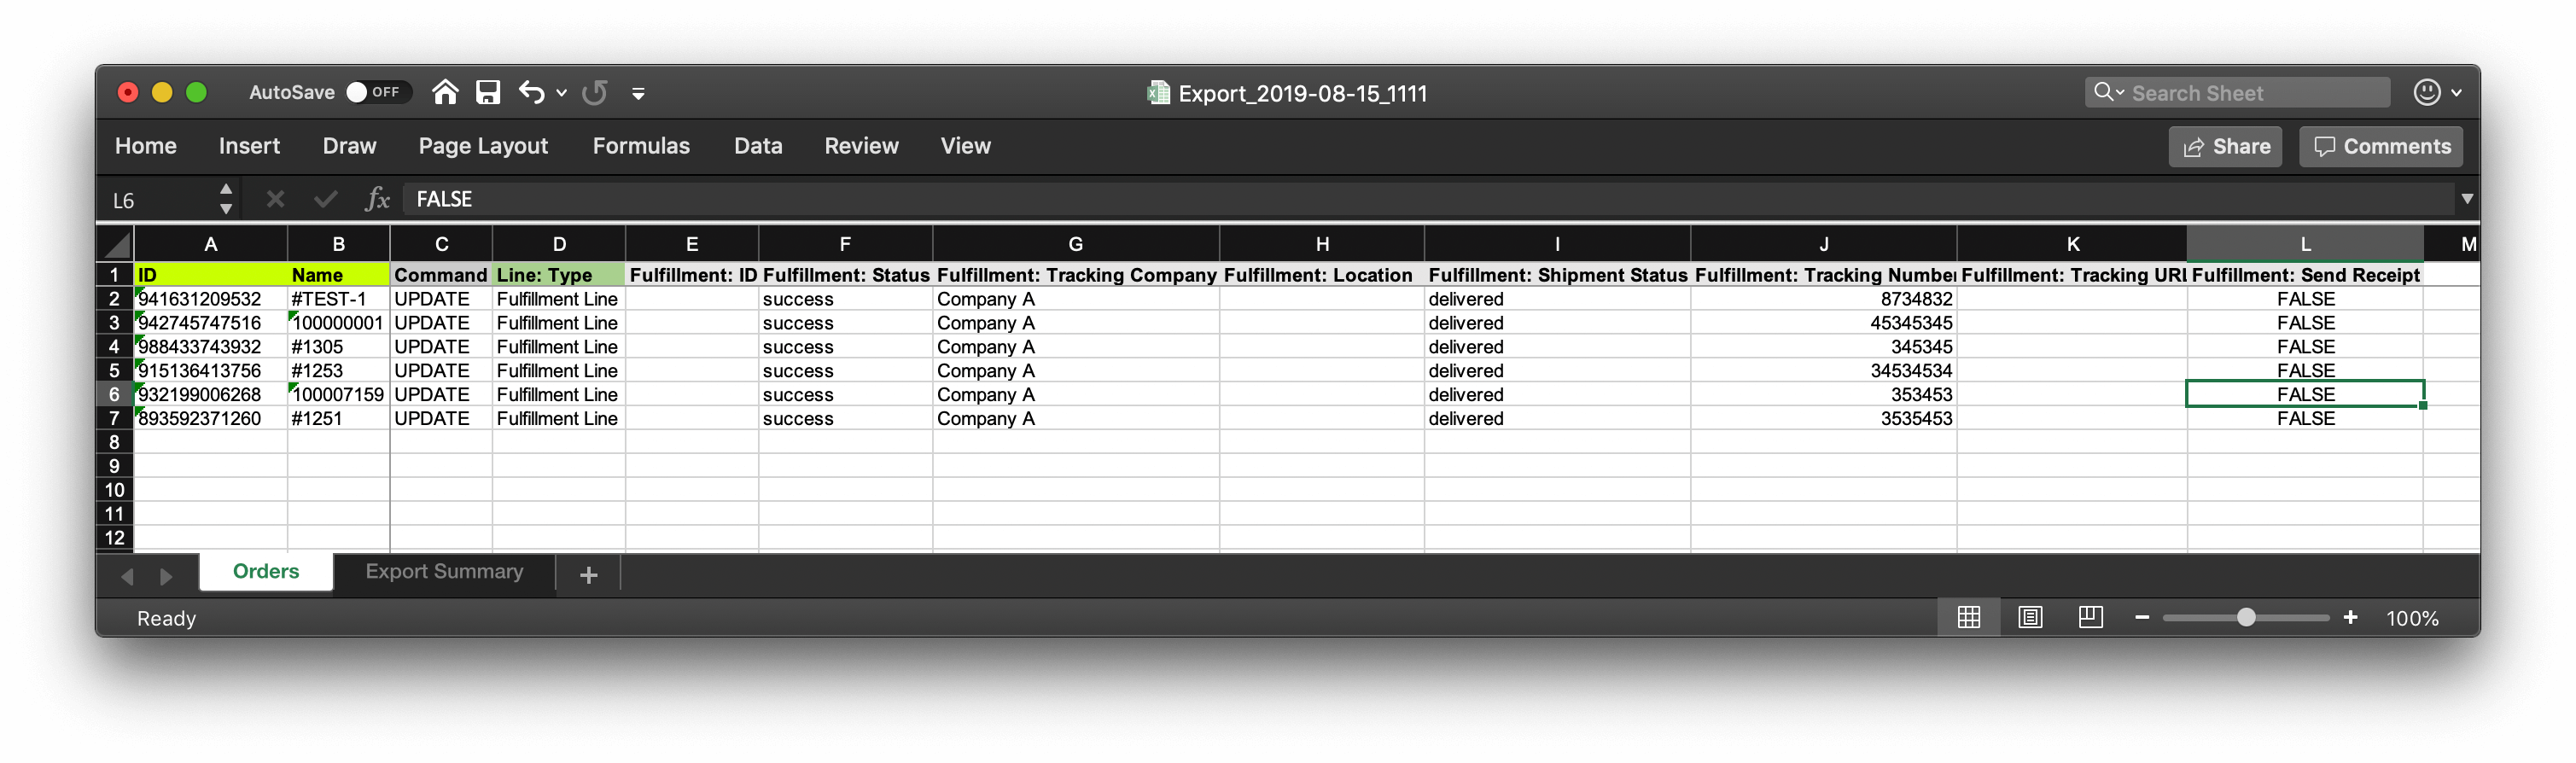 Save the updated Excel file!
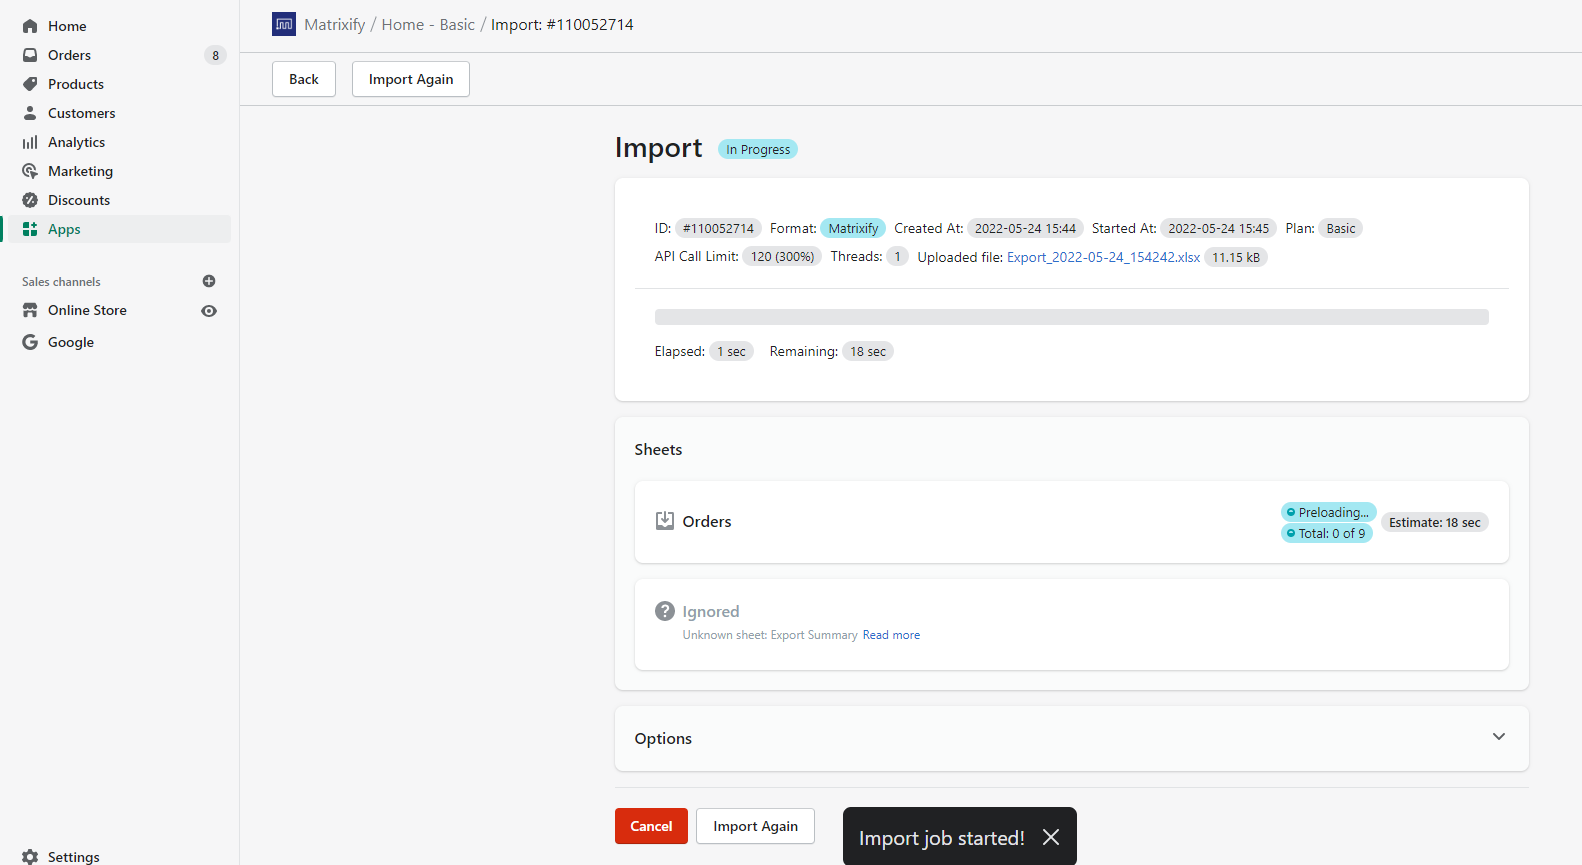
3. Import the file into Matrixify to bulk fulfill Shopify orders
In the Matrixify app, Import the file with the orders you want to fulfill. Make sure the app has recognised you are Importing Orders.
- If using CSV file then the file name needs to contain the word “Order”, for example, “my-shopify-orders.csv”
- If using XLSX file then the sheet/tab name in the file needs to be “Orders”. The file name for the XLSX file does not matter.
Then press the “Import” button in the top right-hand corner and the file will start Importing.
See our “How it works” page to learn more about how the import process works.
Good to know
- If you don’t have tracking numbers or any other tracking data, you can leave the columns blank, or even not include them in the import.
- If you have some of the line items already fulfilled, then this import will fulfill whatever is remaining unfulfilled items.
- If you get the error “Failed. Line Items: must be stocked at the same location” then you either need to specify the location from which to fulfill the items or the location you specified doesn’t have those items stocked in it – then you need to choose another location to ship them from.
- If you want to make fulfillments go out from another Location / Fulfillment Service, you should first change the Fulfillment Service for those Product Variants to that Fulfillment Service, and then create those fulfillments for Orders.
- If you need to partially fulfill an Order, then you need to fill in the following columns:
- ID
- Name
- Command
- Line: Type (with the value “Fulfillment Line” – essentially, just change the Line: Type from “Line Items” to “Fulfillment Line” of the exported Order)
- Line: ID (with “Line: ID” value of the line item you need to fulfill)
- Line: … (all the other Line: columns of the line item you need to fulfill)
- Line: Quantity (the quantity which you need to fulfill. If you wish to fulfill all quantity for this item you can leave “Line: Quantity” empty)
- Fulfillment: ID (set to any number, which corresponds to a fulfillment where you need to put those line items. E.g. if you have to create two fulfillments, set the number “1” for the first, and “2” for the second one).
- Fulfillment: Status
- Fulfillment: Shipment Status
- Fulfillment: Location
- Fulfillment: Tracking Company
- Fulfillment: Tracking Number
- Fulfillment: Tracking URL
Where to go from here?
- Watch the video at the top of this page to see how to do it.
- Read this tutorial if you need to do partial Shopify order fulfillment in bulk.
- See the full list of fields you can fill for Orders import and update, and their possible values.
- Install the Matrixify app from the Shopify App Store.
- See the other things that you can do with the Matrixify app.


