


In the Shopify Admin you create Collections one at a time. A Collection with a Tag condition is automated – Shopify adds a Product to it as soon as the Product gets that Tag, and removes it when the Tag is removed. With Matrixify you can bulk create such Collections from one Excel or CSV file.
Here we will create one Collection by Tag in the Shopify Admin, Export it with Matrixify and go through which column in the file holds each of its settings. Then we use the exported file as a base to create more Collections by Tag and Import them. The same approach works for conditions by Vendor, Type, Price and other Product fields.
Steps in short
- Create one Collection with a Tag condition in the Shopify Admin, to have an example to Export.
- Export that Collection with the Matrixify Collections sheet, selecting only the columns needed for the Collection title and its conditions.
- Open the exported file and see which column holds each setting from the Shopify Admin Collection page.
- Copy the rows in the file and change the Handle, Title and Tag for each new Collection.
- Import the file in the Matrixify app and check that the sheet is detected as Collections.
- Open the new Collections in the Shopify Admin and check their conditions and Products.
1. Create a Collection by Tag in Shopify Admin
Shopify has one Collection type now. Automated Collections (earlier called Smart Collections) and manual Collections were merged into it. Each Collection gets its Products from one or more Sources. A new Collection has one Products source by default. Inside the source you either add conditions, so Shopify picks the Products automatically, or select Products manually.
In this tutorial, we will use a Collection with a Tag rule as an example, but you can apply this approach to any other conditions as well.
If you already have a Collection by Tag in your store that you wish to duplicate to new Collections with different Tags, then you can skip this step and Export that one.
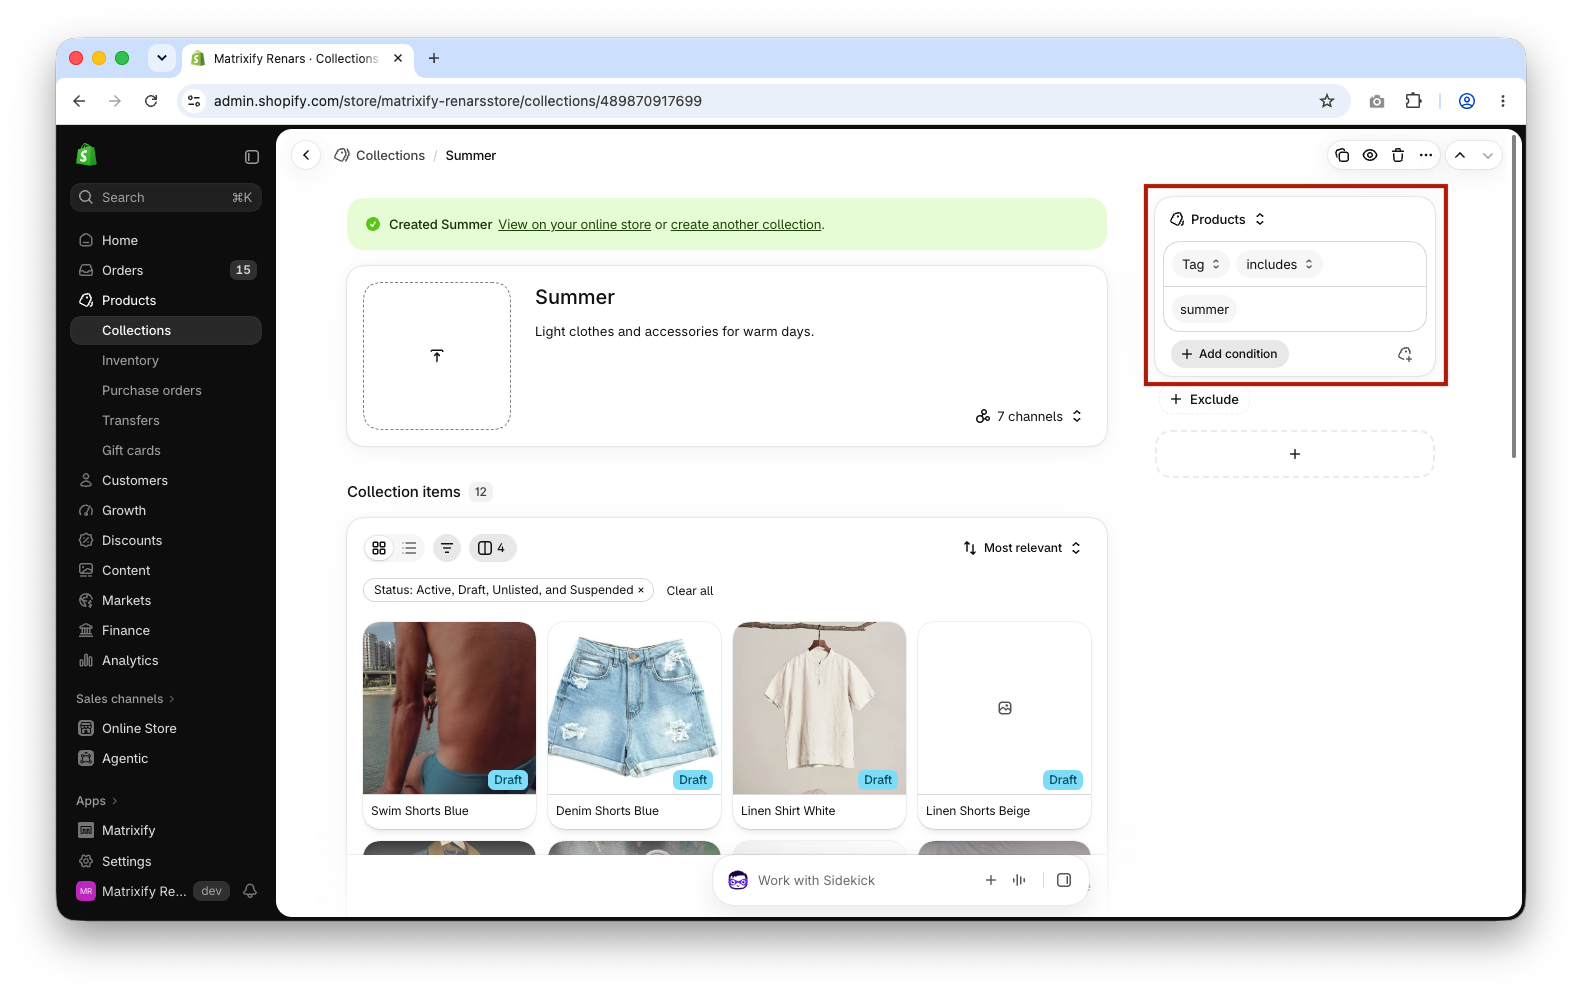
Let’s create one Collection by Tag that we will use as an example:
- In the Shopify Admin go to
Products>Collectionsand clickAdd collection. - Enter the title, for example
Summer, and a description, for exampleLight clothes and accessories for warm days. - In the
Productssource clickAdd condition, selectTag, thenincludes, and select the Tagsummer. - Click
Save.
2. Export the Collection with Matrixify
In the Matrixify app Home page create a New Export by using the New Export button.
- In the
Formatsection selectMatrixify: Excel. - Press
Select Sheetsand selectCollections.
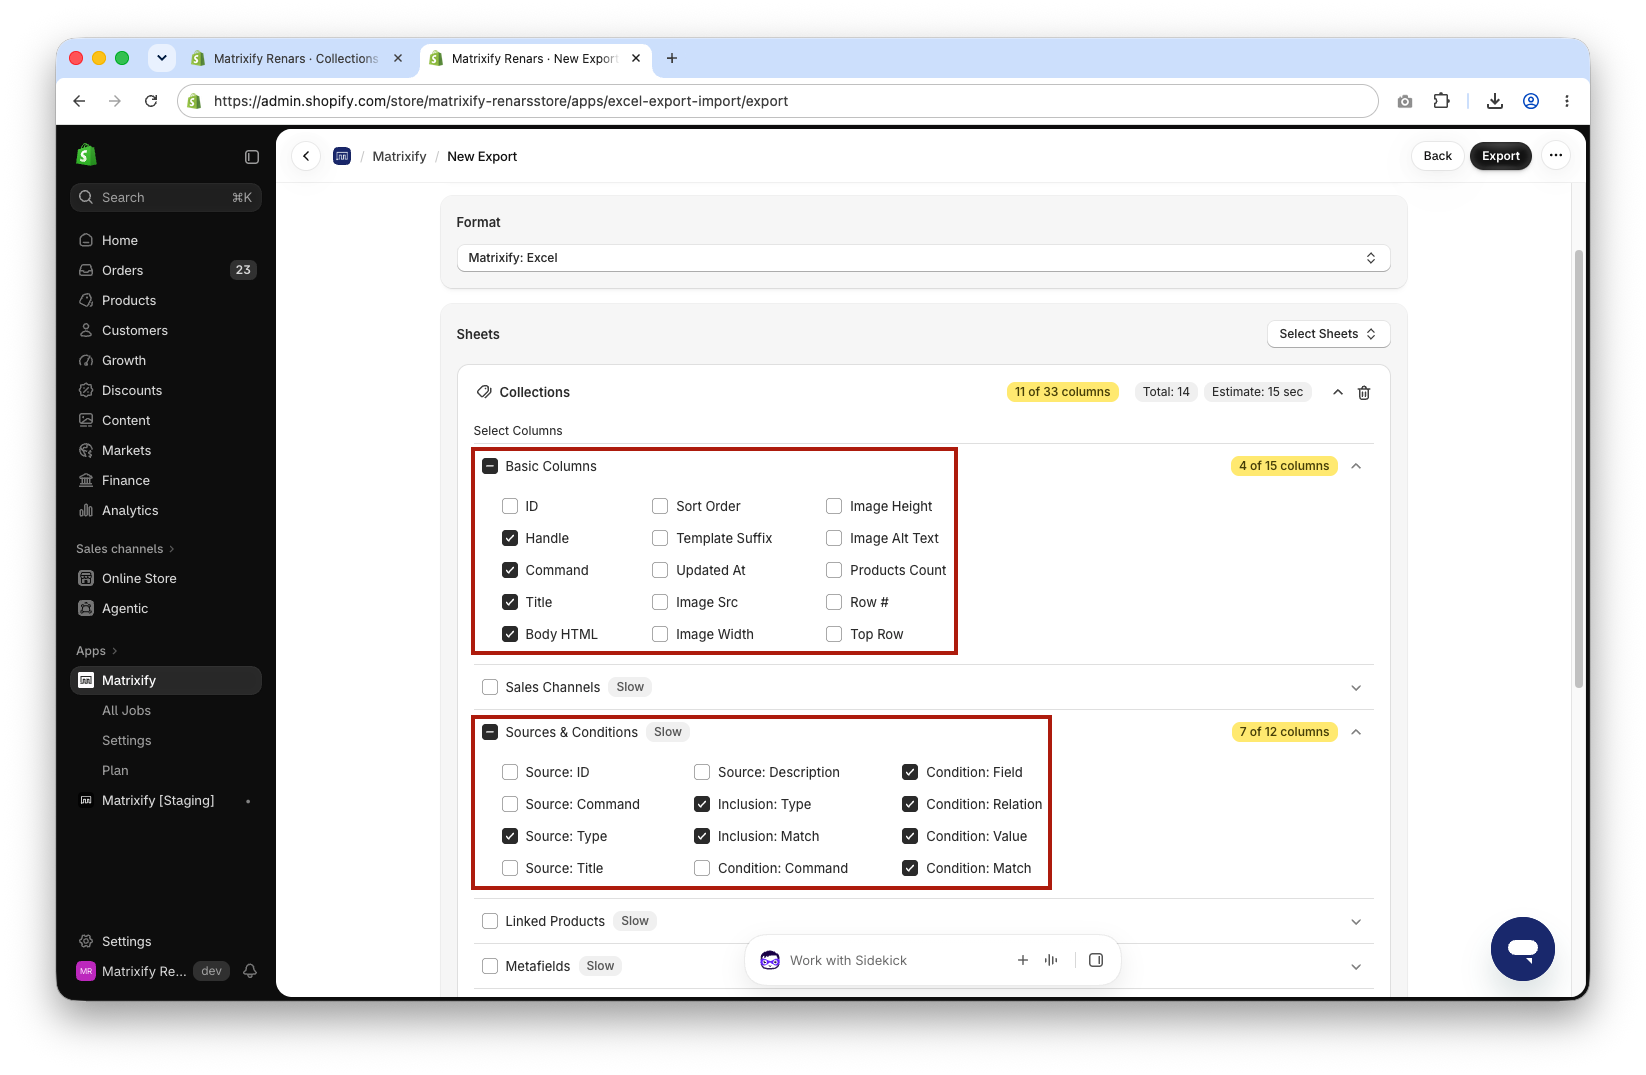
Click on the Collections sheet card to expand it. Open each of these column groups and select only the columns listed:
Basic Columns–Handle,Command,TitleandBody HTML.Sources & Conditions–Source: Type,Inclusion: Type,Inclusion: Match,Condition: Field,Condition: Relation,Condition: ValueandCondition: Match.
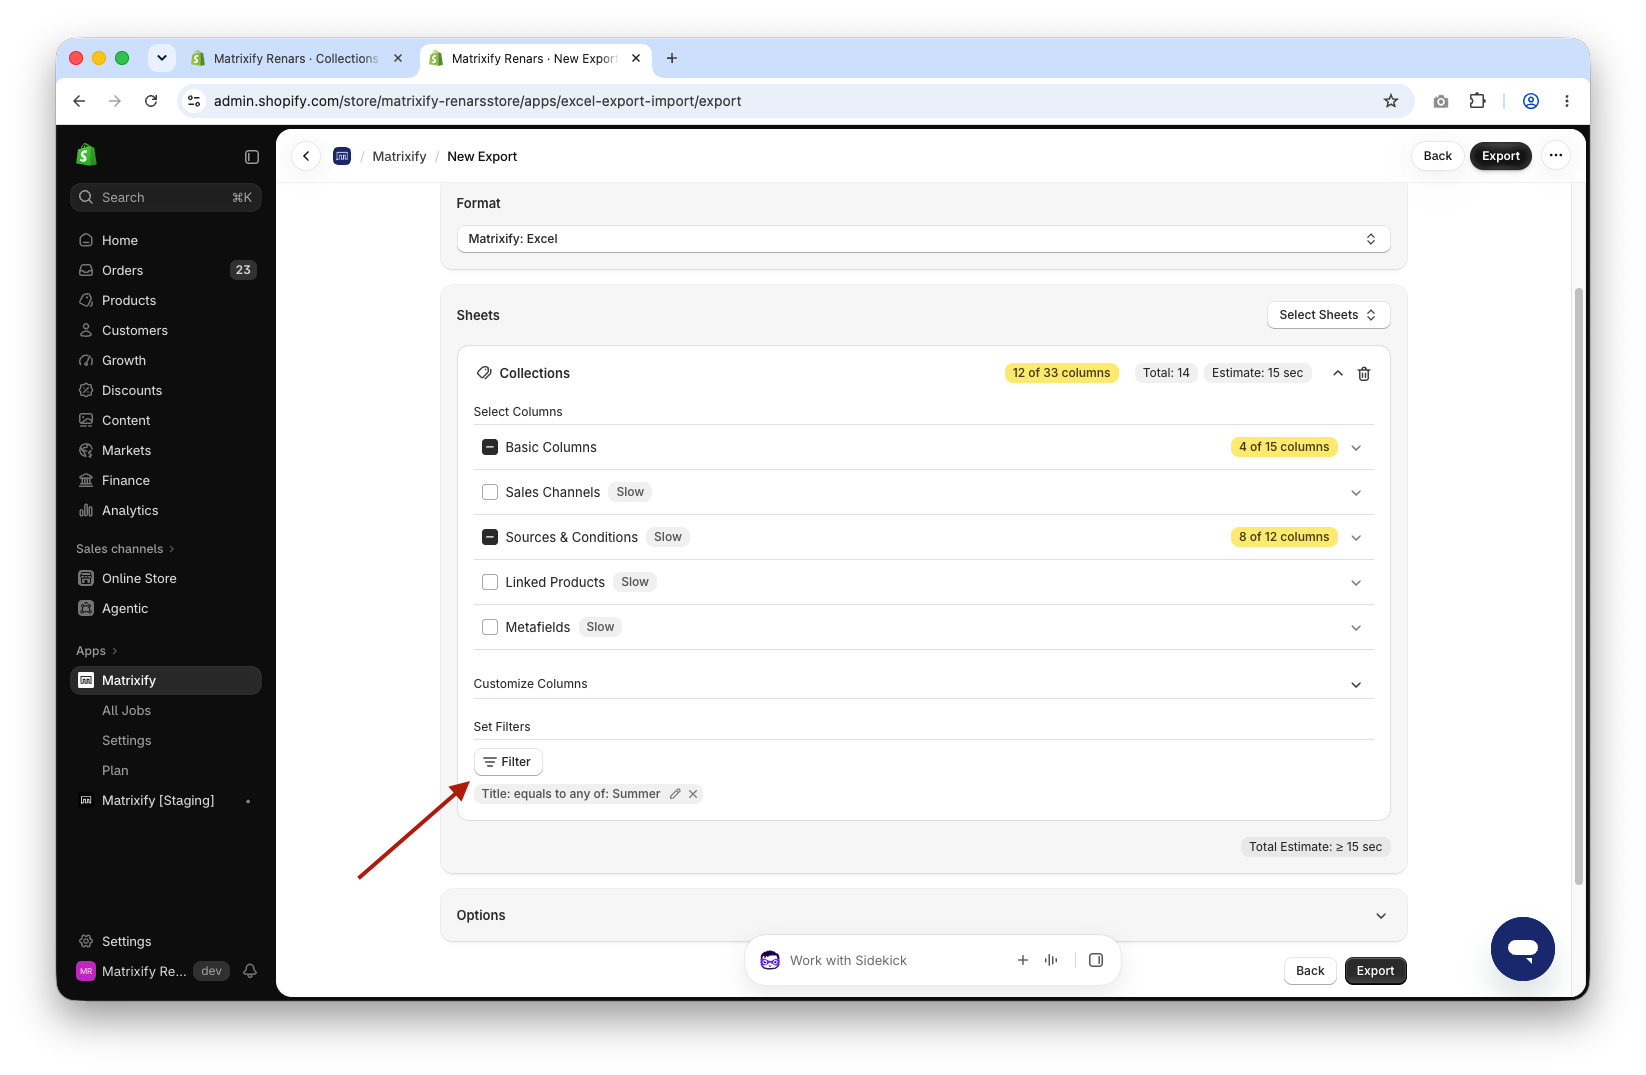
To Export only the example Collection, press the Filter button in the Collections sheet card, select Title – equals to any of – Summer and press Add.
When the Export has been set up, start the Export by using the Export button. Wait for the Export to finish and download the file with Download Exported File button.
3. Understand the exported Collections file
Open the exported file. It has a Collections sheet with one row for the Summer Collection. Each condition of a Collection is a separate row, so a Collection with 3 conditions would have 3 rows.
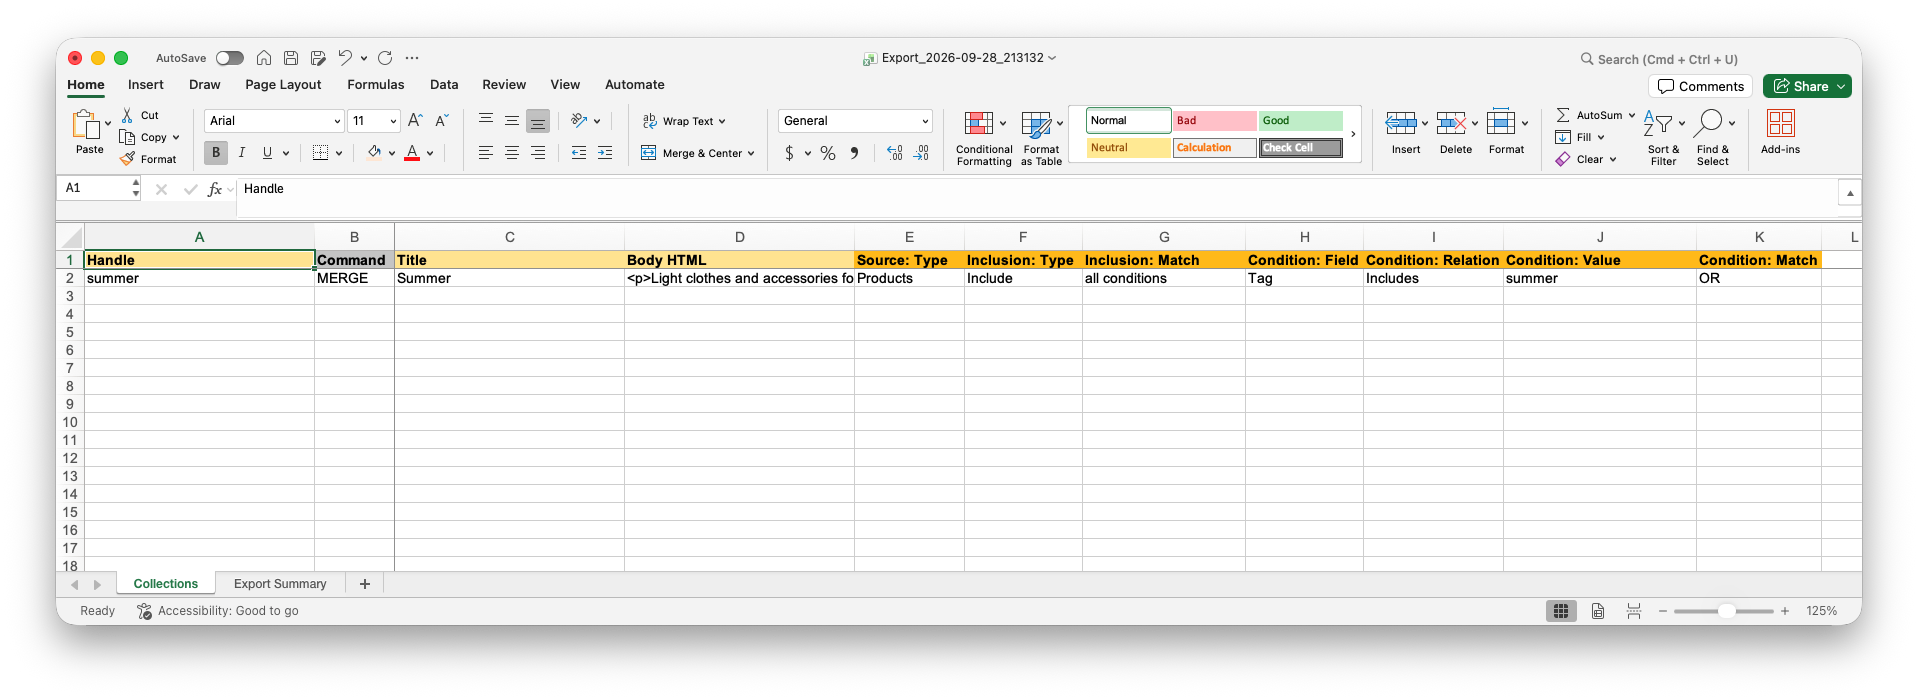
In the exported file, you can see how values you entered in the store when creating a Collection translate to values and structure in the spreadsheet file.
This is how the settings on the Collection page in the Shopify Admin match the columns in the file:
| In Shopify Admin | Column in the file | Value in the file |
|---|---|---|
| Collection URL handle, in the search engine listing | Handle |
summer |
| Collection title | Title |
Summer |
| Collection description | Body HTML |
<p>Light clothes and accessories for warm days.</p> |
Source drop-down: Products, Variants, Collection or App |
Source: Type |
Products |
Include or Exclude section of the source |
Inclusion: Type |
Include |
Match all conditions or Match any condition |
Inclusion: Match |
all conditions |
| Condition attribute, the first drop-down | Condition: Field |
Tag |
| Matching criteria, the second drop-down | Condition: Relation |
Includes |
| The selected Tag | Condition: Value |
summer |
OR or AND when several Tags are selected in one condition |
Condition: Match |
OR |
Command is not a Shopify field. It tells the app what to do with the Collection on Import. The exported value MERGE updates the Collection if it exists and creates it if it does not.
Two columns look alike but work on different levels. Inclusion: Match joins the conditions in separate rows of the same Include or Exclude section. Condition: Match joins several comma-separated values inside one row.
The description is saved as HTML, so the exported value has <p> tags around the text. In the file you can write plain text too – the app converts it to HTML.
Other Collection fields from the Shopify Admin can be exported as columns too: featured image is Image Src, sort is Sort Order, and sales channel availability is in the Sales Channels column group, for example Published: Online Store. Select them in the Export if you want to set them for the new Collections.
4. Add new Collections by Tag to the file
Now use the exported row as a base. Copy it for each new Collection and change the Handle, Title, Body HTML and Condition: Value. For a Collection with more than one condition, add a row for each condition. Write the description only in the first row of the Collection.
Here you can see a screenshot example that has the exported “Summer” Collection and 3 new Collections:
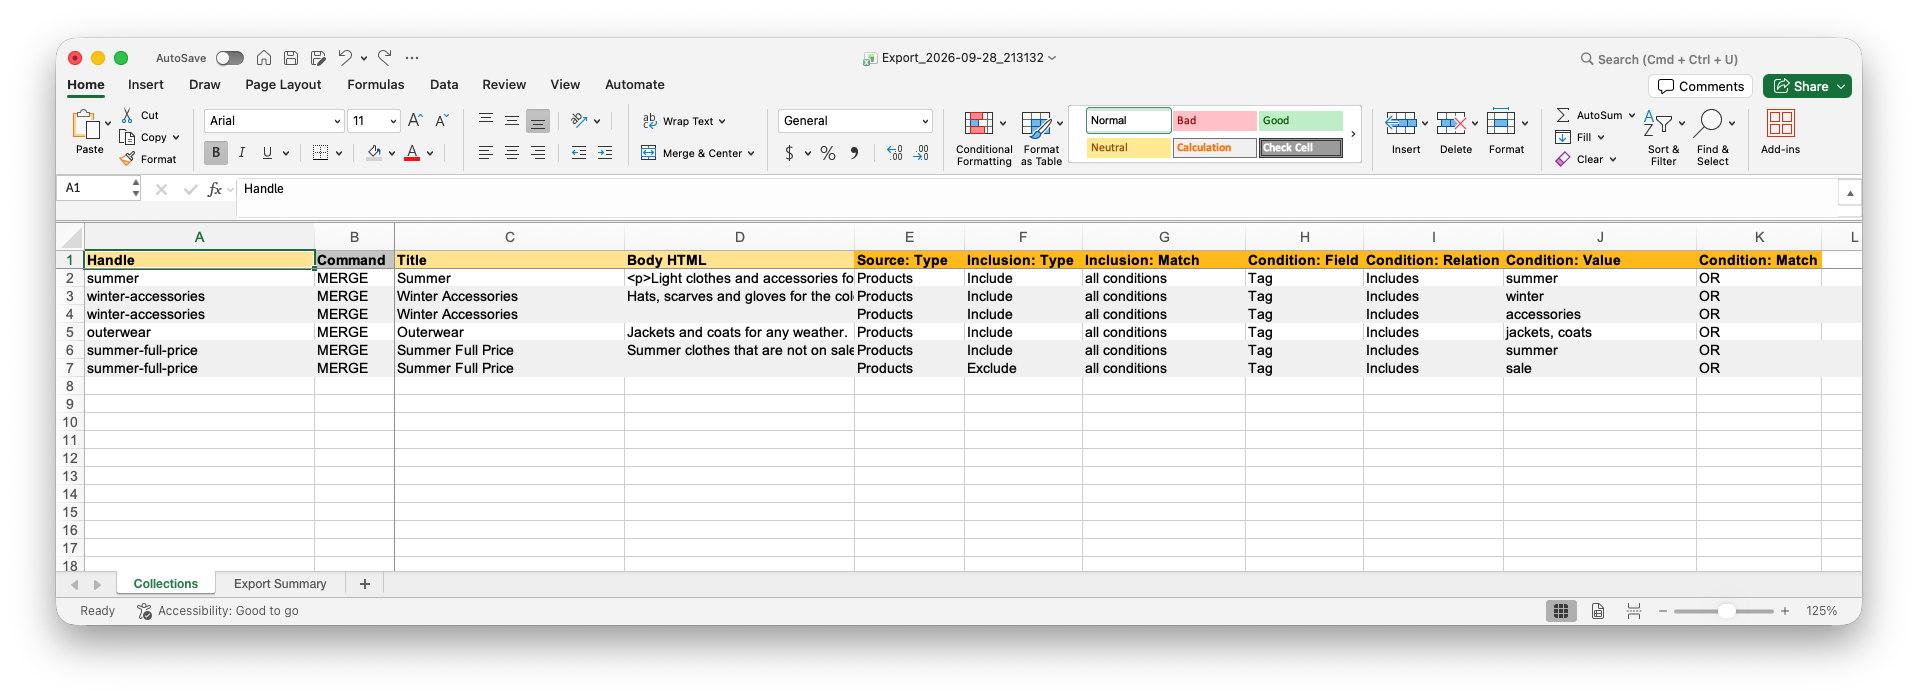
- “Winter Accessories” – two conditions in two rows. With
all conditionsa Product needs both Tagswinterandaccessories. Withany conditionone of them is enough. - “Outerwear” – one condition with two Tags. With
ORa Product needsjacketsorcoats. - “Summer Full Price” – two rows for two conditions – one Include and one Exclude. Products with the Tag
summer, except those with the Tagsale. Excluded Products are never in the Collection, even if they match the Include conditions.
Rows of one Collection go one after another, with the same Handle and Title in each row. When the Handle changes, the app starts a new Collection.
You can keep the row of the Summer Collection in the file. It is imported with the same values and nothing changes in it. Or delete the row if you do not need it or wish to make sure it is not updated.
For Tags, Condition: Relation can be Includes or Does not include in the Include section. In the Exclude row the Condition: Relation can only bet set to Includes. To create Collections by Vendor, Type, Price or another field, replace Tag in Condition: Field and pick a relation from the Condition: Relation list in the Collections documentation. If unsure, create one such Collection in the Shopify Admin and Export it the same way.
Save the file. Keep the sheet name Collections – it tells the app what you are importing.
5. Import Collections by Tag with Matrixify
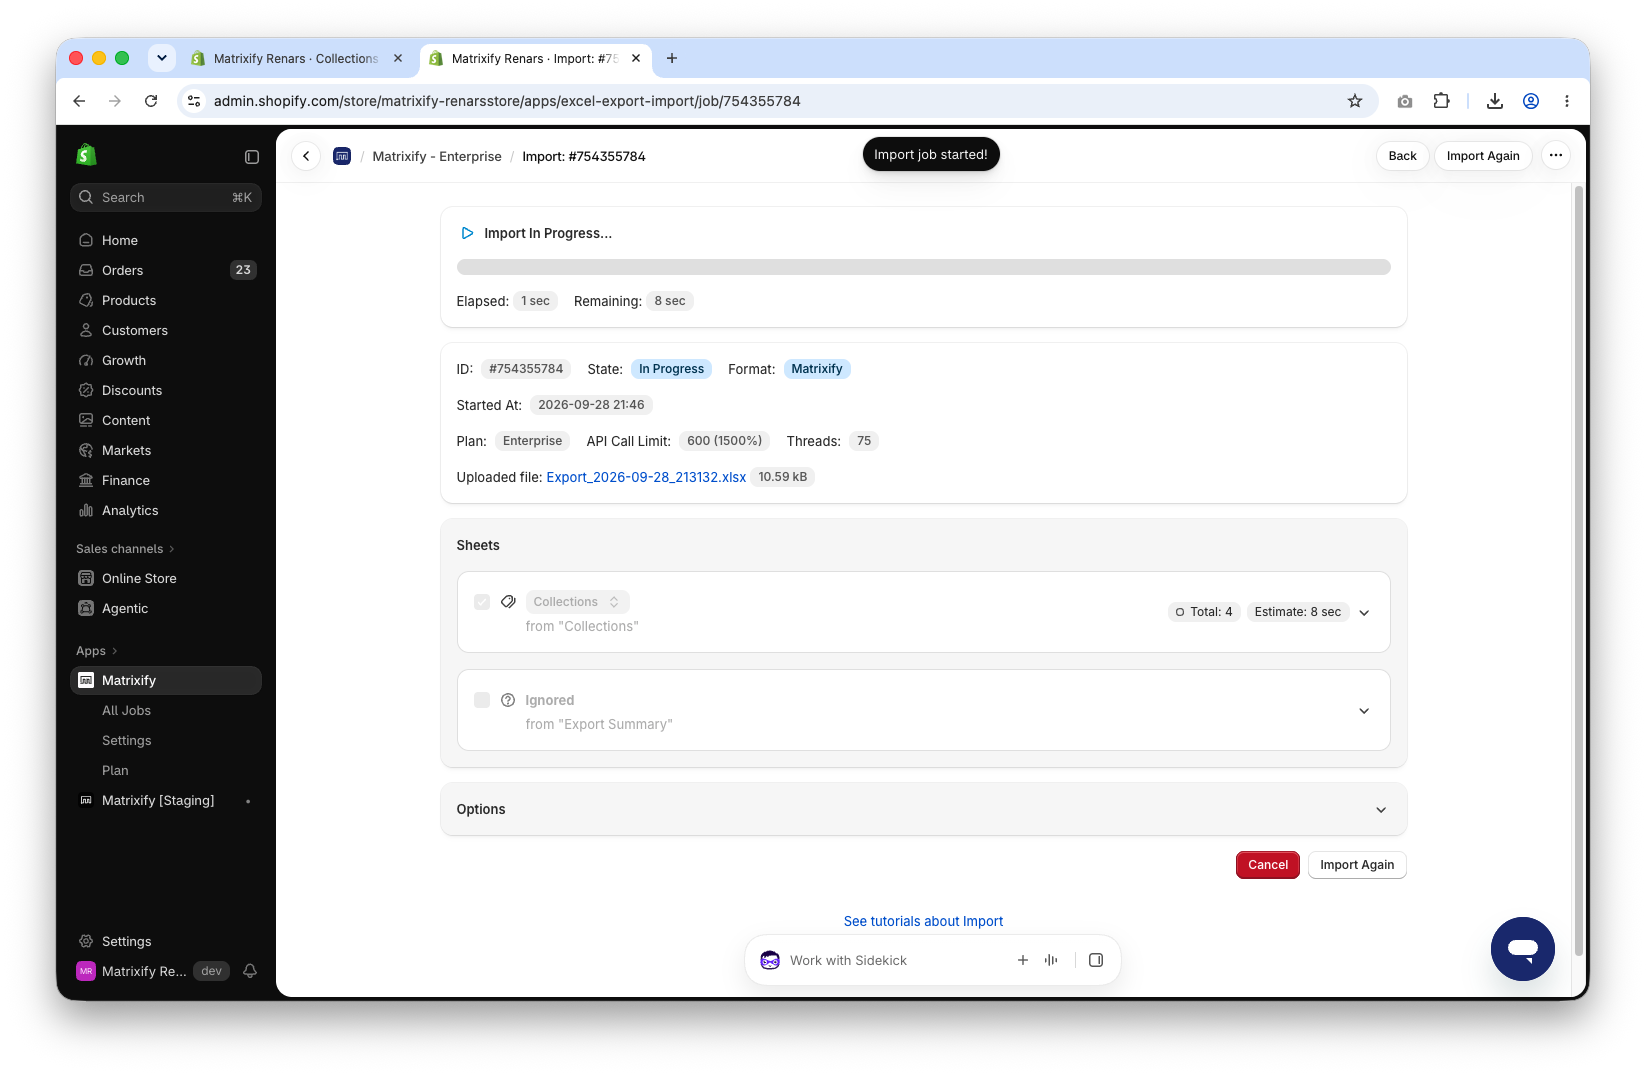
In the Matrixify app Home page, upload the file in the Import section. Once the file is analyzed, make sure that the app detects the sheet as Collections. The count is the number of Collections in your file, not rows – in the example file it is 4.
Default Import Options will work fine for our import, so no need to adjust any Options in the job.
Press Import to start the Import. The Import runs on Matrixify servers, so you can close the app while it runs.
6. Check imported Collections in Shopify Admin
When the Import is finished, the job status will be “Finished”. If some Collections failed, download the Import Results file and check the Import Comment column – it tells why the Collection failed. Fix those rows and Import only them again.
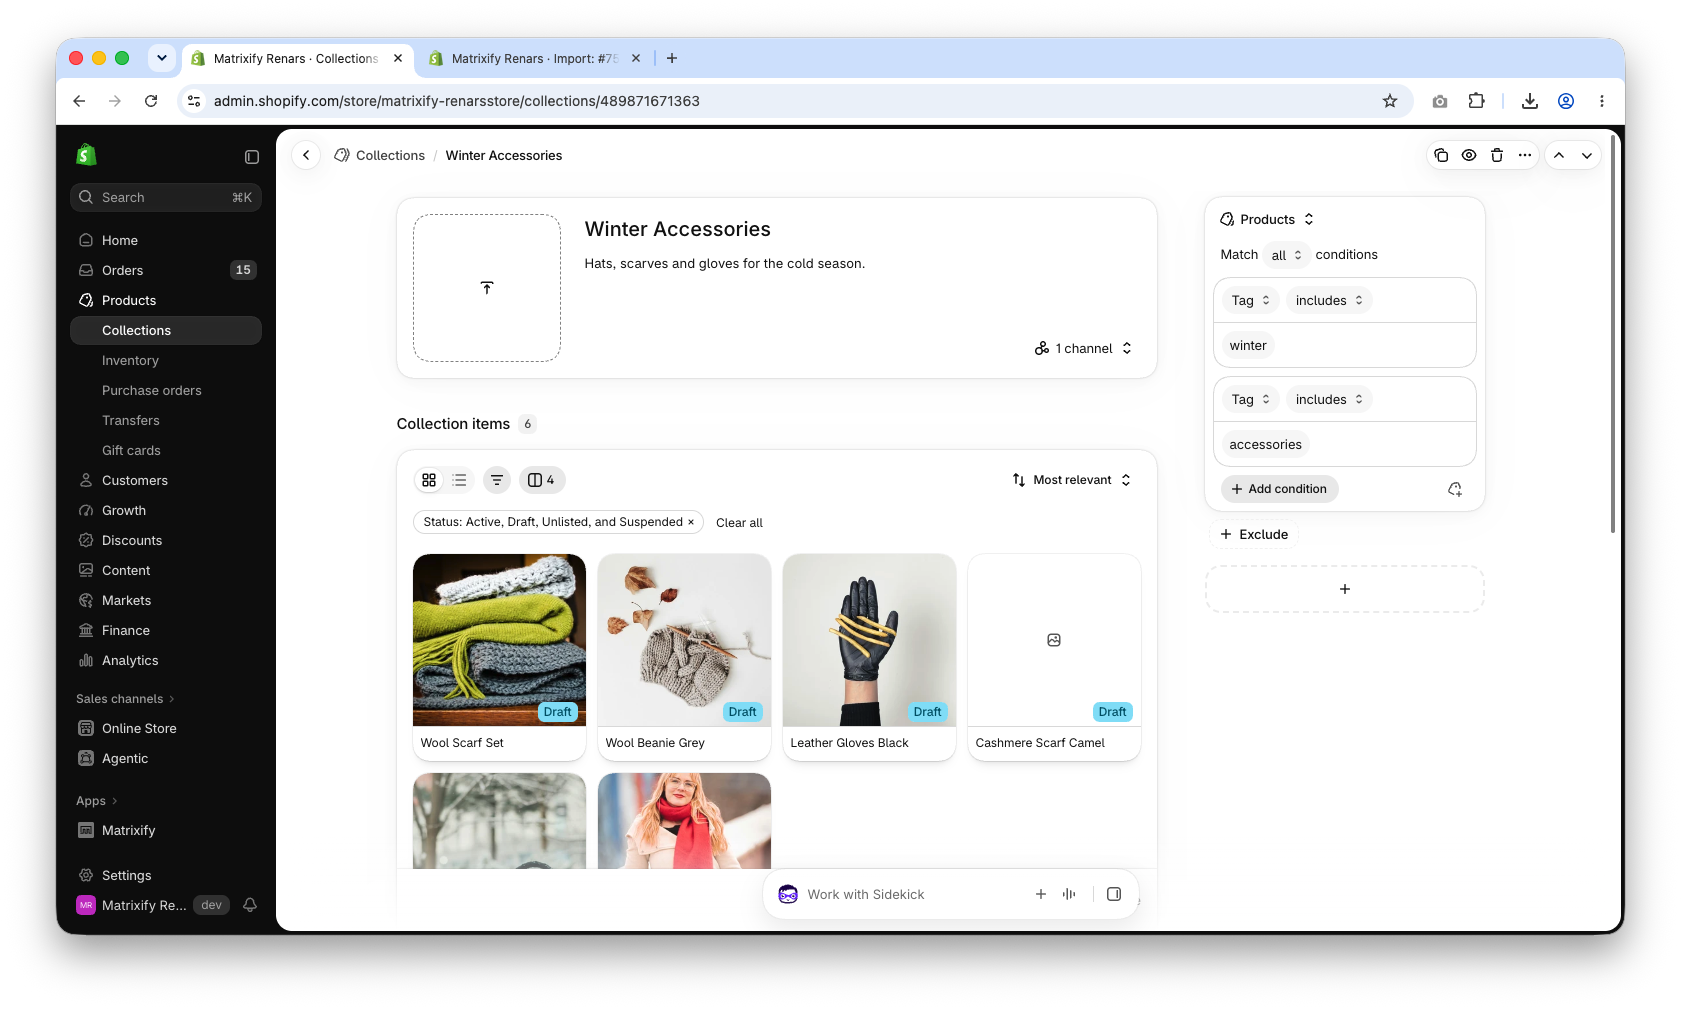
In the Shopify Admin, go to Products > Collections and open one of the new Collections. It has the description from Body HTML, the Products source has the same conditions as in your file, and the Collection lists the Products that have those Tags.
Good to know
- A store can have up to 5,000 Collections with conditions, and each Collection can contain up to 60 conditions. These are Shopify limits.
- You can also write the file from scratch. The minimum columns are
Title,Condition: Field,Condition: RelationandCondition: Value– without the other columns the app creates aProductssource withIncludeinclusion. - If the file has no
Sort Ordercolumn, new Collections getMost Relevantsort order. - To add Tags to Products before creating the Collections, see the Matrixify tutorial on how to bulk update Shopify Tags.
- To change conditions of existing Collections, Export them with
Sources & Conditions, edit the rows and Import the file back.Condition: Commandset toDELETEremoves a condition. - To add specific Products manually instead of by Tag, use
Condition: Fieldset toManual Selection. See the tutorial on how to bulk add, include and exclude specific Products in Shopify Collections. - The Smart Collections and Custom Collections sheets are deprecated. Older files with
Must MatchandRule: ...columns are for the Smart Collections sheet – use theCollectionssheet for new files.
What to do next?
- Export all your Collections – how to Export Shopify Collections to Excel or CSV.
- Create Products and add them to Collections in one file – Import Shopify Products and include them in Collections from the same file.
- Change the order of Products – bulk change Product positions in Shopify Collections.
- See all Collection columns and allowed values in the Collections documentation.
- Contact Matrixify support if you have questions.


