
Do you have a data file from which you need to import Products to Shopify? Or maybe you wish to create new Shopify Products in bulk from scratch?
Let’s take a look at how you can bulk upload Products into Shopify with the product importer app – Matrixify!

Understanding your Shopify product import files
Shopify has specific fields where you can store your information. To bulk upload products you will need to have a file where the Matrixify app can understand what information goes into what fields.
Take a look through your file and all its columns. Check where is product Title, Price, Description, and so on..
You can download Matrixify Demo template file and check what fields are available in the Matrixify and Shopify.
If you do not understand some specific field from the Matrixify template, do not worry – you can look it up in our “Products” sheet documentation. It covers description, possible values, and examples of every field.
If some of your fields just don’t have a place within Shopify available fields, then you can also look into storing them as Metafields.
Matrixify allows to import and export Shopify Metafields. You can look into our tutorial “How to manage Shopify Metafields in bulk” for more information.
We have tested by product import limits and you indeed can do a lot in the Shopify, still there are some limits to look out for:
Editing the Shopify import file
The idea behind editing your file is quite simple – you need to rename column headers in your file to the ones matching the Matrixify template.
File format and name
With the Matrixify app, you can import Excel XLSX and CSV file formats.
See the Matrixify app “How it works” page with exact file size and format limitations.
Importing to Shopify from an XLSX file
Excel XLSX file is the best option to go with if you do not have so much data that it exceeds Excel limits.
You are free to use formulas in the Excel file import, the Matrixify app will see the value of the cell not the formula.
To tell the app what you are importing you need to name the sheet/tab in the file to “Products”. The file name for XLSX files does not matter.
If you don’t have an Excel, you can use the Google Sheets, and paste the link to the Matrixify app as well – that will work the same as the Excel file (see this tutorial on how to import to Shopify from Google Sheets).
Importing to Shopify from a CSV file
The import CSV file needs to have CSV file structure, it needs to be a comma-separated CSV file.
To tell the app what you are importing you need to rename the file correctly. For Products, the CSV file name needs to contain the word “Products”, for example, “my shopify products.csv”.
If your file is not over any of the known excel limits, such as the maximum of 1 million rows or 16 000 columns, then we strongly suggest NOT to use the CSV file, but use the Excel as XLSX format file before starting to work on it.
Basically, the only real reason to use CSV files, is if you are generating them automatically from some other system. But if you are working manually with spreadsheets, then definitely use the Excel XLSX files.
Finding matching columns
First – download previously mentioned Matrixify demo template file.
In your Products take each column and find matching one in Demo file.
For example, if your supplier file has a column “Name”, then matching column from the Matrixify file would be “Title”.
You do not need to match all columns and you are free to import a file with columns that are not recognized by the app. Such a column will be just ignored. So you can keep any additional columns or sheets for your own reference, for vlookups or other product data matching formulas.
Managing Shopify’s Product Variants
In Shopify, the only mandatory thing for Variants is to have unique Option combination for each Variant within the Product.
Single Product can have up to 100 Variants and each Variant can have up to 3 Options.
The app sees rows as Variants for a product if any column starting with “Variant” or “Option” is filled in your file.
To tell Matrixify that these Variants are for the same product you will need to make sure that “Handle” and “Title” columns have the same value in all the rows that are under same Product.
Note that for the app to correctly read lines as rows from the same Product – they do need to be adjacent to one another.
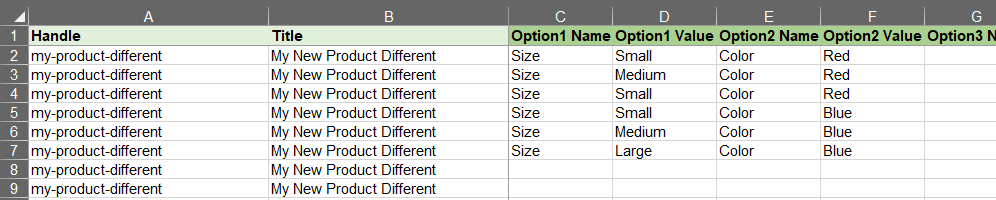
Let’s take a look at an example of how simple product with 6 Variants and 2 Options would be created:
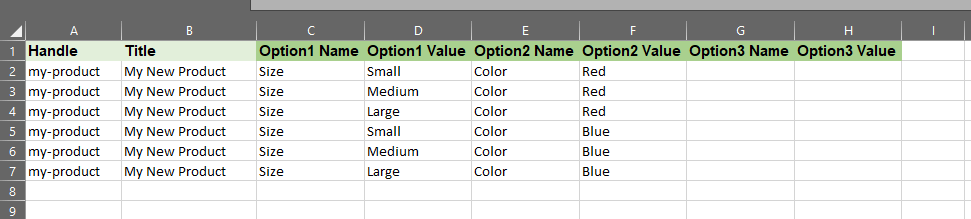
As you can see in the screenshot, all 6 rows of the Product have the same Handle and Title filled so the app knows that all these rows as single Product.
The Variant options in the file all have unique combinations within the Variant, for example, Variant 1 has Size = Small and Color = Red, and there are no other Variants with such combination of Options.
Images
Your supplier file might also contain images.
To import Shopify product images in bulk, you will need to use the column “Image Src”. Here you can list public and direct links to your images which will then be downloaded by the Shopify for your Products.
There are two ways to list images:
One image per row
Same as with Variants, you can list one row for each Image and the app will use Handle and/or Title to see what rows are from the same Product.
You now might be wondering – how the app knows if the row does not need to be added as Variant.
As previously mentioned – for Matrixify to count a row as Variant, you need to have at least one column filled that starts with “Variant” or “Option“.
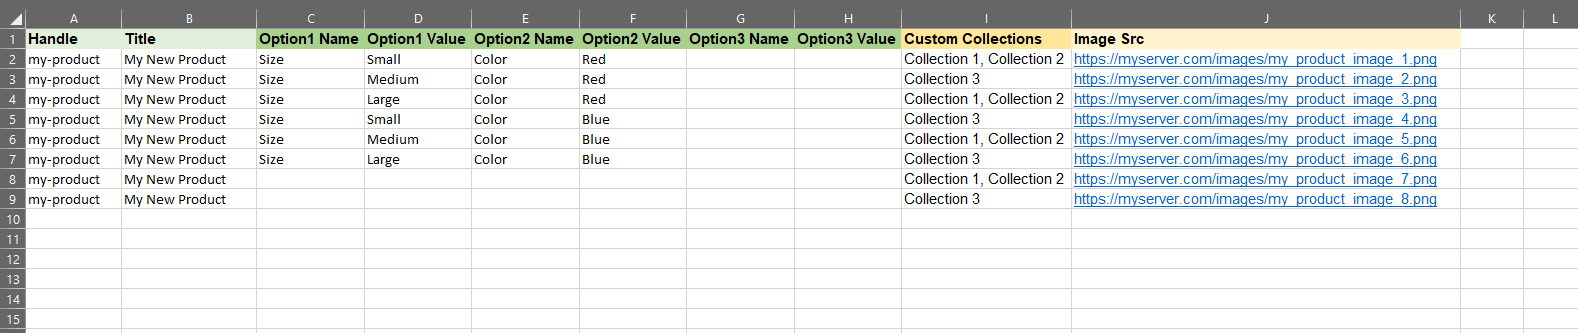
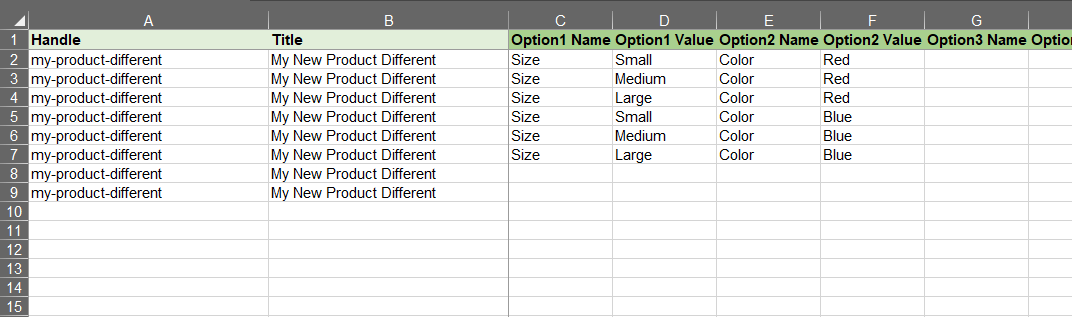
Let’s add 8 images to the example file to see how it would work within the Matrixify:

As you can see in the screenshot above – all rows have the same Handle and Title. The app knows that all these 8 rows are still from the same Product, but since rows 8 and 9 do not have any Variant information filled then the app will just take Images from these rows.
Note that the image rows don’t match up with variant rows – “Image Src” column images will be product images, and not the variant images.
Images will appear in the product in the same order as they appear in the file, but you can change that with the “Image Position” column to specify the positions for each image.
Multiple images in single cell
Your file already might have all Product images listed in a single cell, and Matrixify also supports that!
You will need to make sure that the images are separated by a ; (semicolon) as you can see in the example below:
 This can be handy also if your supplier has several images across several columns – then you can concatenate them using the Excel (or Google Sheets) formula. You can have blank spaces between semicolons like this ;;;https://shopify-image…;;another-image; – don’t worry about that. Matrixify will know to just take images.
Managing Shopify Collections
Thru the Products import, you can also assign and even create Shopify Custom Collections in bulk (in Shopify Admin known as “Manual Collections“).
You can use the column called “Custom Collections” to list the comma-separated values of Custom Collections where this Product should be in.
Do not worry if for a product with multiple rows the Collection names repeat. The app will gather all Collection names for that Product and take only unique values.
Metafields
In Shopify, you can create custom fields where to store information for your Products. In Shopify those custom fields are called “Metafields“.
When you cannot find a field where to store specific information then you can store it in these Metafields, and by editing your Shopify stores theme code, they can also be displayed in your Online Stores product page.
For example, if your Products have dimensions – height, length, width – in Shopify there is no default place where to store this information. Then you can create 3 columns in your file where you can store this information.
Detailed info on how the Metafield columns are constructed you can find in our “How to manage Shopify Metafields in bulk” tutorial.
There are two types of Metafields for Products in Shopify. Those attached to the whole Product and those attached to specific Variant.
Product Metafields
Product level Metafields are set one Metafield for the whole Product. This would come in handy if you need to store some information that is same for all the Variants without a need to save it for each Variant individually.
A product Metafield only need to be listed in the first top row of each Product as there can only be 1 value for the whole Product in each Metafield (but of course each Product can have many Metafields).

Variant Metafields
If you need to assign unique values for each Variant, or just values that are Variant specific then you would need to use Variant Metafields.
These Metafields can be listed for each Variant the product has.
Note – if you have Variant Metafield column filled then the app will assume that this row is a Variant row (even if your other variant columns will be empty for this row).

Shopify Product import
Once you have finished your file make-over, you can start its import.
How to import products into Shopify
Uploading the file
Here you will need to go into the Matrixify app. In the “Home” screen locate “Import” section.
You can click on the “Add File” button to add the file or just drag & drop it on the app screen.
The app will first upload your file to the Matrixify servers and once uploaded open the new import page where the file will get analyzed.
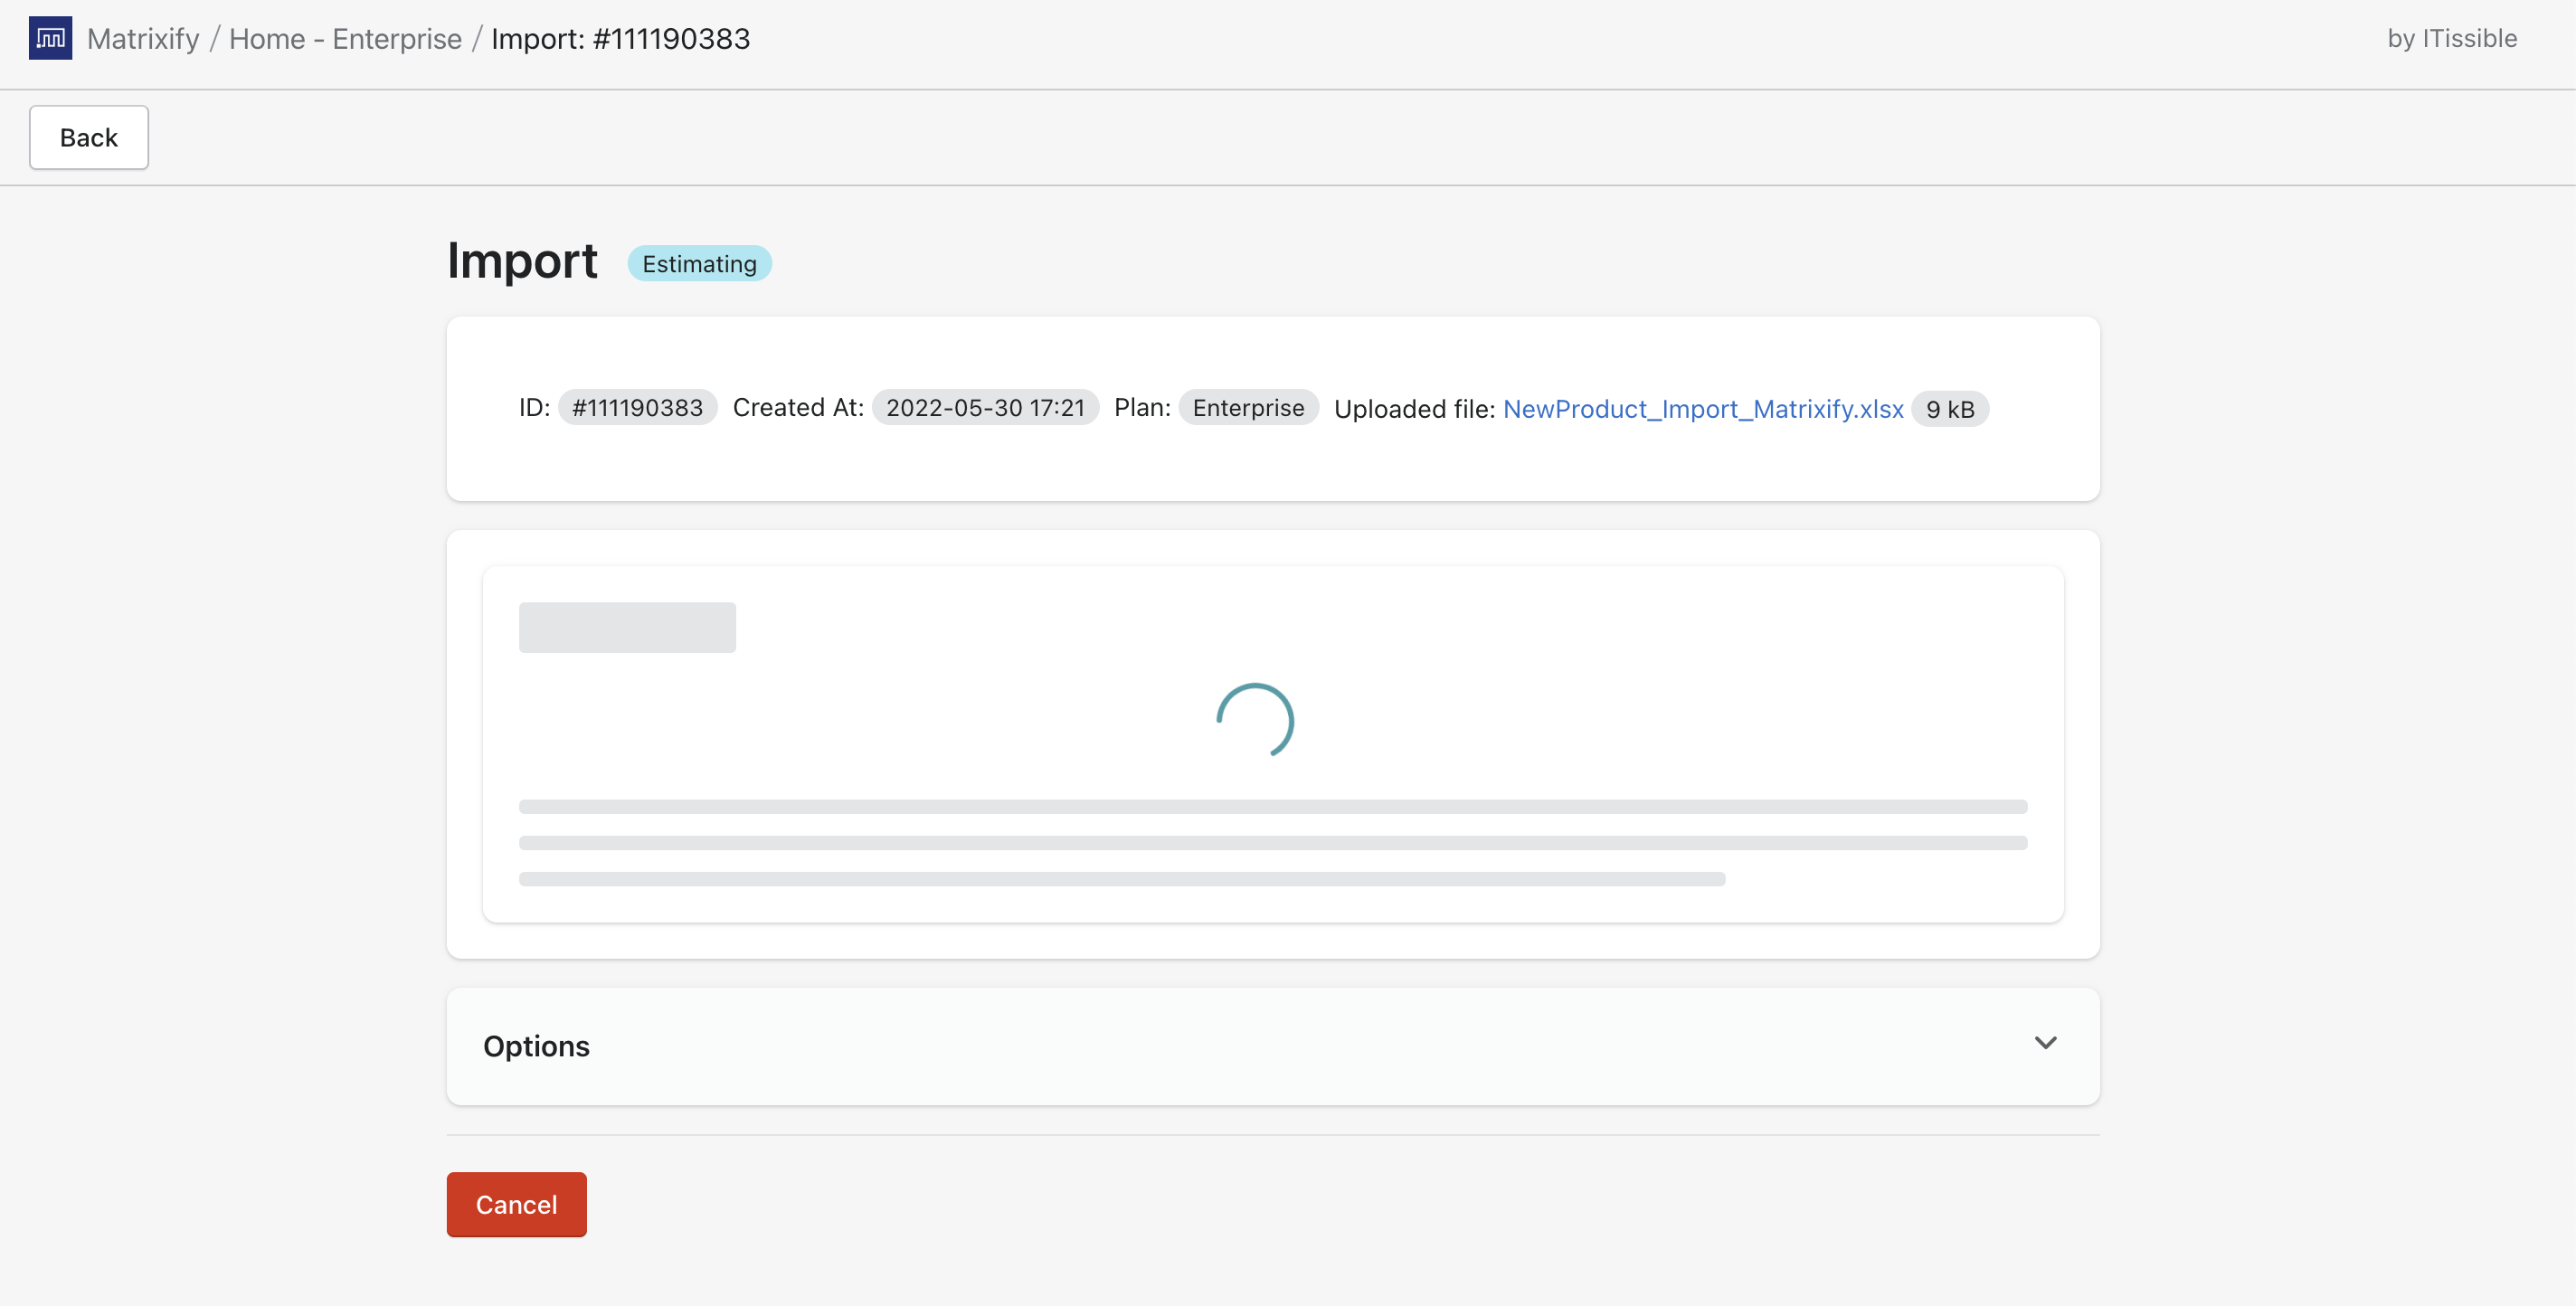
Analyzing the file
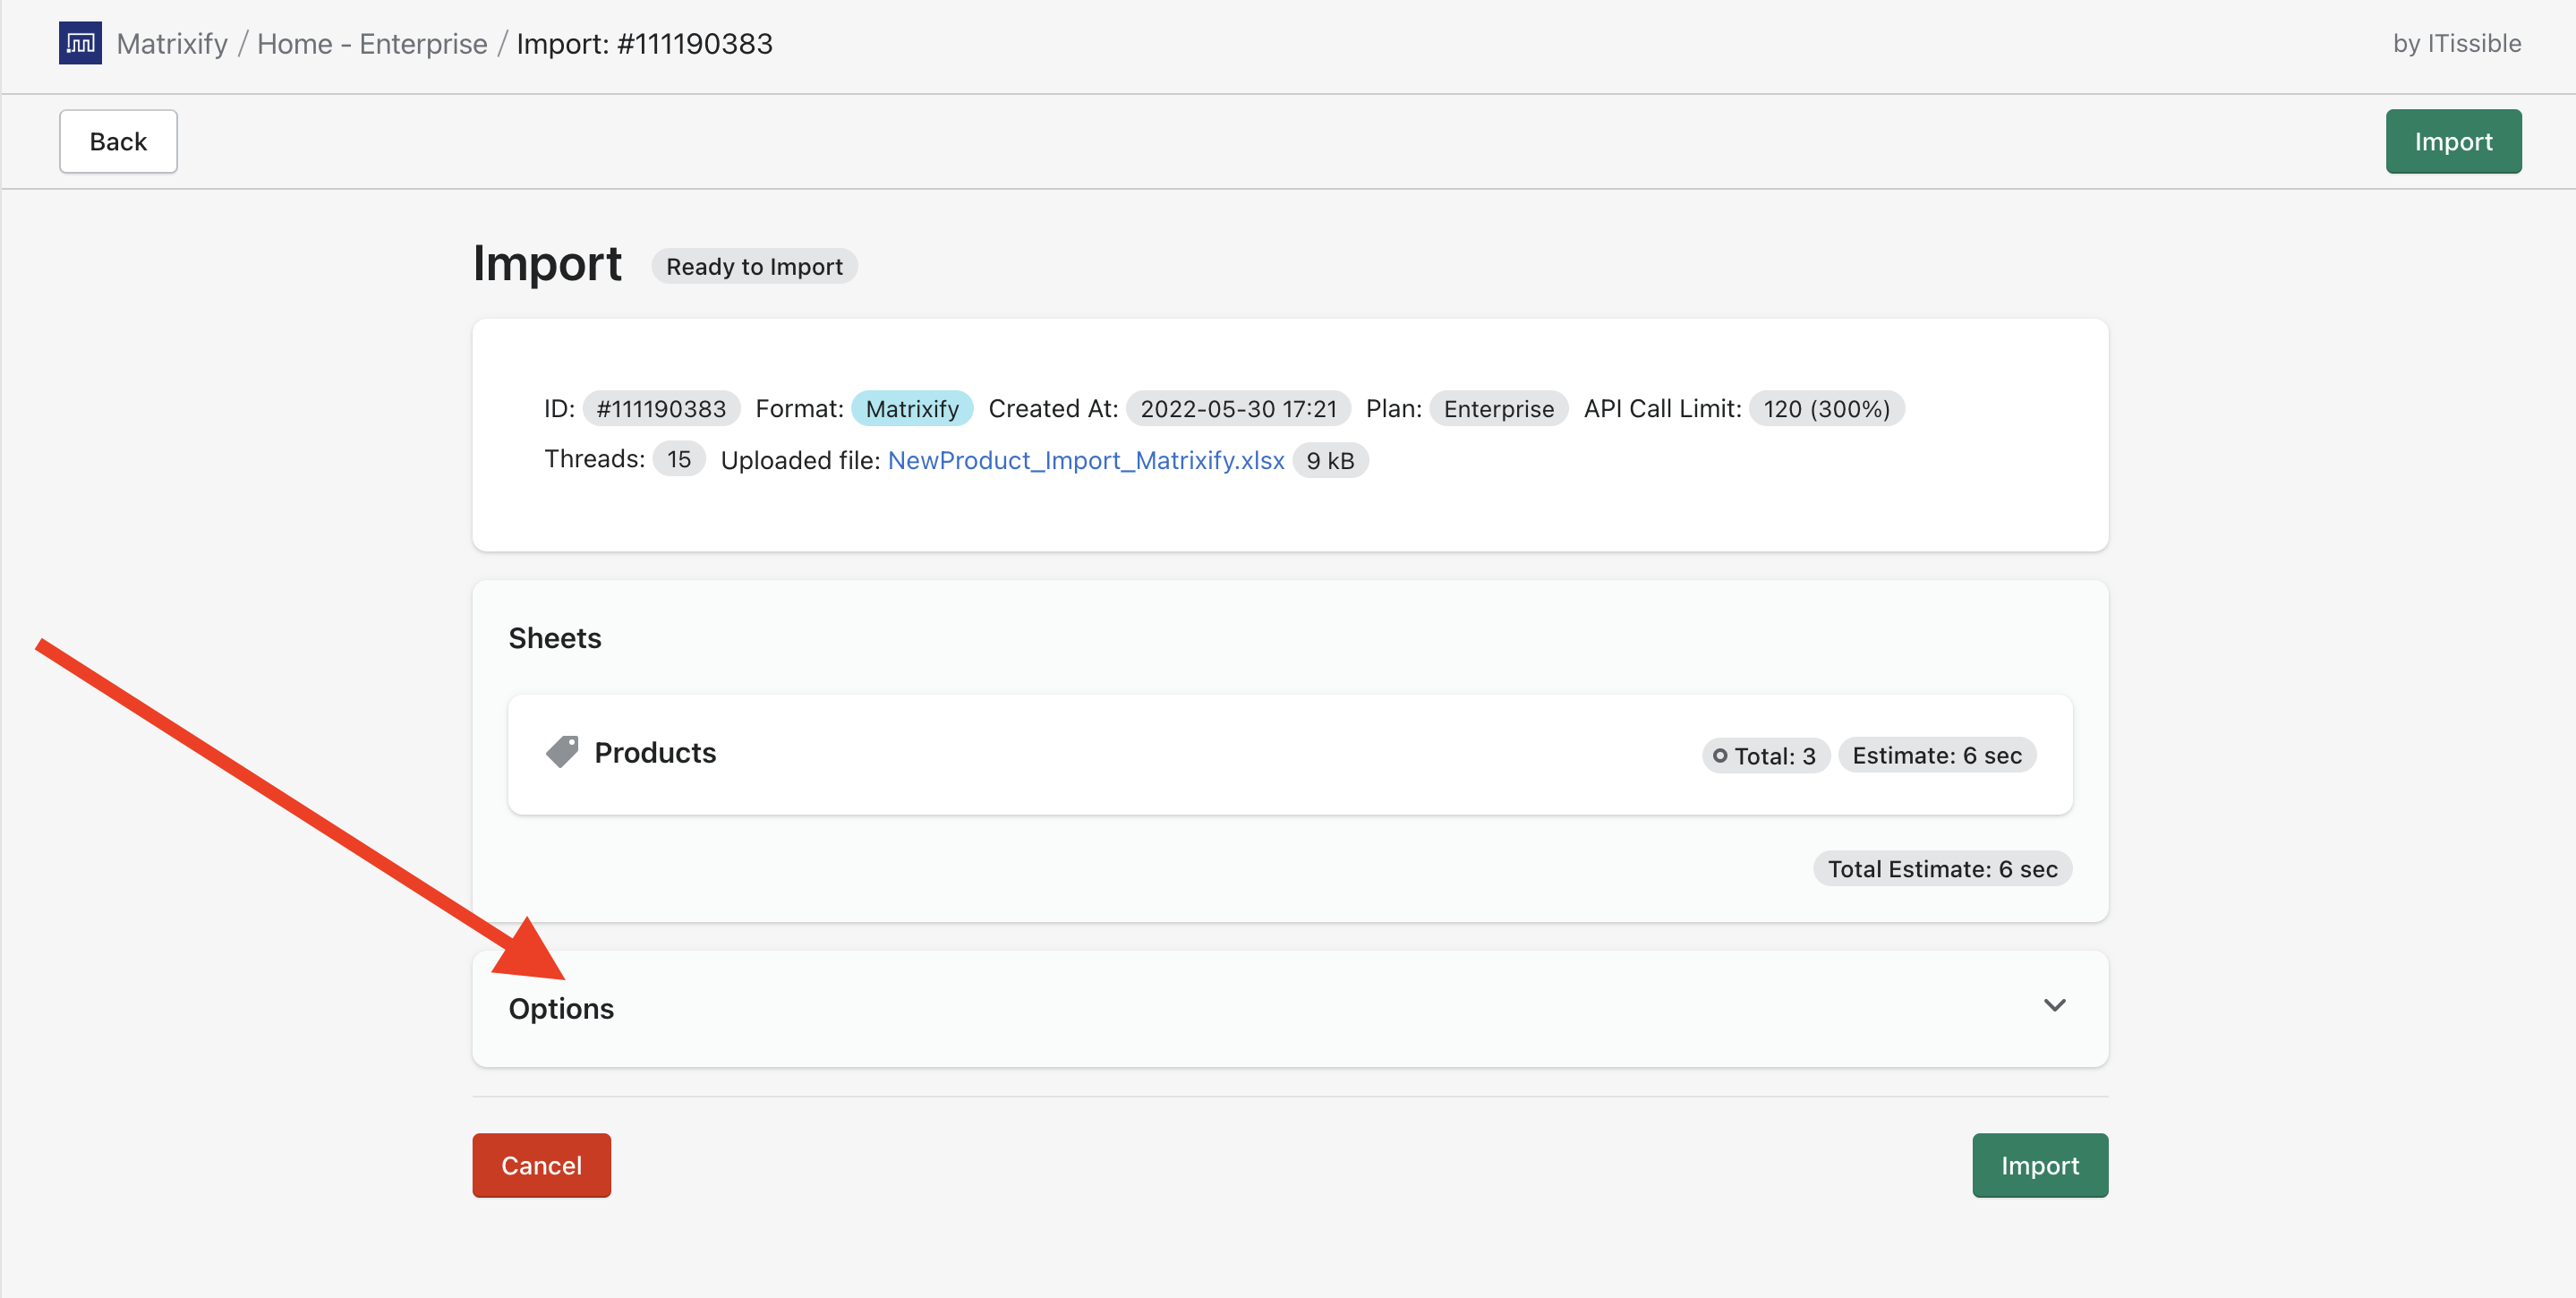
Once the file has been analyzed you can check if the data looks correct to you.
First, check if the app recognized your import sheet as “Products”. As previously discussed you can specify what you are importing by having specific file name for CSV or sheet/tab name for XLSX.
Next, you can check the total count of the items that Matrixify will import and make sure that it matches the number of items there should be in the file. If the count doesn’t match to what you require, that means there are some construction issues most likely within the file.
Note that the app will count full Products, not file rows. So if your file contains 30 rows for 3 Products, each with 10 Variants, then the app will show just as 3 Products.
Also, you will see the approximate time estimate for how long the import might take. As the import will start, this time estimate will adjust with the more accurate estimates for your import.
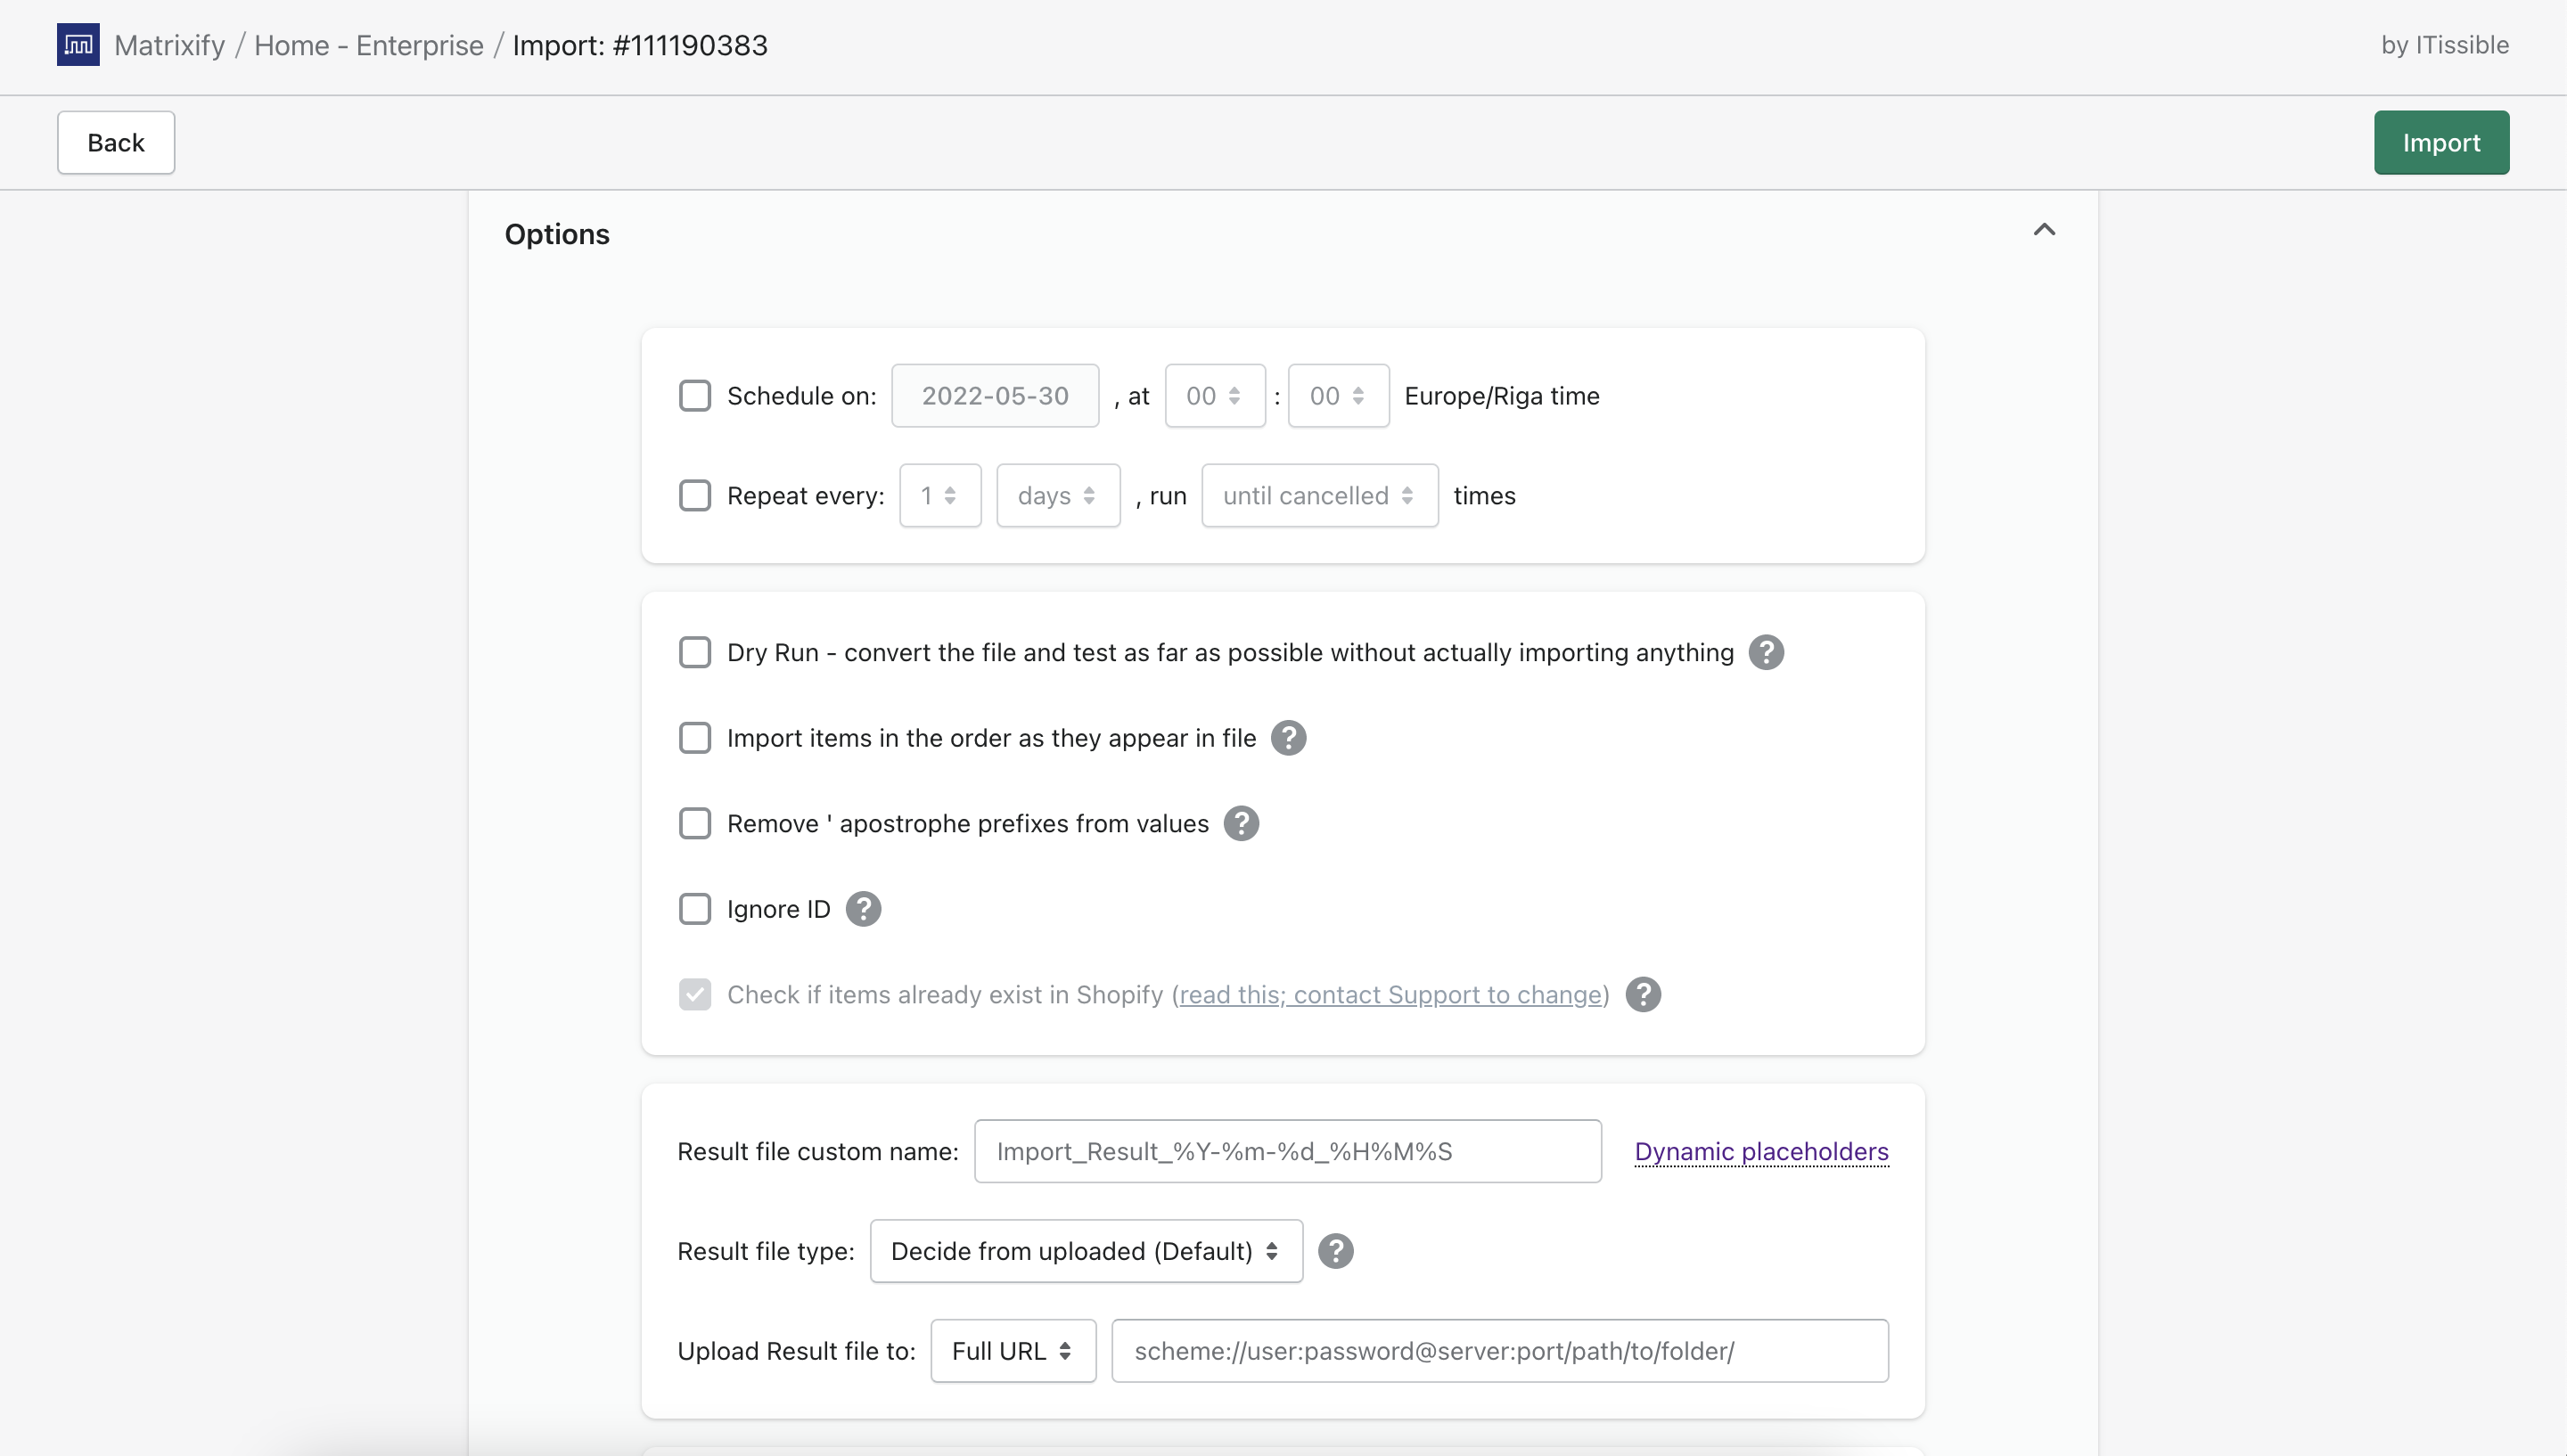
Setup import options
For the import, you can apply various options that can be seen in the “Options” section.
With regular imports, you do not usually need to edit anything within the “Options” as default selections should work fine for usual Product import.
But it is worth going through them to see what is available. You can hover over the “?” mark symbol to see small explanation about the Options checkbox.
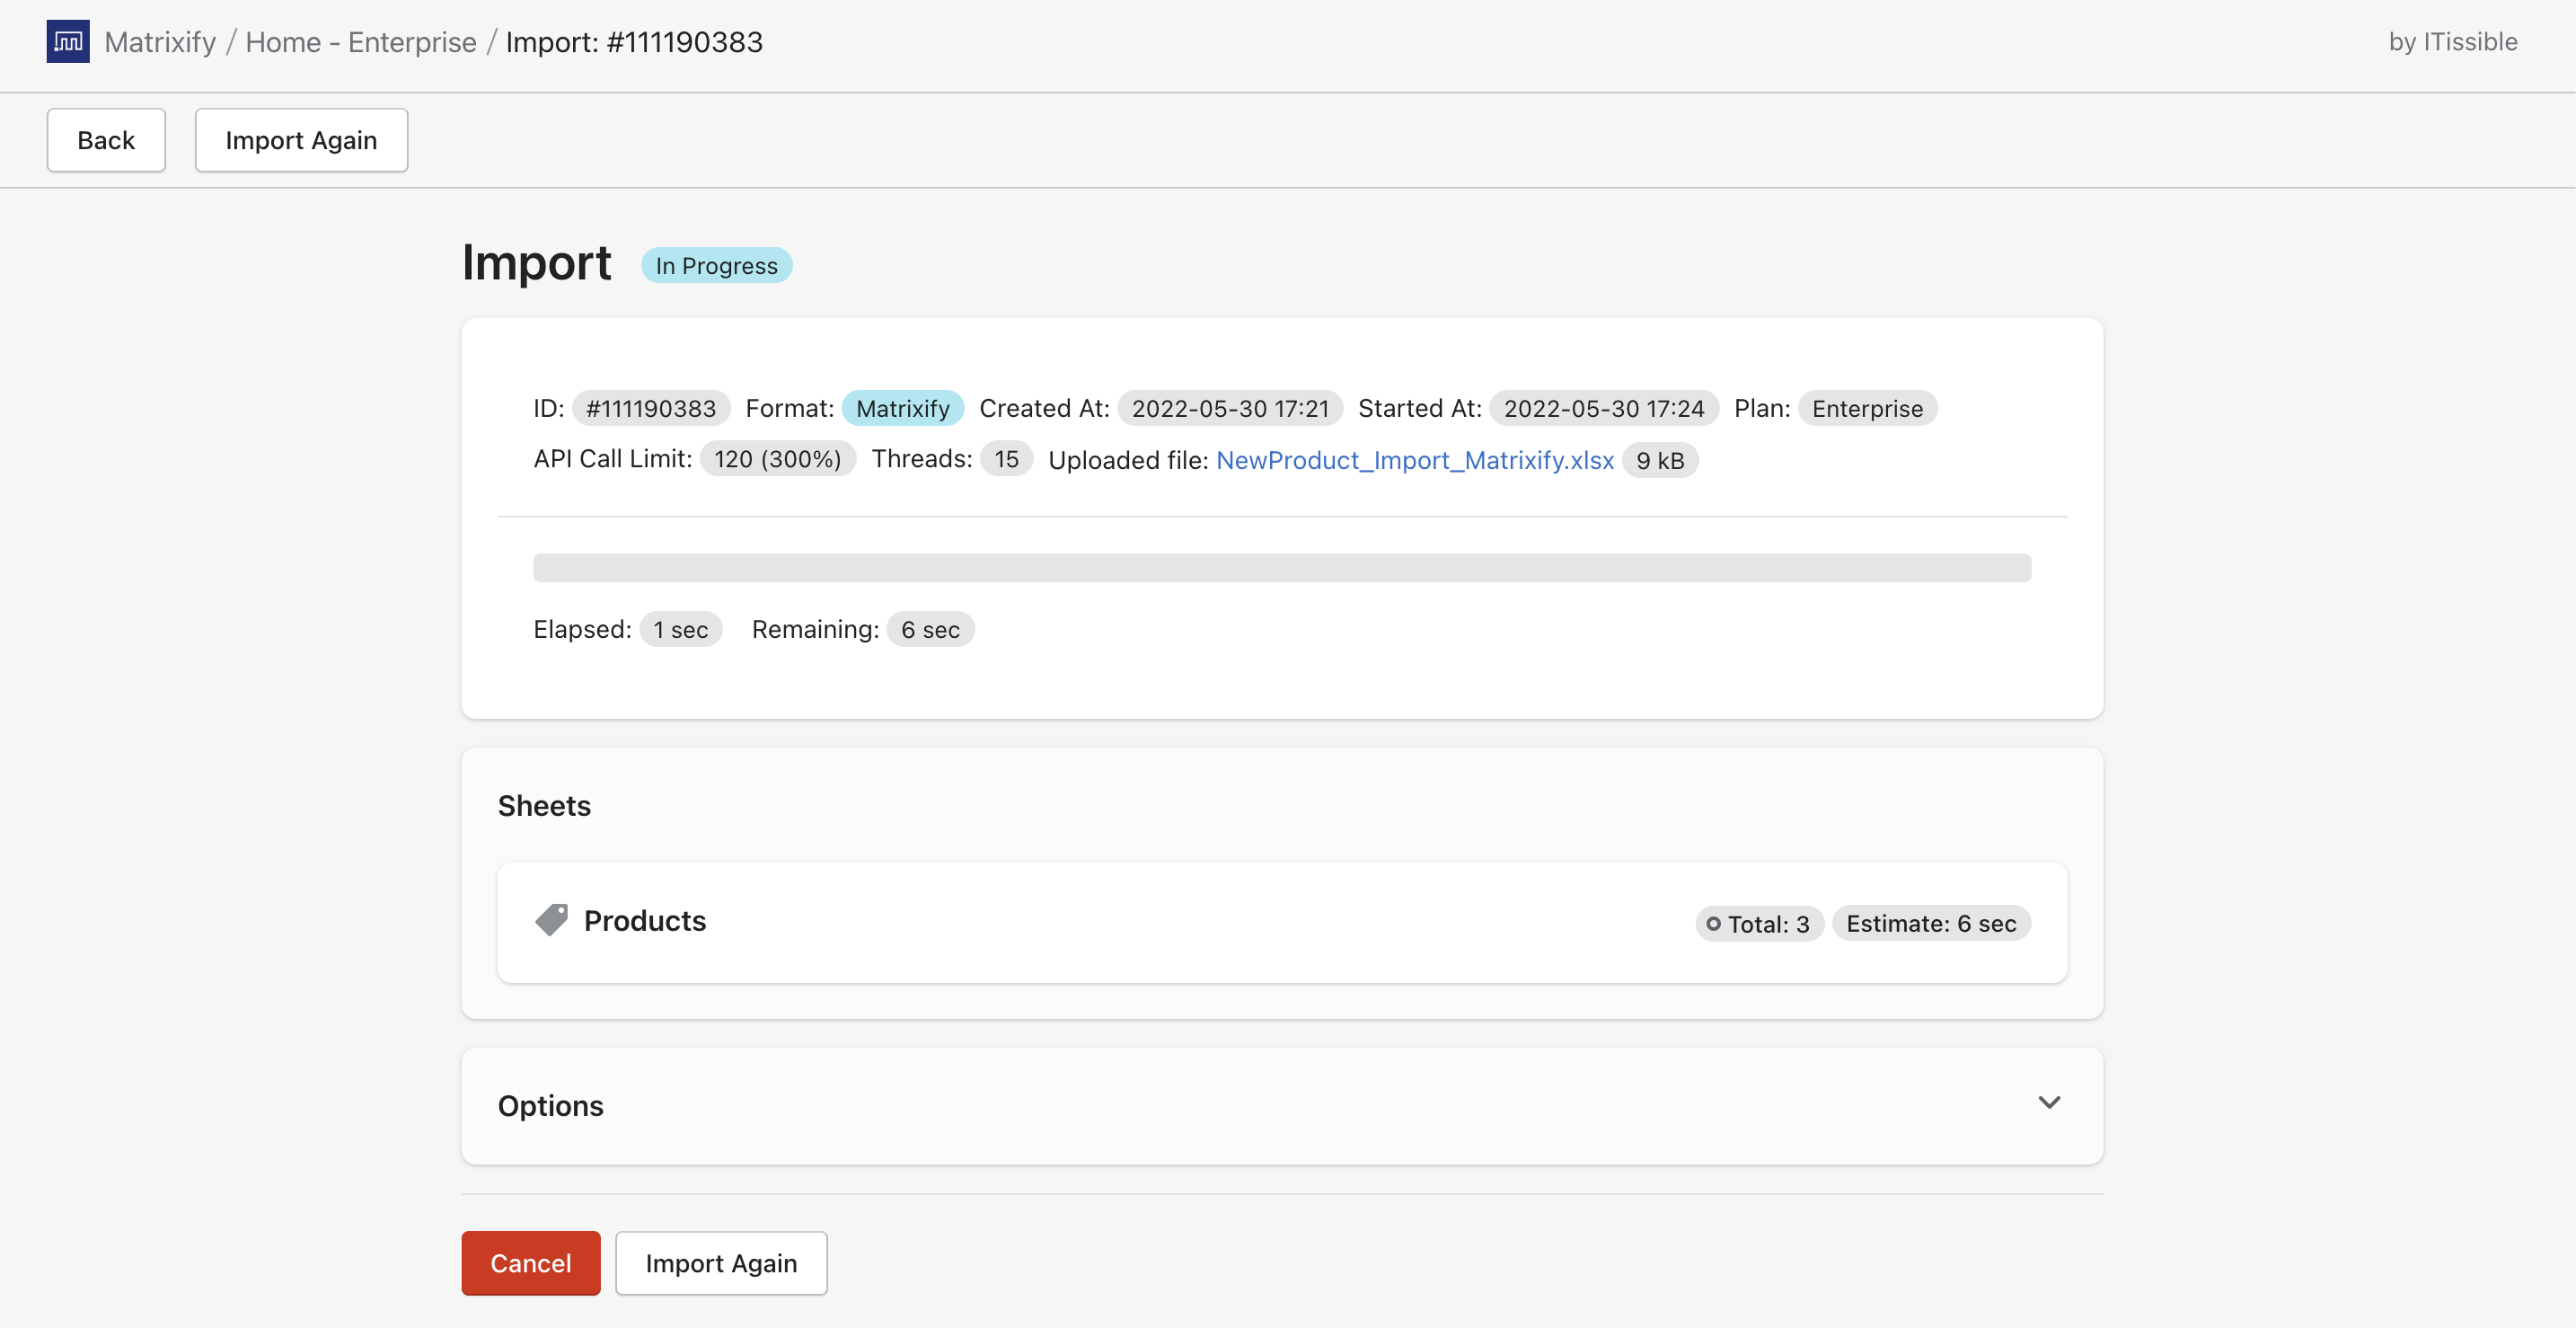
Importing the file
Once everything is set up, you can click on the “Import” button.
Now you can see how far the app is with the import, how many items have been imported, if any items have failed, updated, created new, or deleted.
You can also see all the details about the job on this page, including what Options were applied, and the adjusted remaining time, and what is the import speed – seconds per Product.
You can leave this page at any time and find it in the “All Jobs” list in the app.
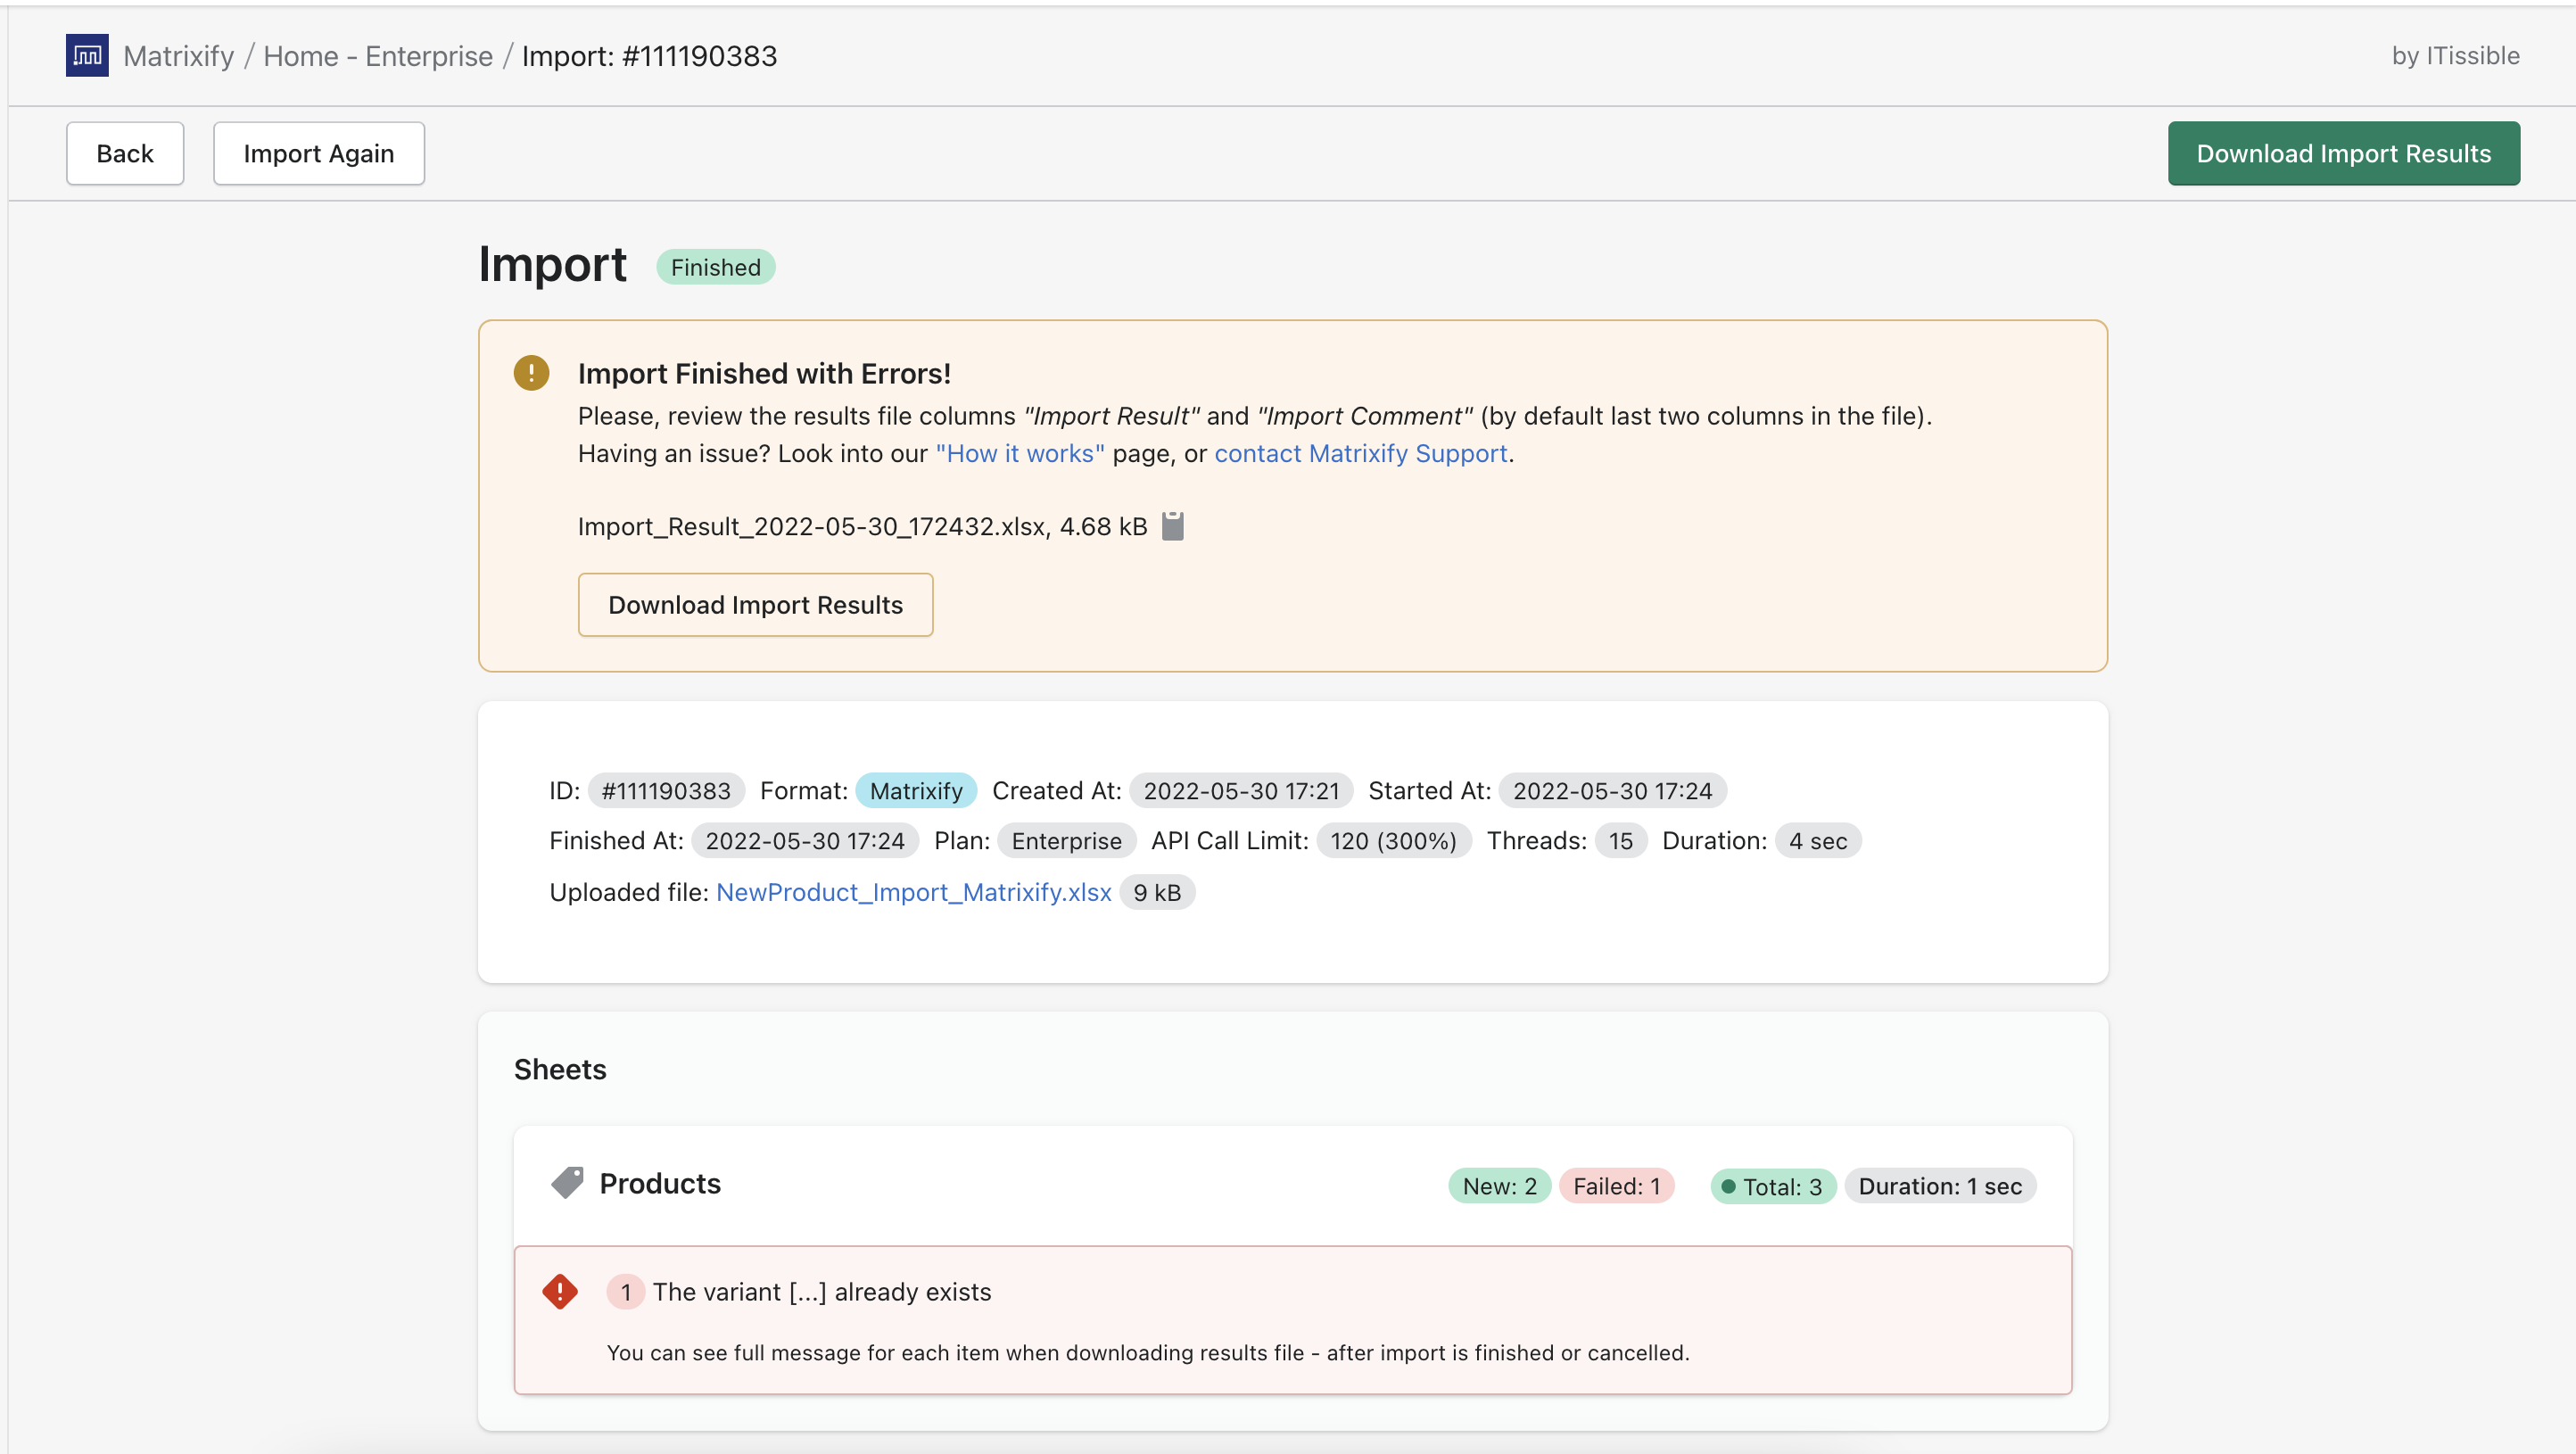
Import Results
After an import will be finished, you will see the job status as “Finished” or “Limited” (if importing more items than supported by your subscription plan), or “Cancelled” (if you canceled the job).
At this stage, the job is no longer running and all items created will already be in your store.
If some of the items failed to import then you can download the “Import Results” file to find the issue.
In the Results file, you will have two columns “Import Result” and “Import Comment“. By default these should be the two last columns of the file.
Import Result column
In this column, you can see the general status of the whole item. Usually, the value in the column is “OK” or “Failed”.
By this column, you can see the items that have failed and you can also use Excel to filter the file – to only display Failed items if needed.
Import Comment column
In the comment column, you can see a comment of what has happened to the Product whilst importing. For the “Failed” items here you will also find the error message.
In my example, I have an error message “Failed. Base: The variant ‘Small / Red’ already exists. Please change at least one option value.”
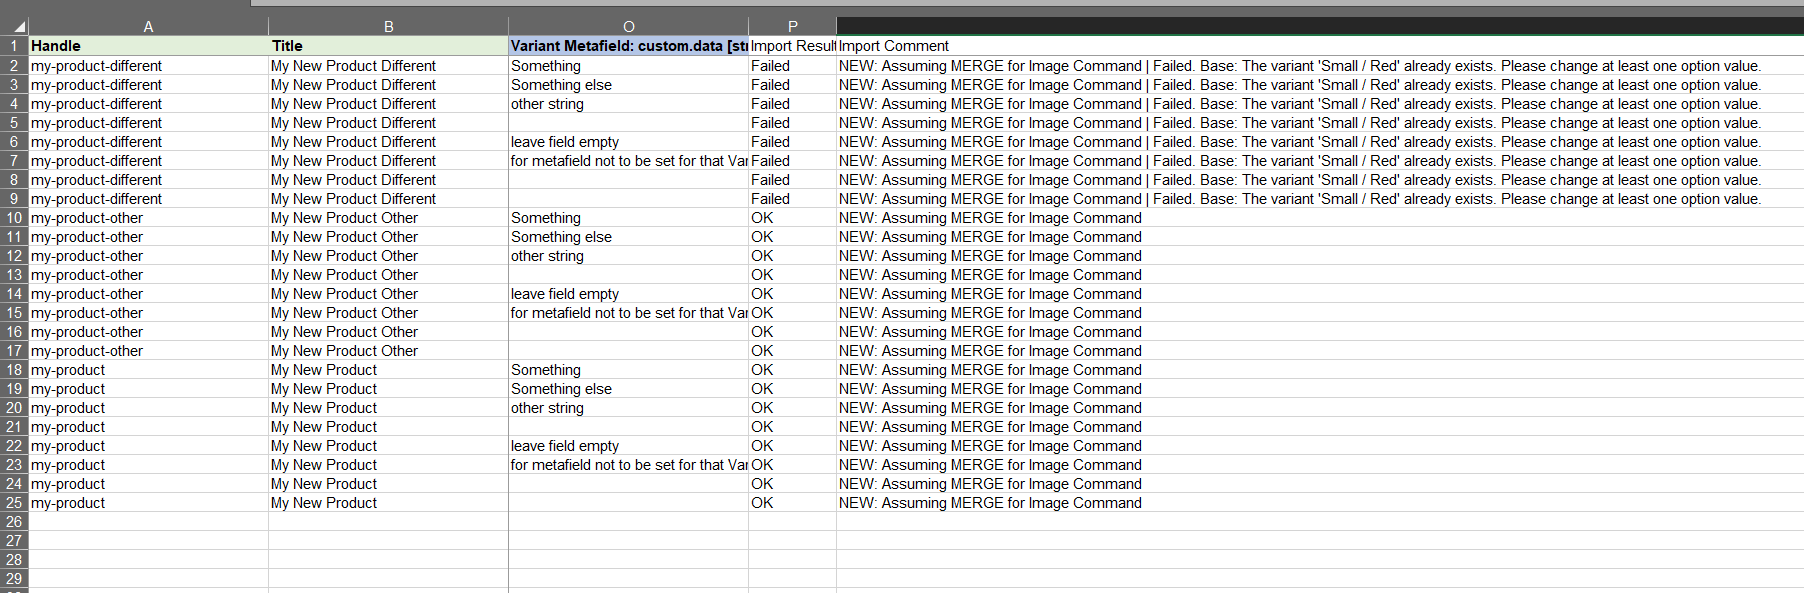
Fixing an error
There seems to be some issue with the Variant Options for this Product. Looking at the Options we can see that I have “Small” – “Red” option listed twice in the file.
Then we can fix the error, and since all other items imported “OK” I can delete them from the file, and now only import 1 Product – only that one product which was Failed.
You can fix the issue right there in the Results file and import that instead of the original file.
Column colors – only for XLSX format
If working with the Excel XLSX file, then the results file will also be returned in the Excel file.
In this file, you can go over all the column headers. If a column header is not colored – that means the app ignored this column. Possibly there is a typo in the column header.
What to do next?
- Install the Matrixify app.
- Check other Product related tutorials.
- Look into our “How it works” page to understand other details and things you can do with the app.
- Learn how to update certain fields for existing Shopify products.
- You can also import Orders with Matrixify.
- Contact our support if you have any questions or issues.


