
Ability to export products from Shopify can be a crucial and key element to construct various synchronization feeds, reports, or simply to update your Shopify products.
That is why it is important to have as much information as possible included in your exported inventory and product files.
Matrixify offers many benefits when exporting Products, such as more fields/details about the Products, automated exports, exporting to various formats, ability to adjust what you are exporting, see the export progress in the understandable and user-friendly user interface, and much more!
Here we will take a look at benefits on exporting with Matrixify!
Export Products with Shopify
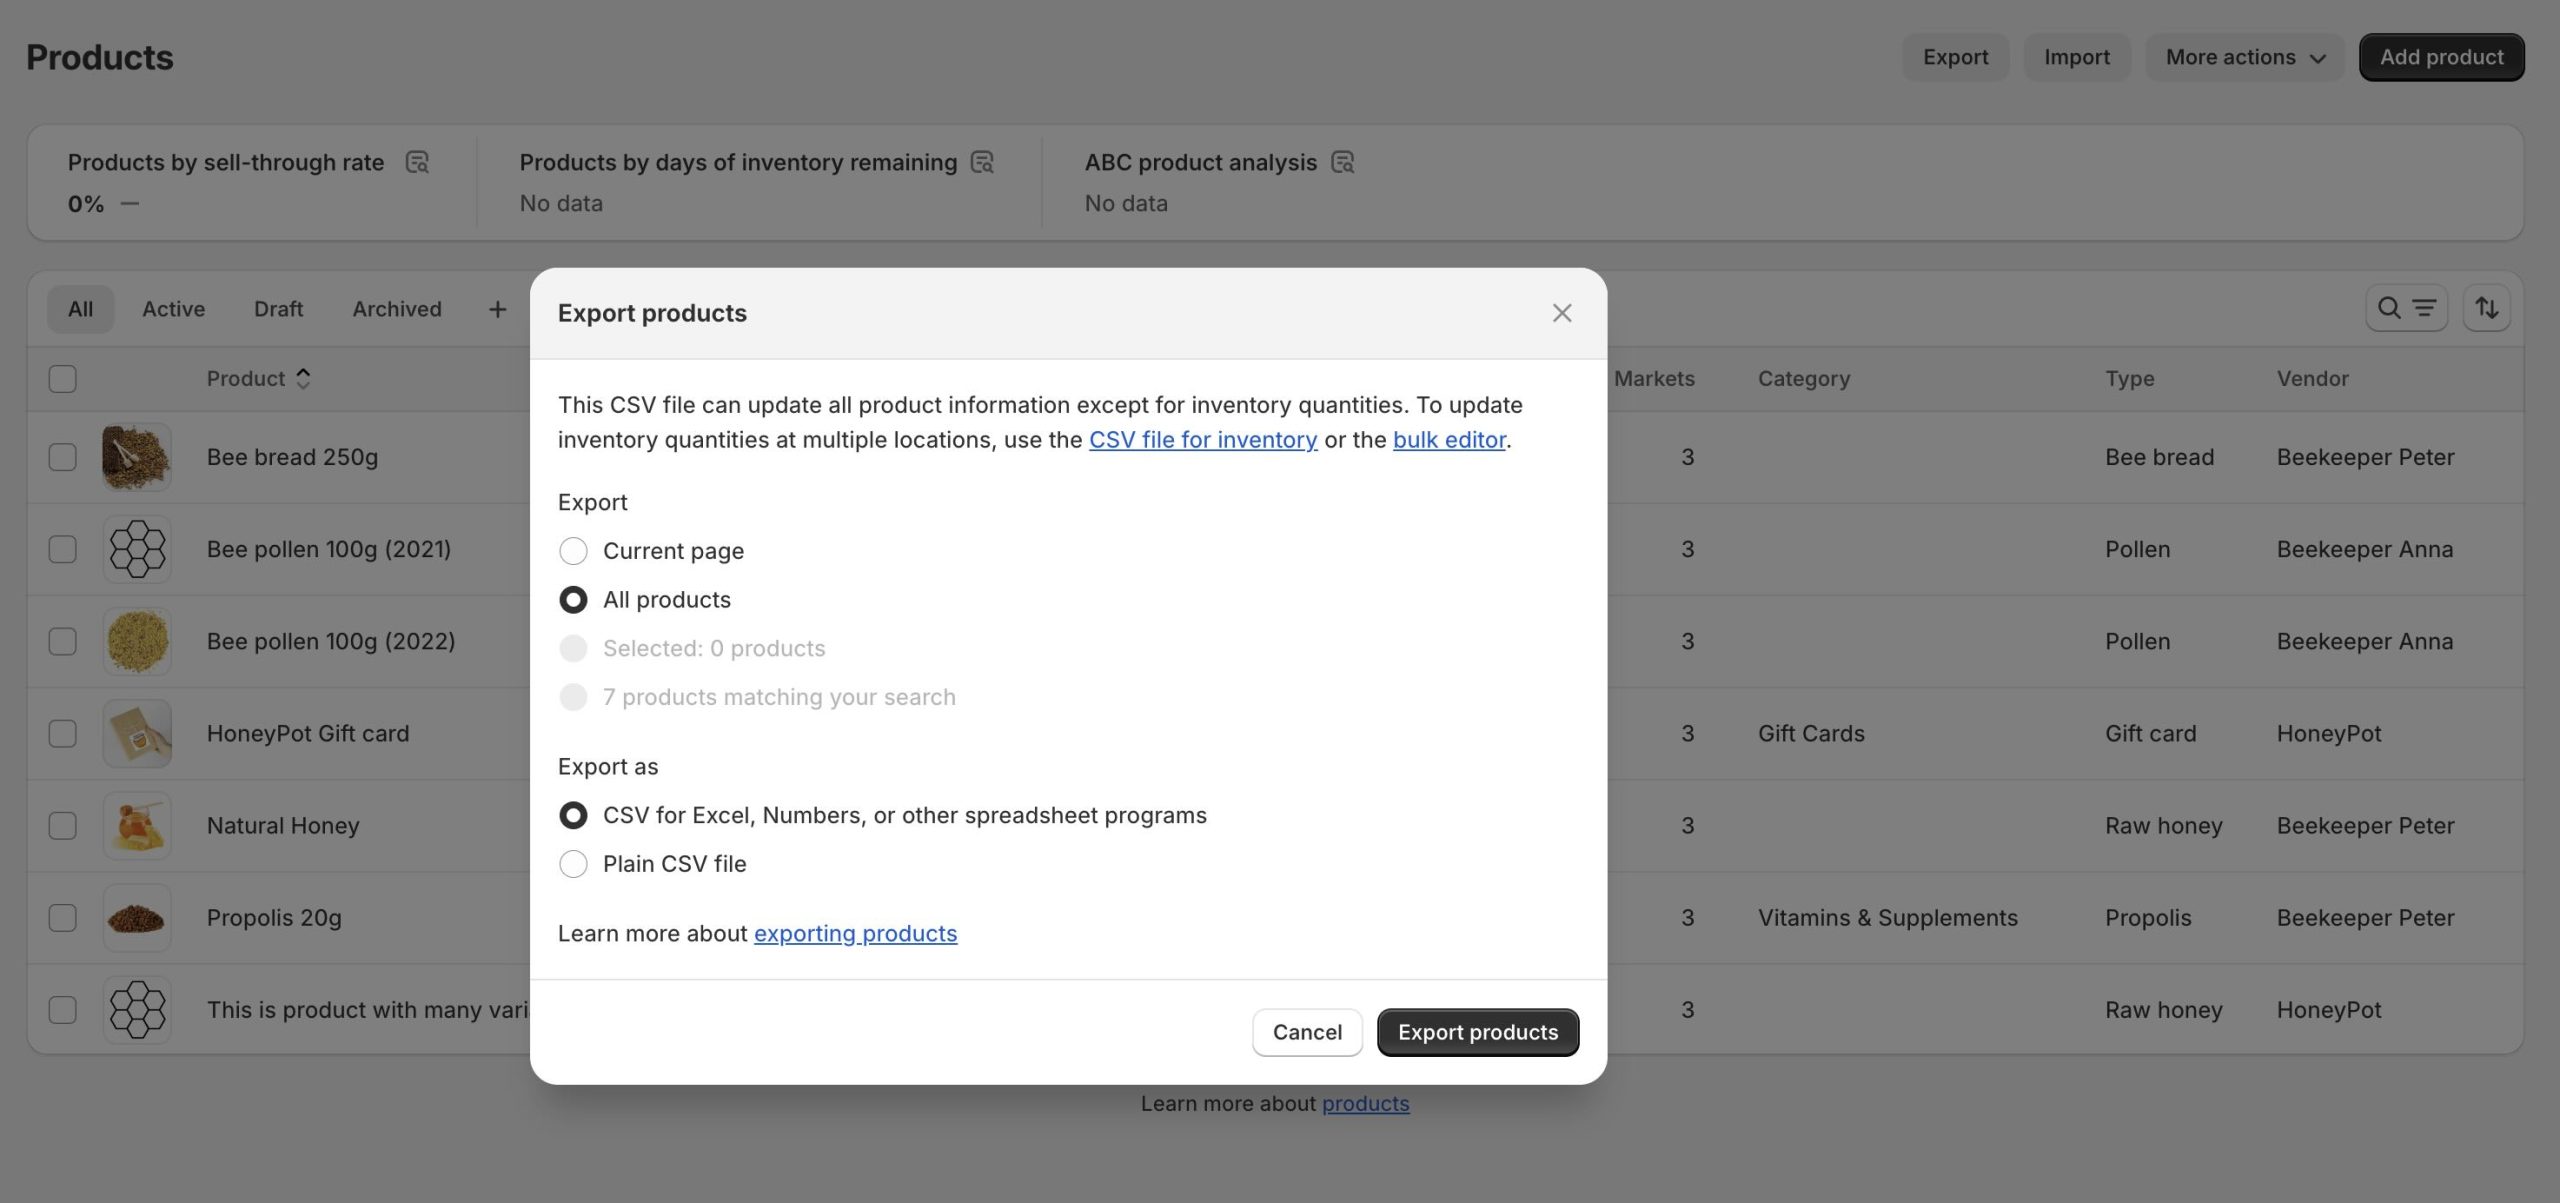
You can export Shopify Products with the Shopify native export option by going into the Shopify Admin -> Products.
Upon clicking the “Export” button a dialog box will open where you can select if various settings for the export.
If you are exporting one page (50 Products) or fewer items then the exported file will download in your browser. If you are exporting more items or “All Products” then the exported file will get emailed to you.
Once you have the file, you can open it and see all basic Product and Variant information.
Such as product Handle, Title, Description, Variant Options, Prices, and others.
Benefits of exporting Products with Matrixify over Shopify
For some the Shopify exported Products file is all that is needed, and that is great, but there may be multiple reasons why Shopify Products export might not work for you.
That is where the Matrixify app comes into the picture!
Internal Shopify IDs
A lot of times when working with the exported data, you may need to also see internal Shopify product IDs.
They might be used in your ERP system or elsewhere as it is not changing unique identifier for a product, that changes only if you replace or delete the Product.
Having the ability to export Product ID also enables you to update your product Handles in bulk.
Available Product ID columns in the Matrixify are:
- ID
- Variant ID
- Variant Inventory ID
Metafield data
Multiple stores and apps work with Shopify Metafields, which are Custom fields for your Products.
Having them in the Shopify product export file is crucial if you wish to see or edit these custom fields in bulk.
Product level Metafields in the Matrixify exported file will be in a column that starts with “Metafield: “.
Variant level Metafields will be in columns that start with – “Variant Metafield: ”
You can also import Metafields with the Matrixify app to update Metafields in bulk.
Multi-Location Inventory
The ability to export inventory for your products is important especially if your store is working with multiple locations and you have Product inventory stocked in different locations.
In the Matrixify product export file you will have two columns for each Location in your store.
- Inventory Available: <location name>
- Inventory Available Adjust: <location name>
You can use these columns for your reports or to bulk update the multi-location inventory.
Other additional fields
Matrixify also allows you to export all following fields that are not included in the Shopify Product export:
- Updated At
- Published At
- Published Scope
- Template Suffix
- Variant Position
- .. and others.
See the full list of Matrixify exported Product fields in our “Products” sheet documentation.
Export only fields that you need
Matrixify allows users to export only specific fields, so your exported file is smaller and easier to work with.
When creating an export, select the column group you need, open it to select individual columns, and change their positions in the Customize Columns section.
Check more details about it in our tutorial – Export Data from Shopify with custom columns
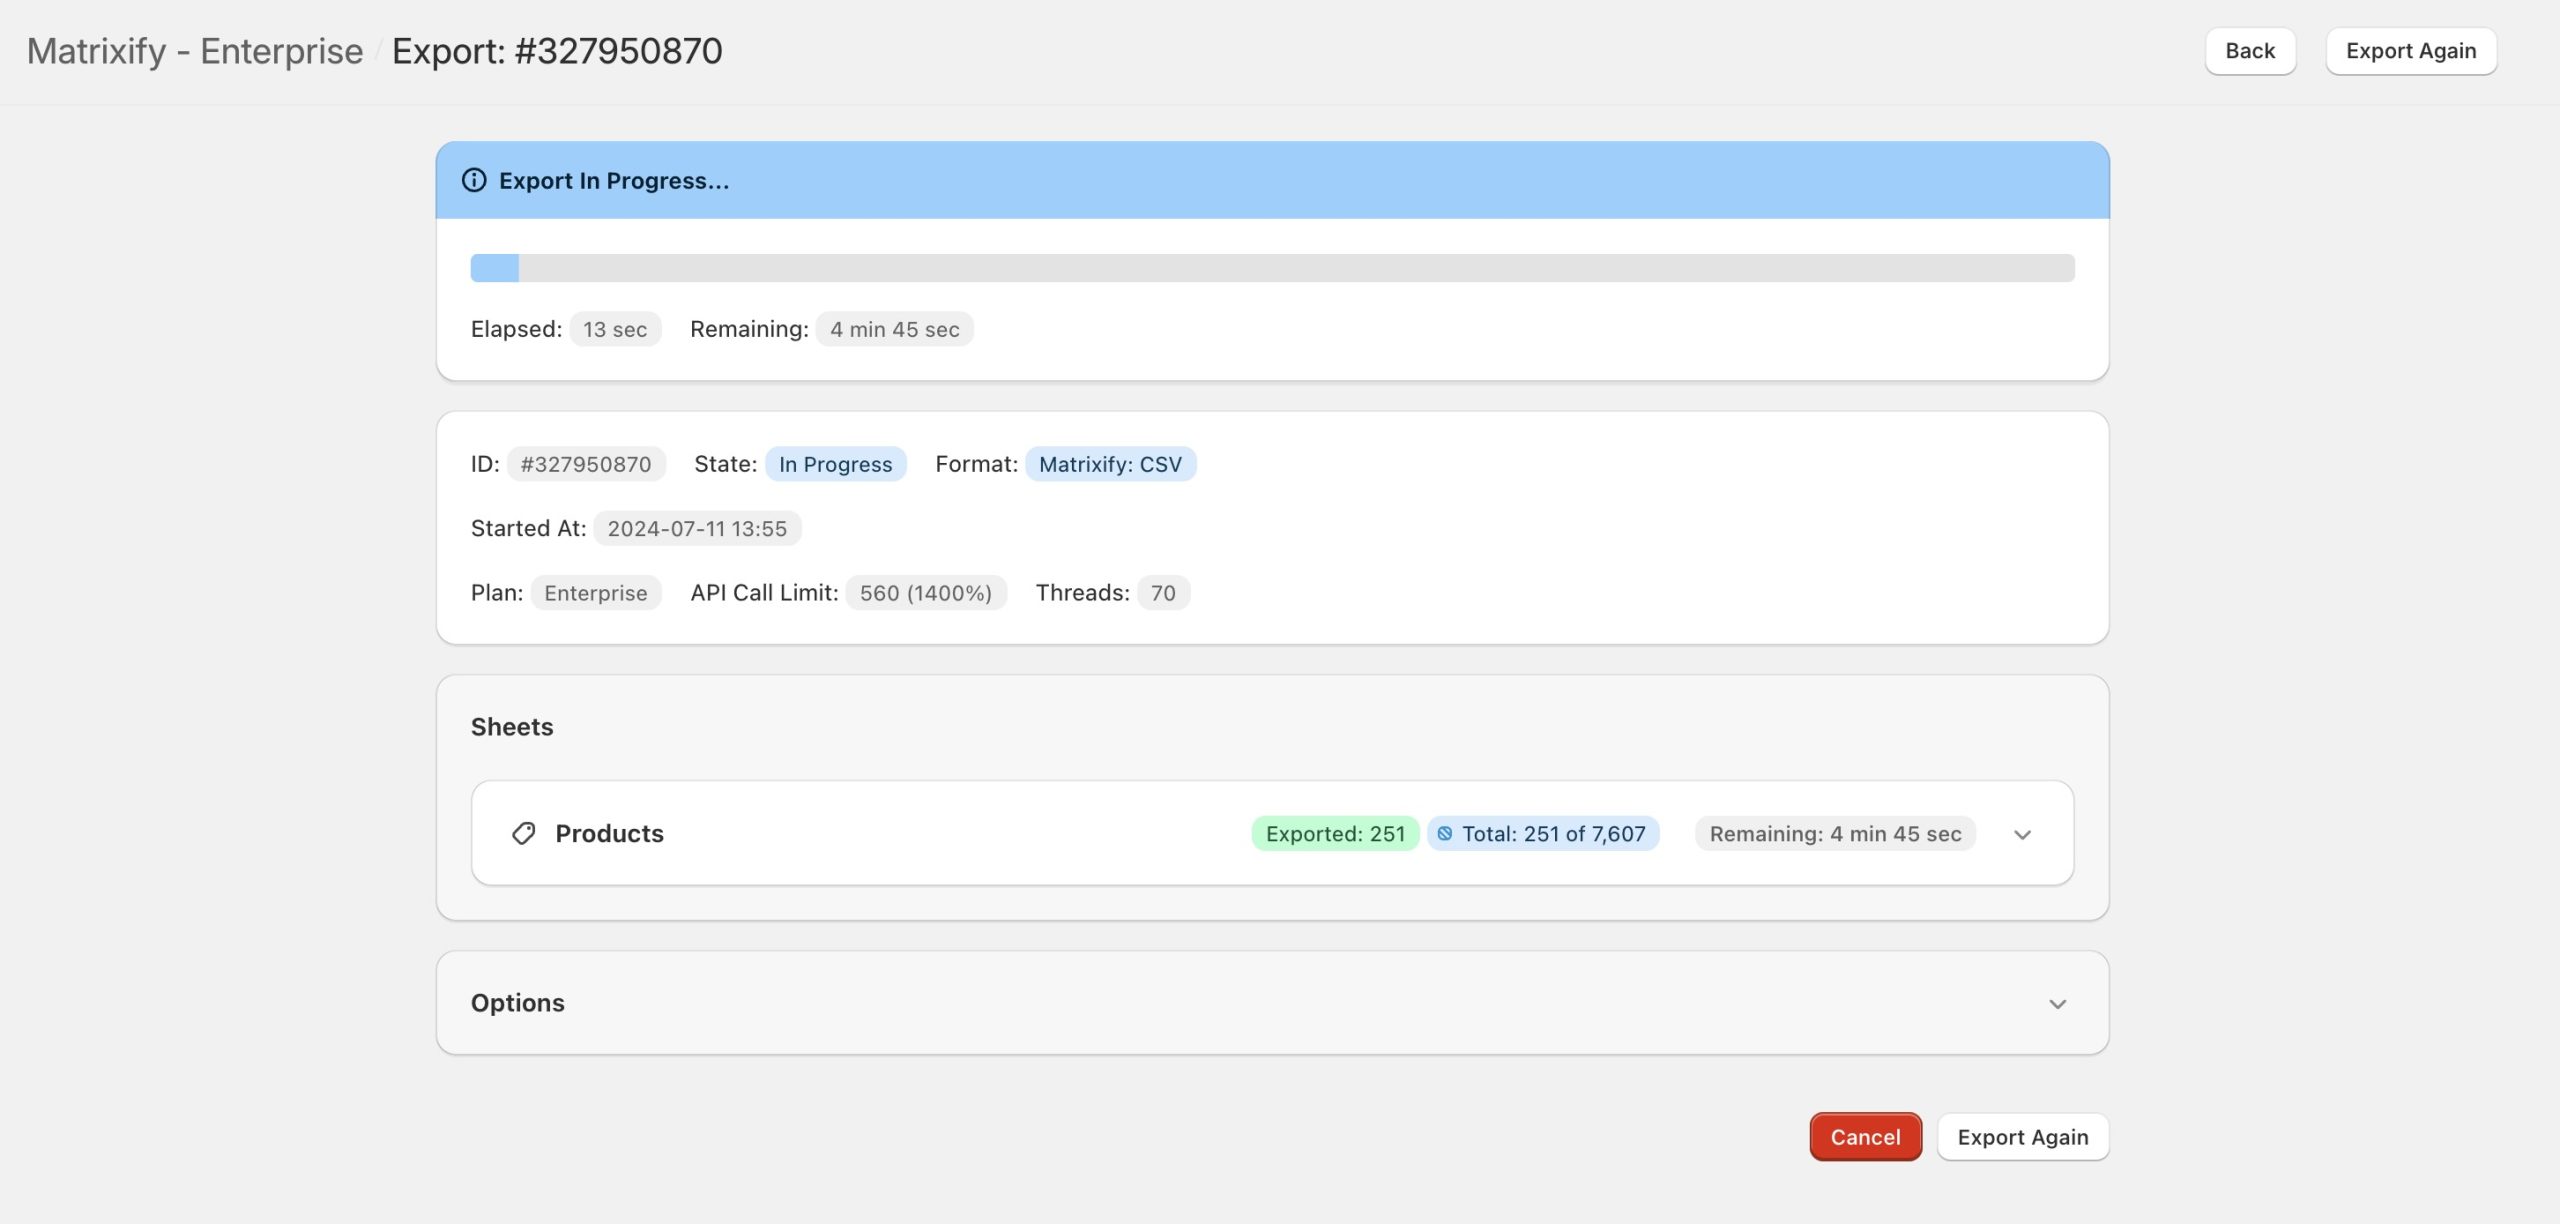
Track export progress
It is important to see when a report will be finished and how many items are being exported in real-time.
Matrixify offers to track this information while the job is running. At any time you can go and look at your current running jobs to see the progress of them and estimated finishing time.
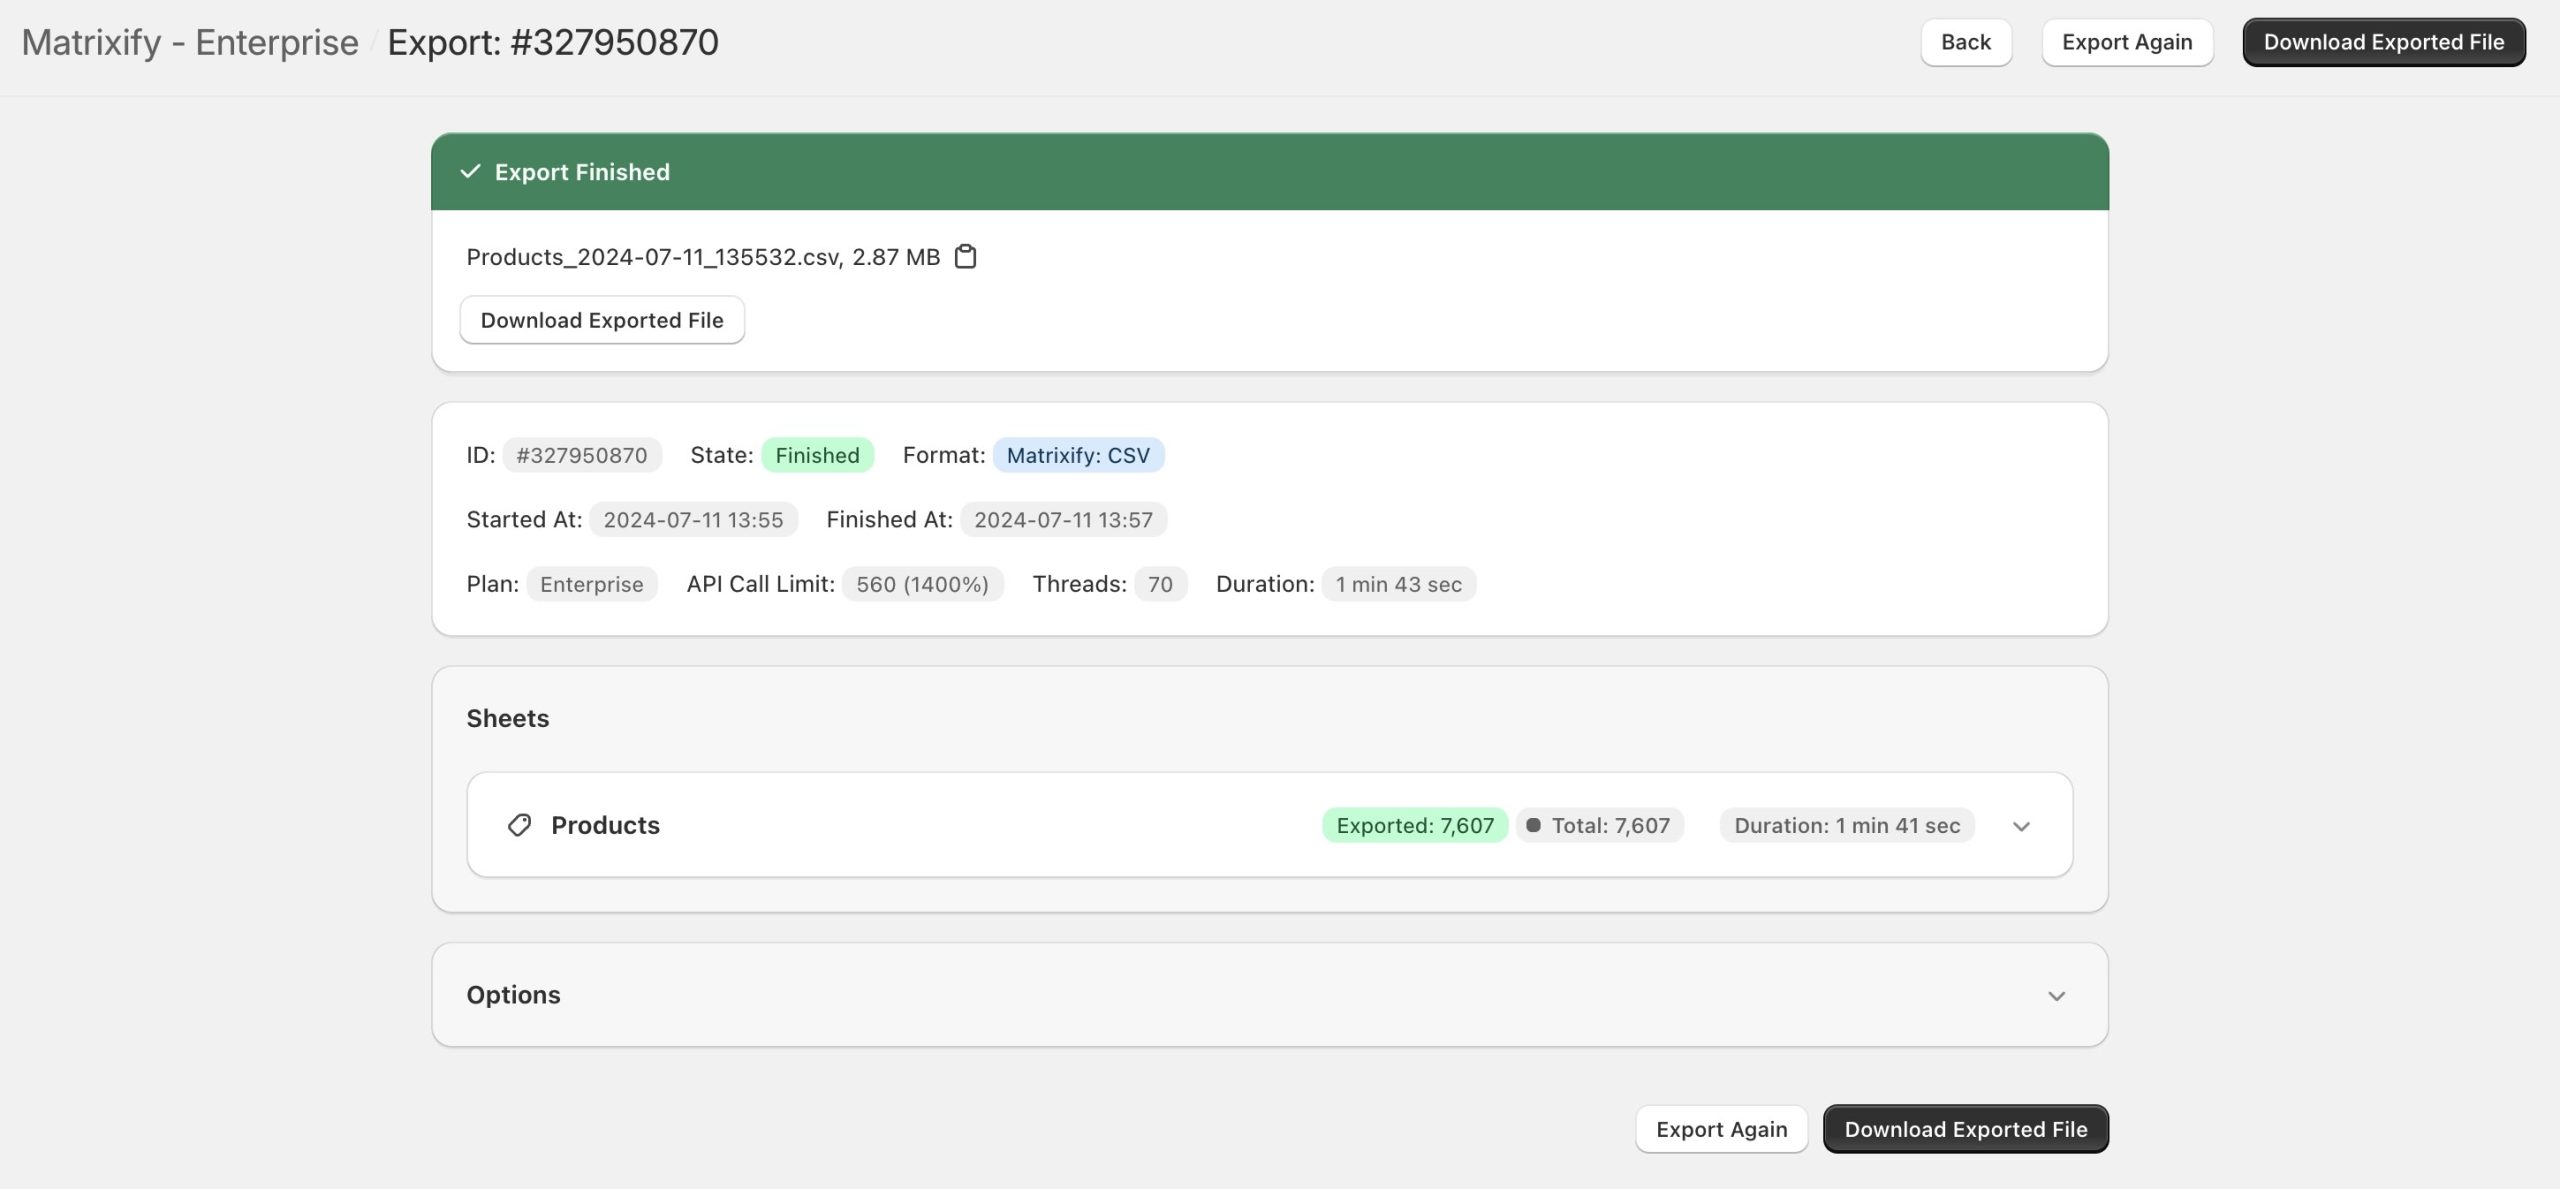
See your past exports and download those files
You are also able to see all your past exports, with dates, counts, times and all other details you might wish to find about them.
Here you can also download these past files.
Scheduled and automatically repeated Shopify Product exports
In the Matrixify you can schedule for export to run at specific date and time, and also make repeated exports.
This might be used to create your Shopify Products backups or daily reports.
Export Products directly to your FTP/SFTP servers
No need to manually download the files and upload. If you have your own servers for backups or reports, then with the Matrixify app you can export your items directly to FTP/SFTP servers!
Export from Shopify to CSV file with custom delimiters, quotes, newlines, encoding and more
To be compatible with various systems to which you might need to export the CSV file, when selecting CSV export format, in the Export Options section you can change CSV file data construction.
Such as changing CSV files delimiter, quotes symbol, newline symbol, force quotes, include BOM character and file encoding.
Export Products with Matrixify
Exporting your Shopify products with the Matrixify is simple and provides great customization of what data to export.
1. Creating new export
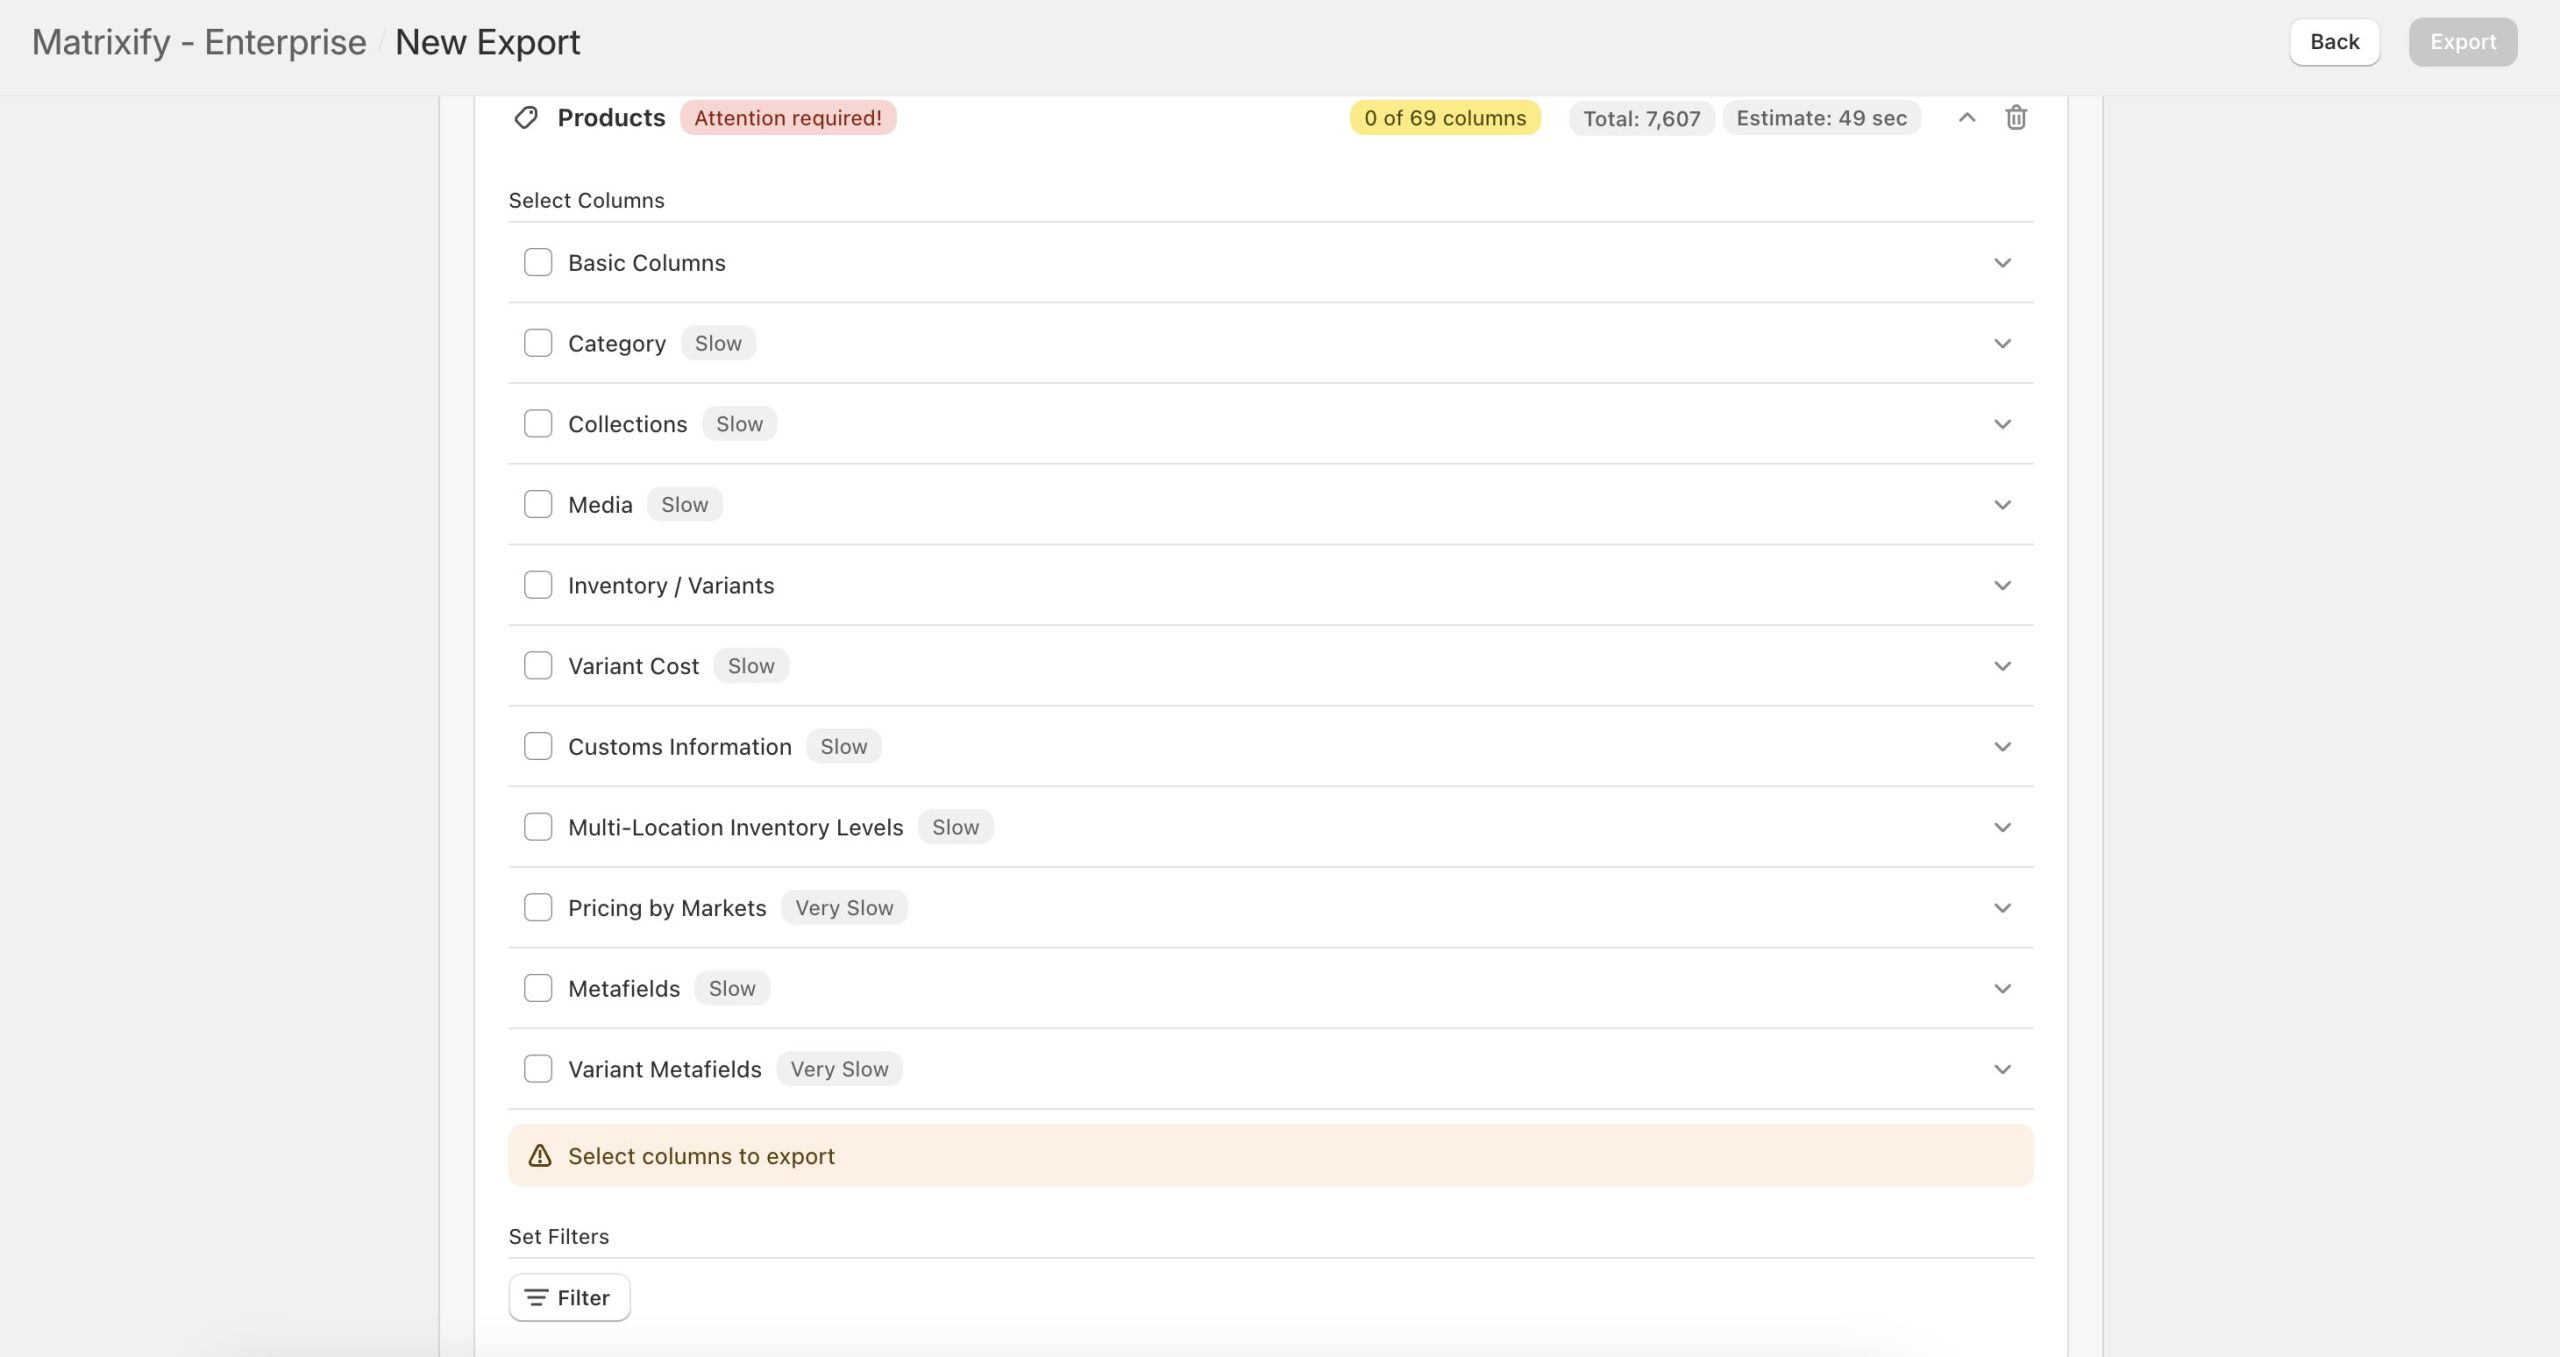
In the Matrixify app Home screen, you can see the button “New Export“. Clicking this will open a page where you can set up your export.

2. Configure your export
A. Select Checkboxes
In the new export page, you can select the “Select Sheets” button and the check the checkbox for “Products”. The checkboxes under “Products” will allow you to limit what data you wish to have exported:
- Basic Columns – basic Product information
- Category – Shopify Product Category
- Collections – Columns indicating in what collections each Product is in
- Media – fields listing Image or Video URLs, Alt texts, Image positions, and Image dimensions
- Inventory / Variants – All Variant information and basic inventory columns
- Variant Cost – “Variant Cost” field
- Customs Information – HS Code and Country Of Origin fields
- Multi-Location Inventory Levels – Stock quantity columns for each location the items are stocked in
- Pricing by Markets – Market-specific fixed pricing and columns to show if products are included in individual Shopify market catalogs
- Metafields – product level Metafields
- Variant Metafields – variant level Metafields
Each of these checkboxes allows for exporting different groups of fields, detailed list of what fields are under each group you can see in Matrixify Products sheet documentation by using the sidebar menu.
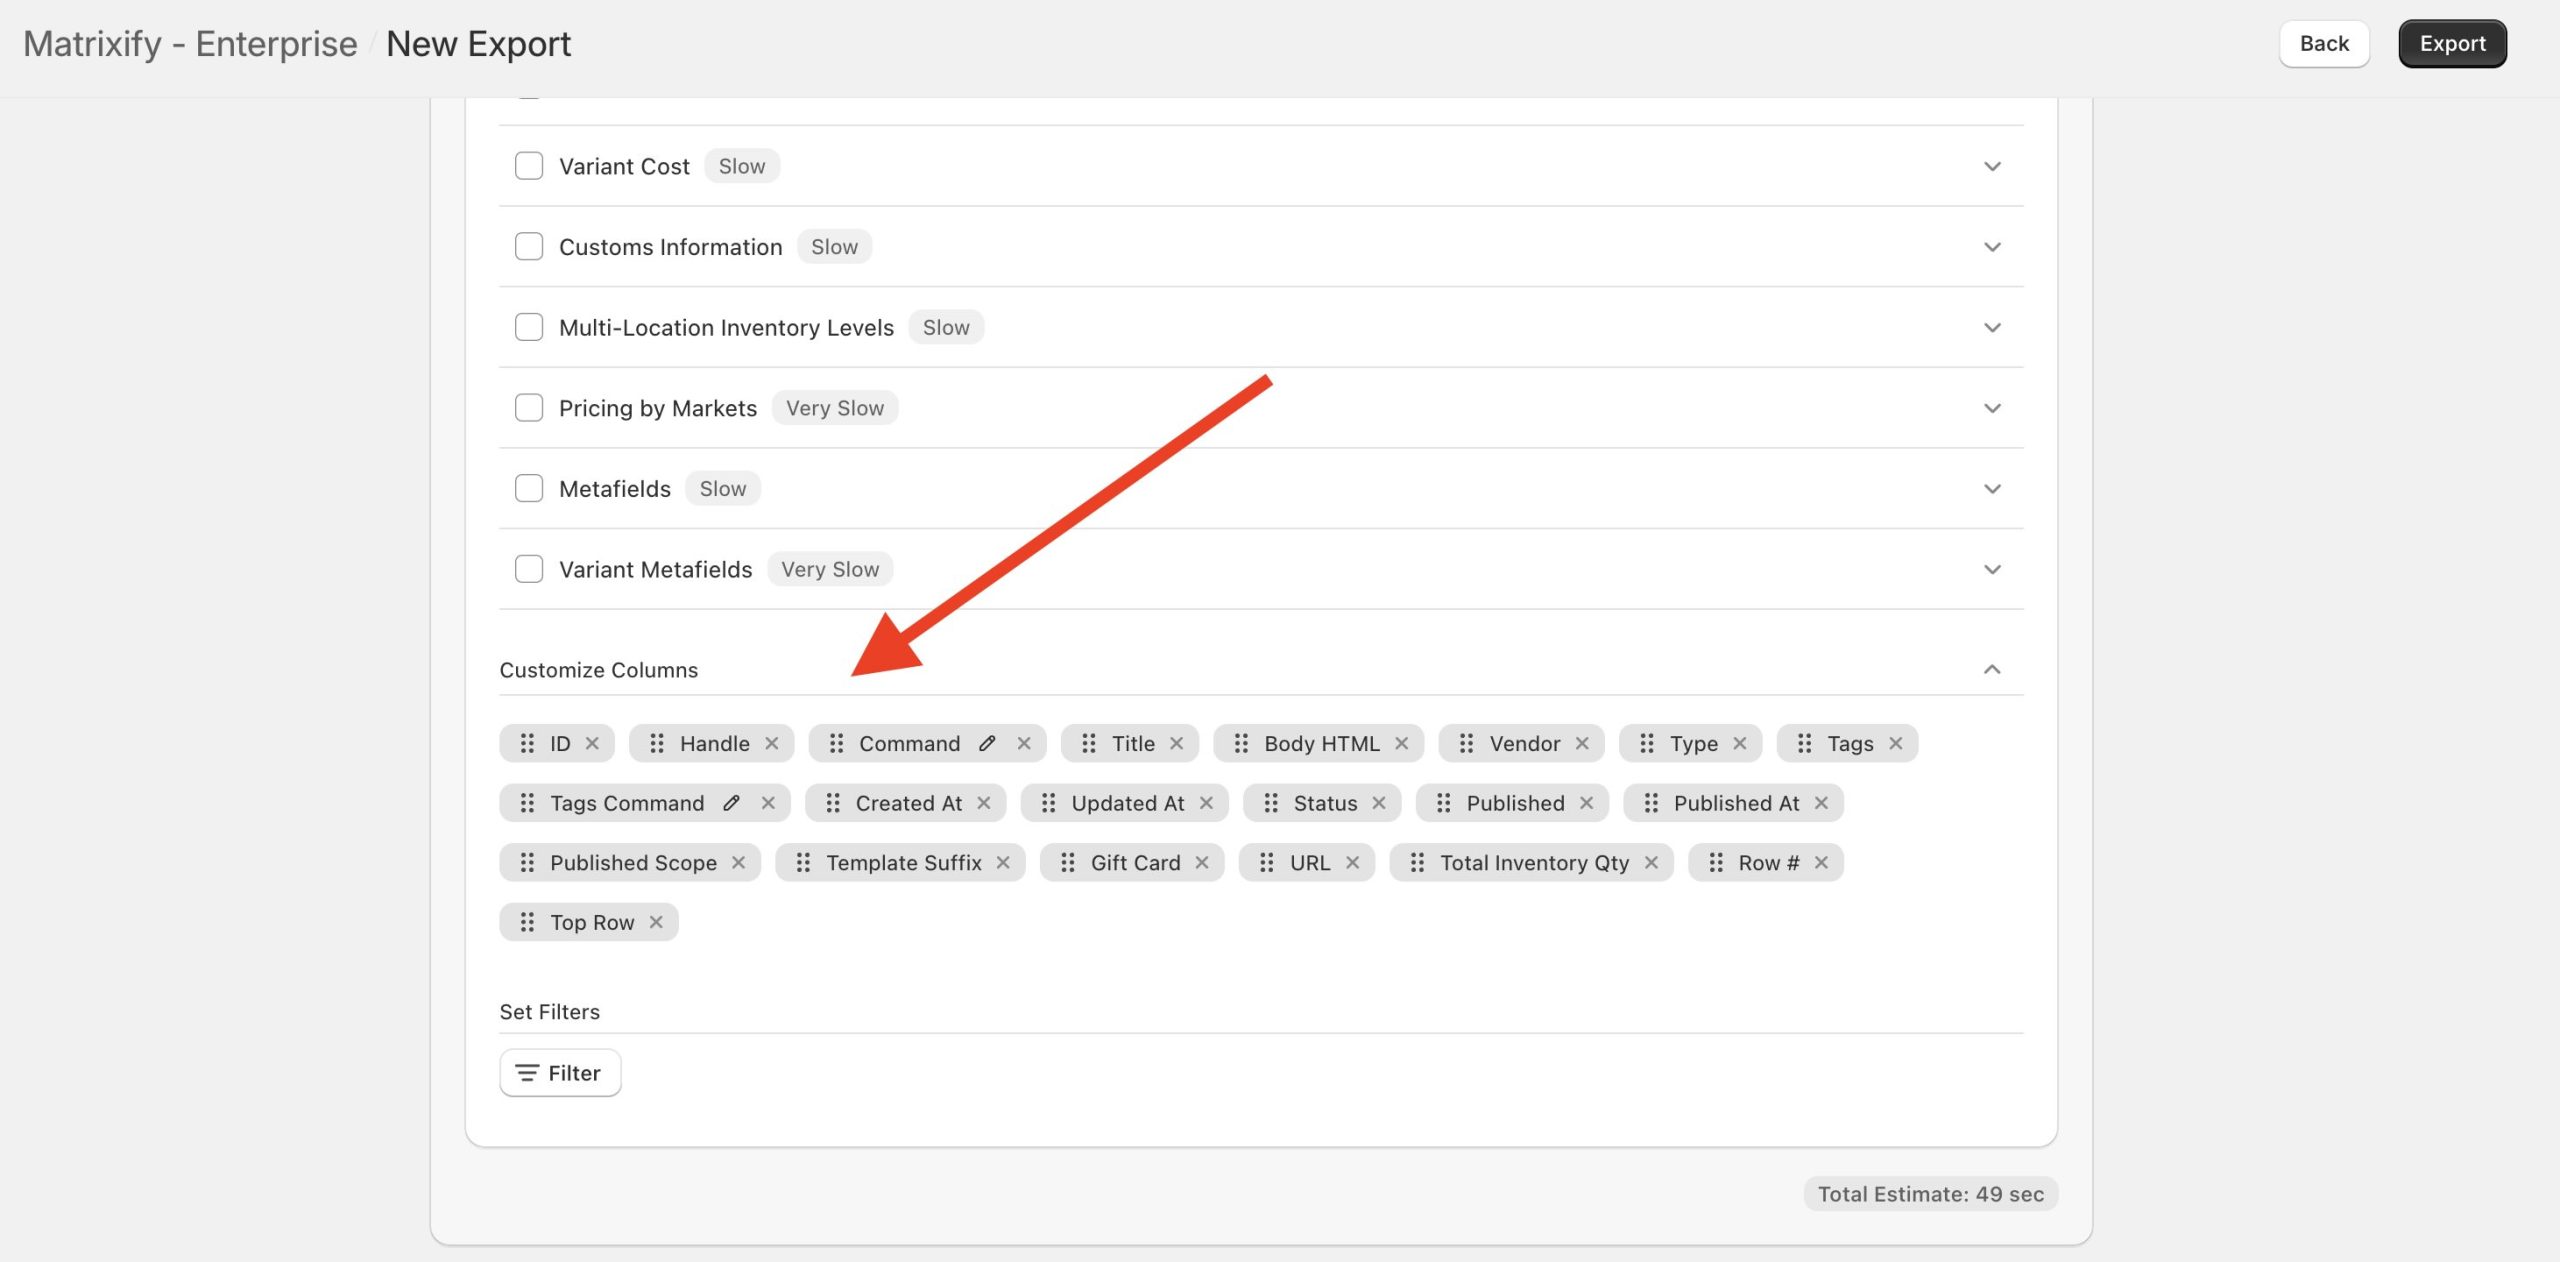
To export only specific fields open the “Customise Columns” tab where you can add or remove individual fields. Or you can click on the “Basic Columns” drop-down for example to reveal what columns will be Exported. You can uncheck/check which ever columns you would like to see in the Exported file.
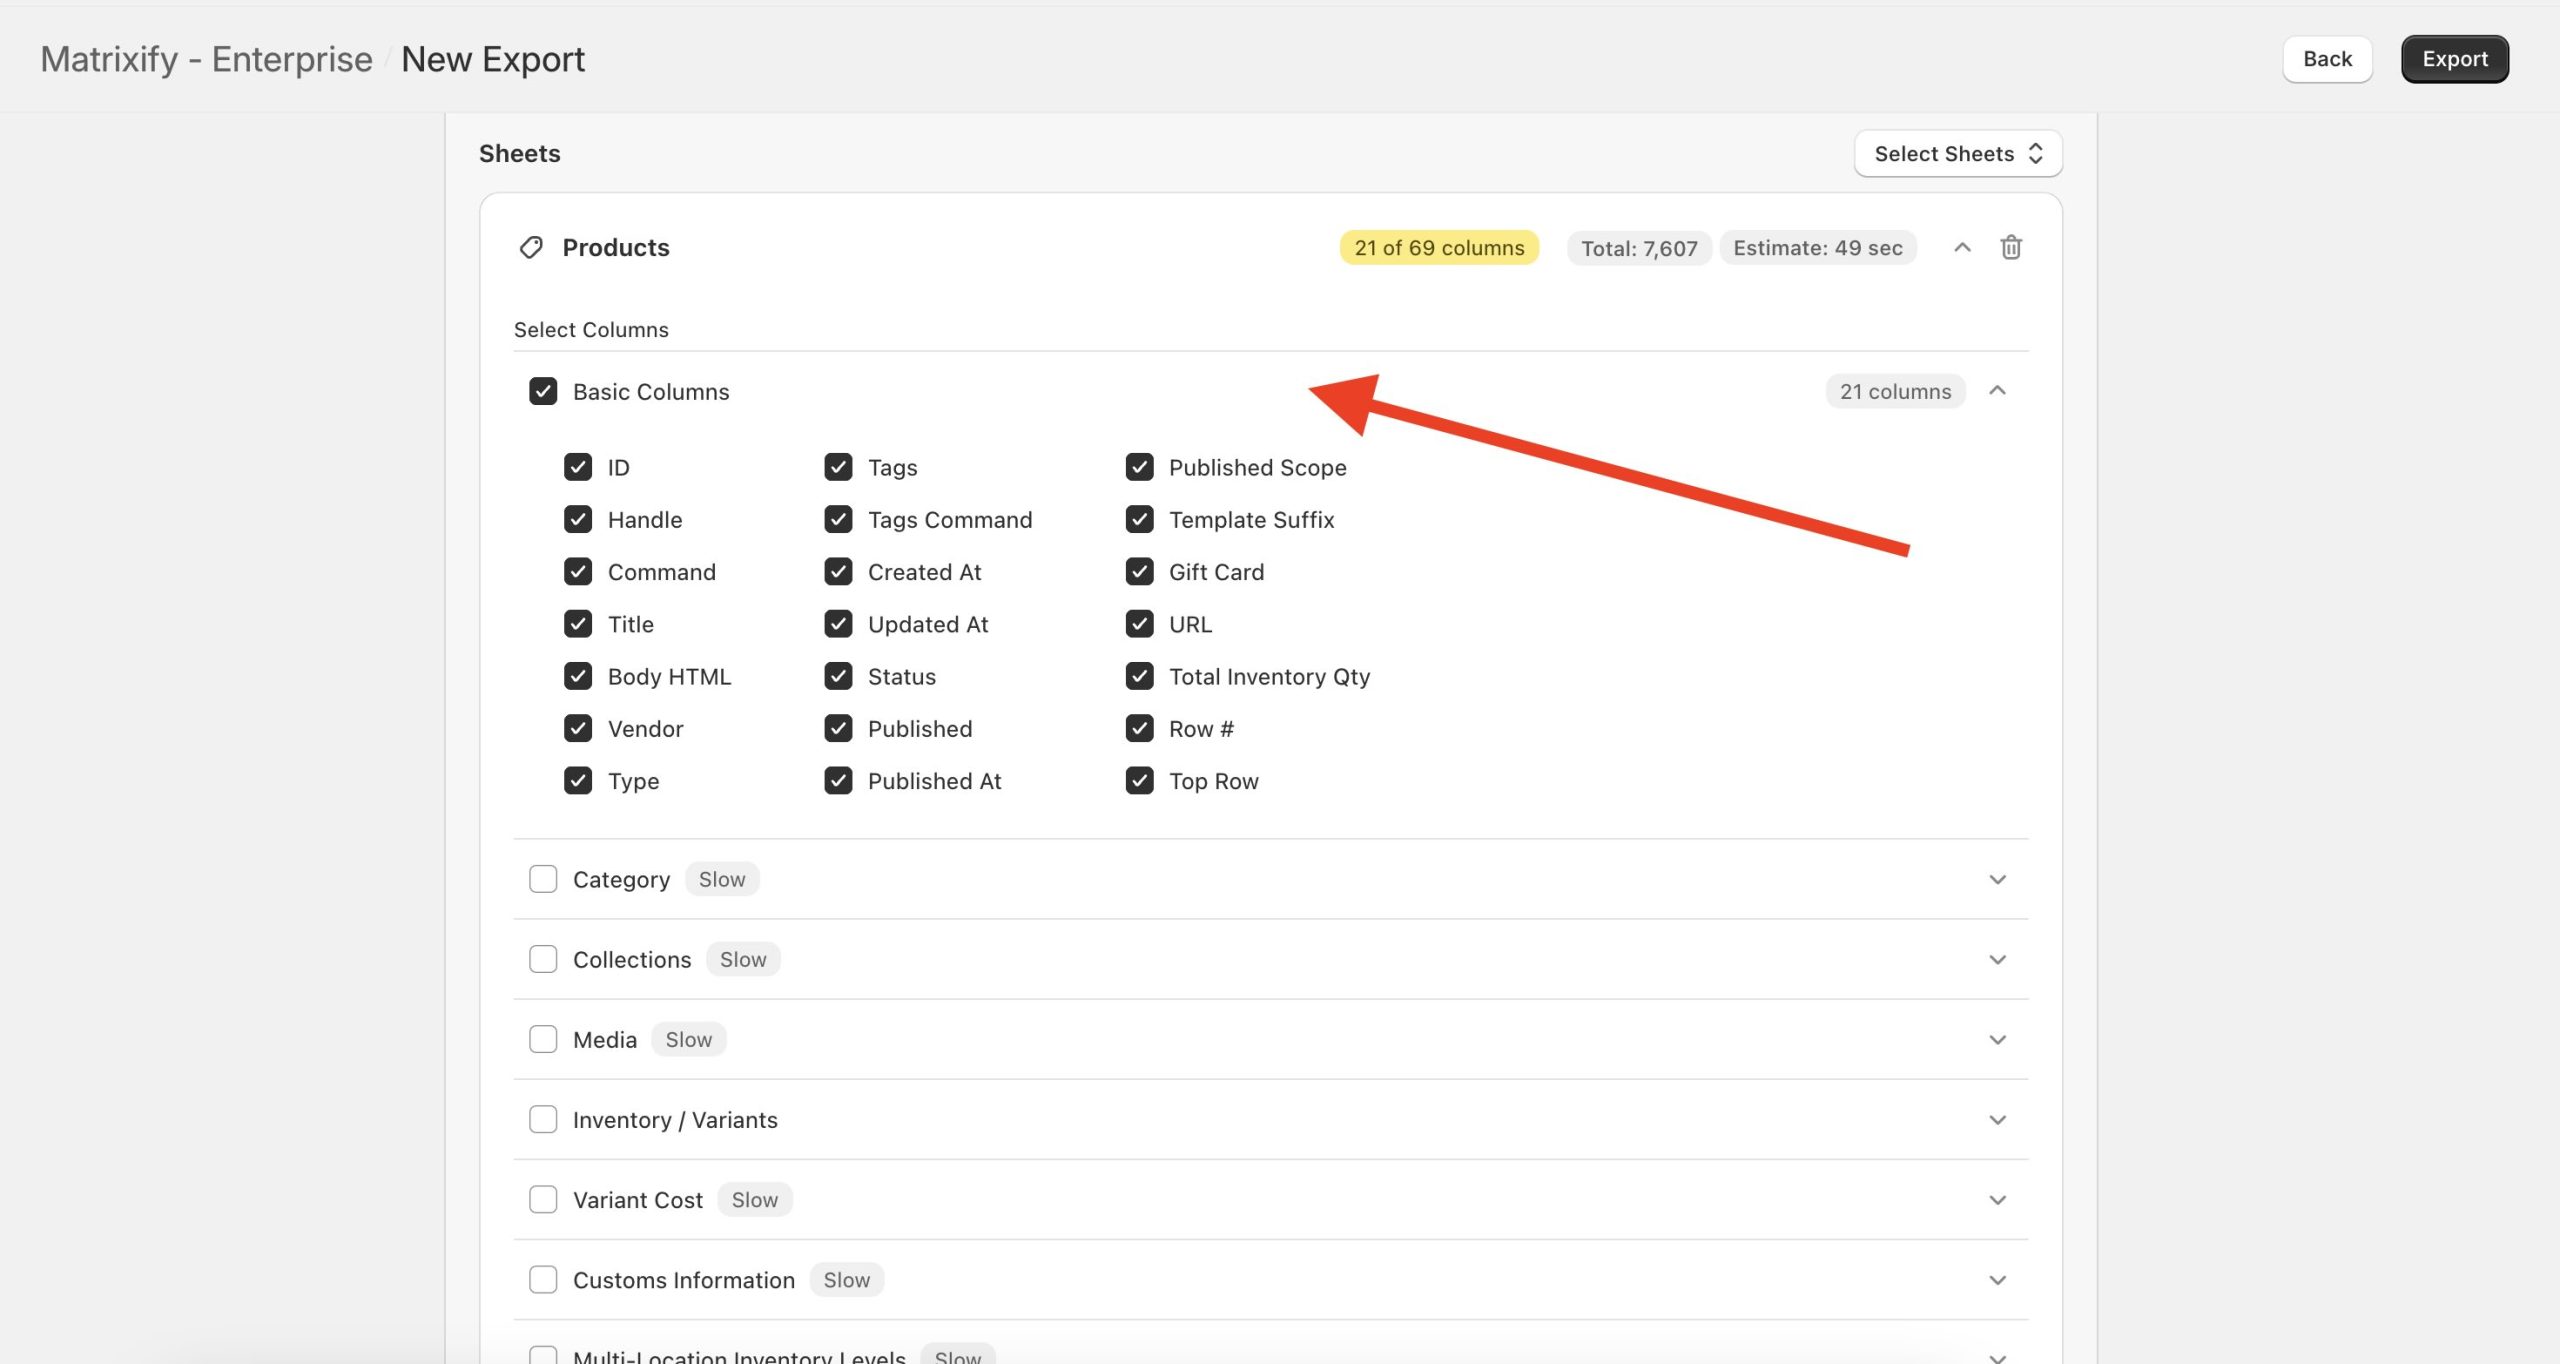
In the “Customise Columns” section you can add or remove fields by checking or unchecking them in this dropdown, or you can click on the field tags “X” button to remove it.
To change exported field order you can drag the columns by the 6-dot symbol of each field.
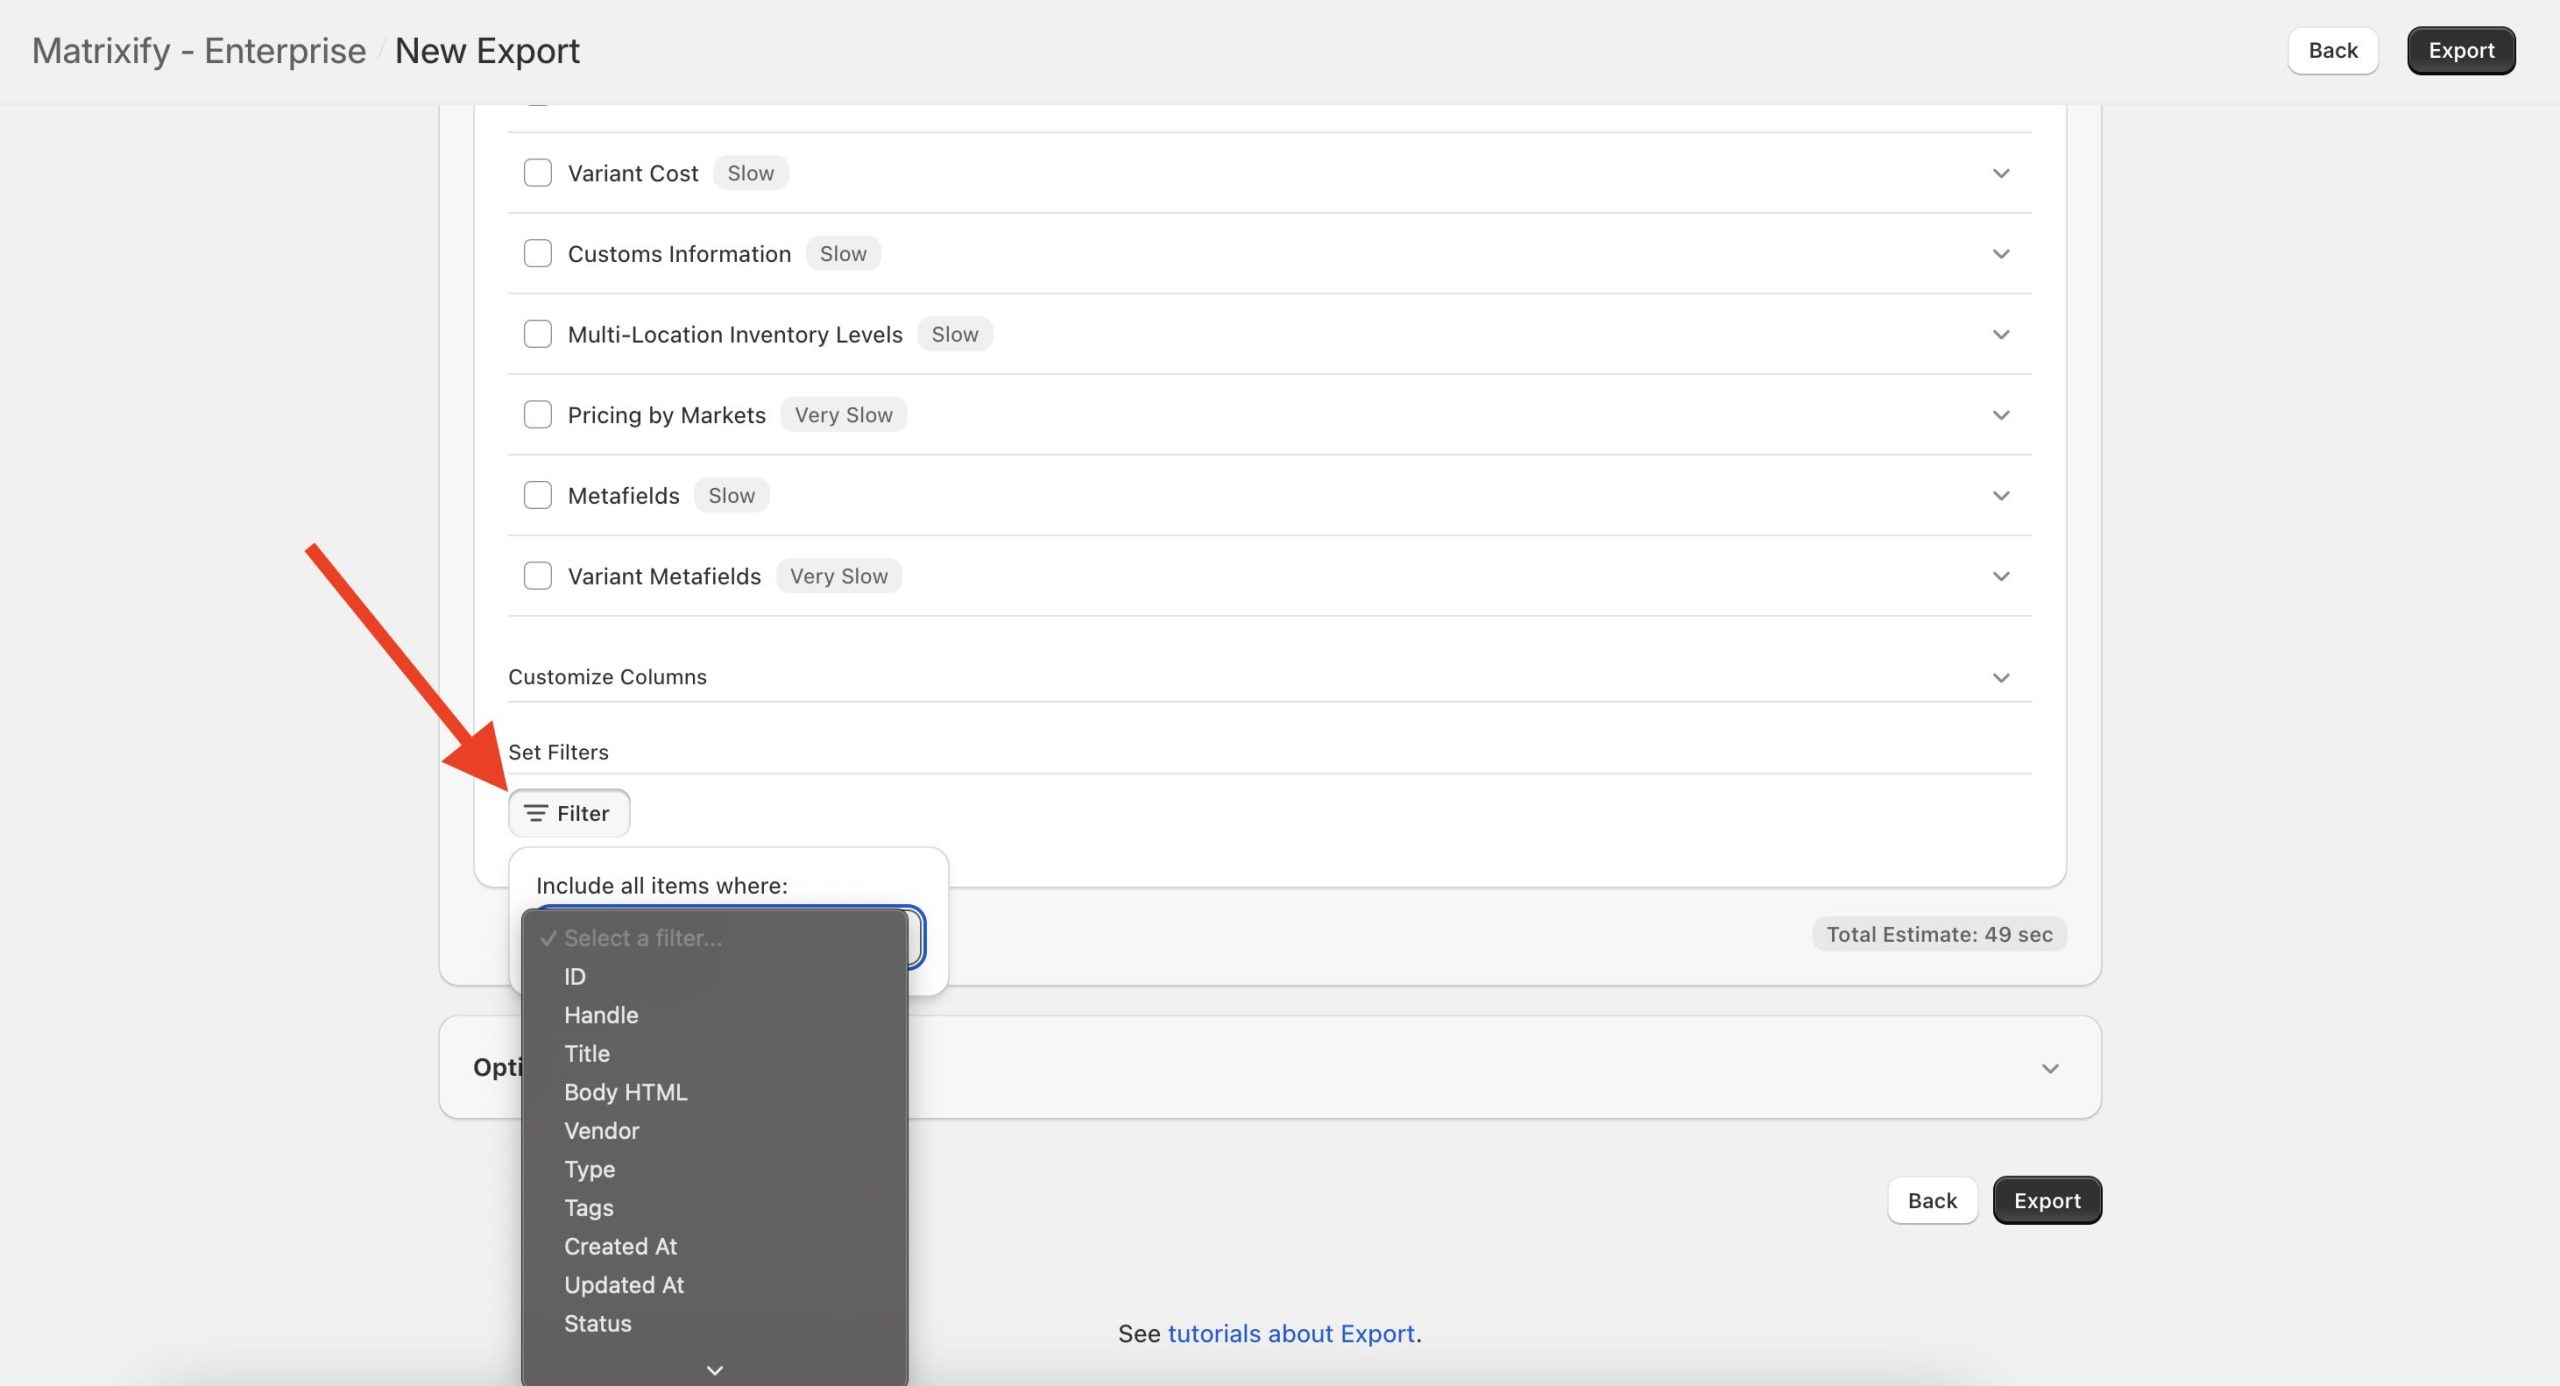
B. Apply Product filters if needed
You can also apply one of the many filters that we offer so you can export only the products that you need to.
You can see all the filters listed in our “Export Filters” documentation page.
C. Select format
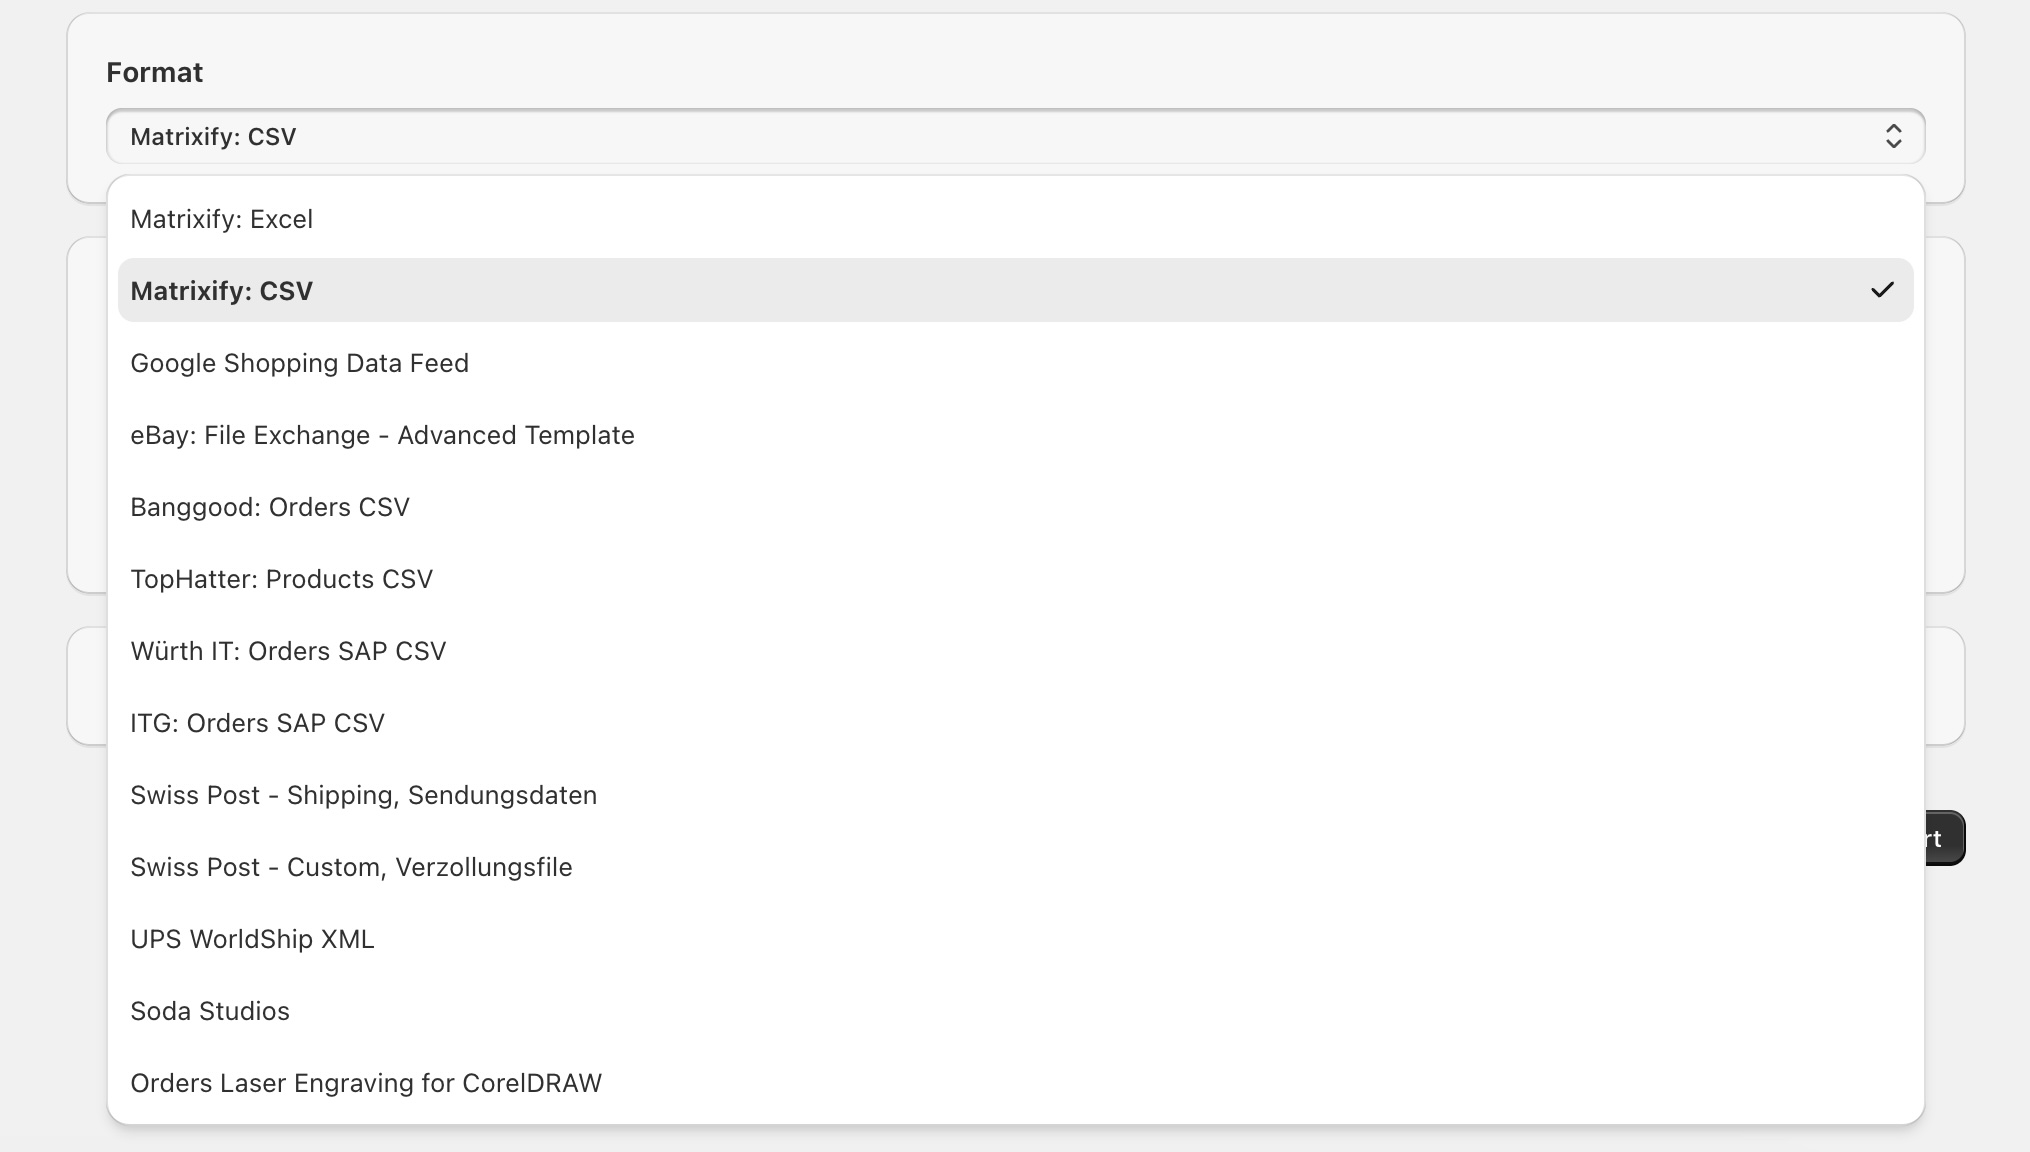
Once you have selected what you wish to export, then you can scroll down to the Options and Format sections.
Select Format you will need to export your items to. To be able to import this file back into the Matrixify you can select “Matrixify: CSV” or “Matrixify: Excel” formats.
You are also able to export your Shopify Products to other platform formats by selecting the correct format from the drop-down.
D. Apply options
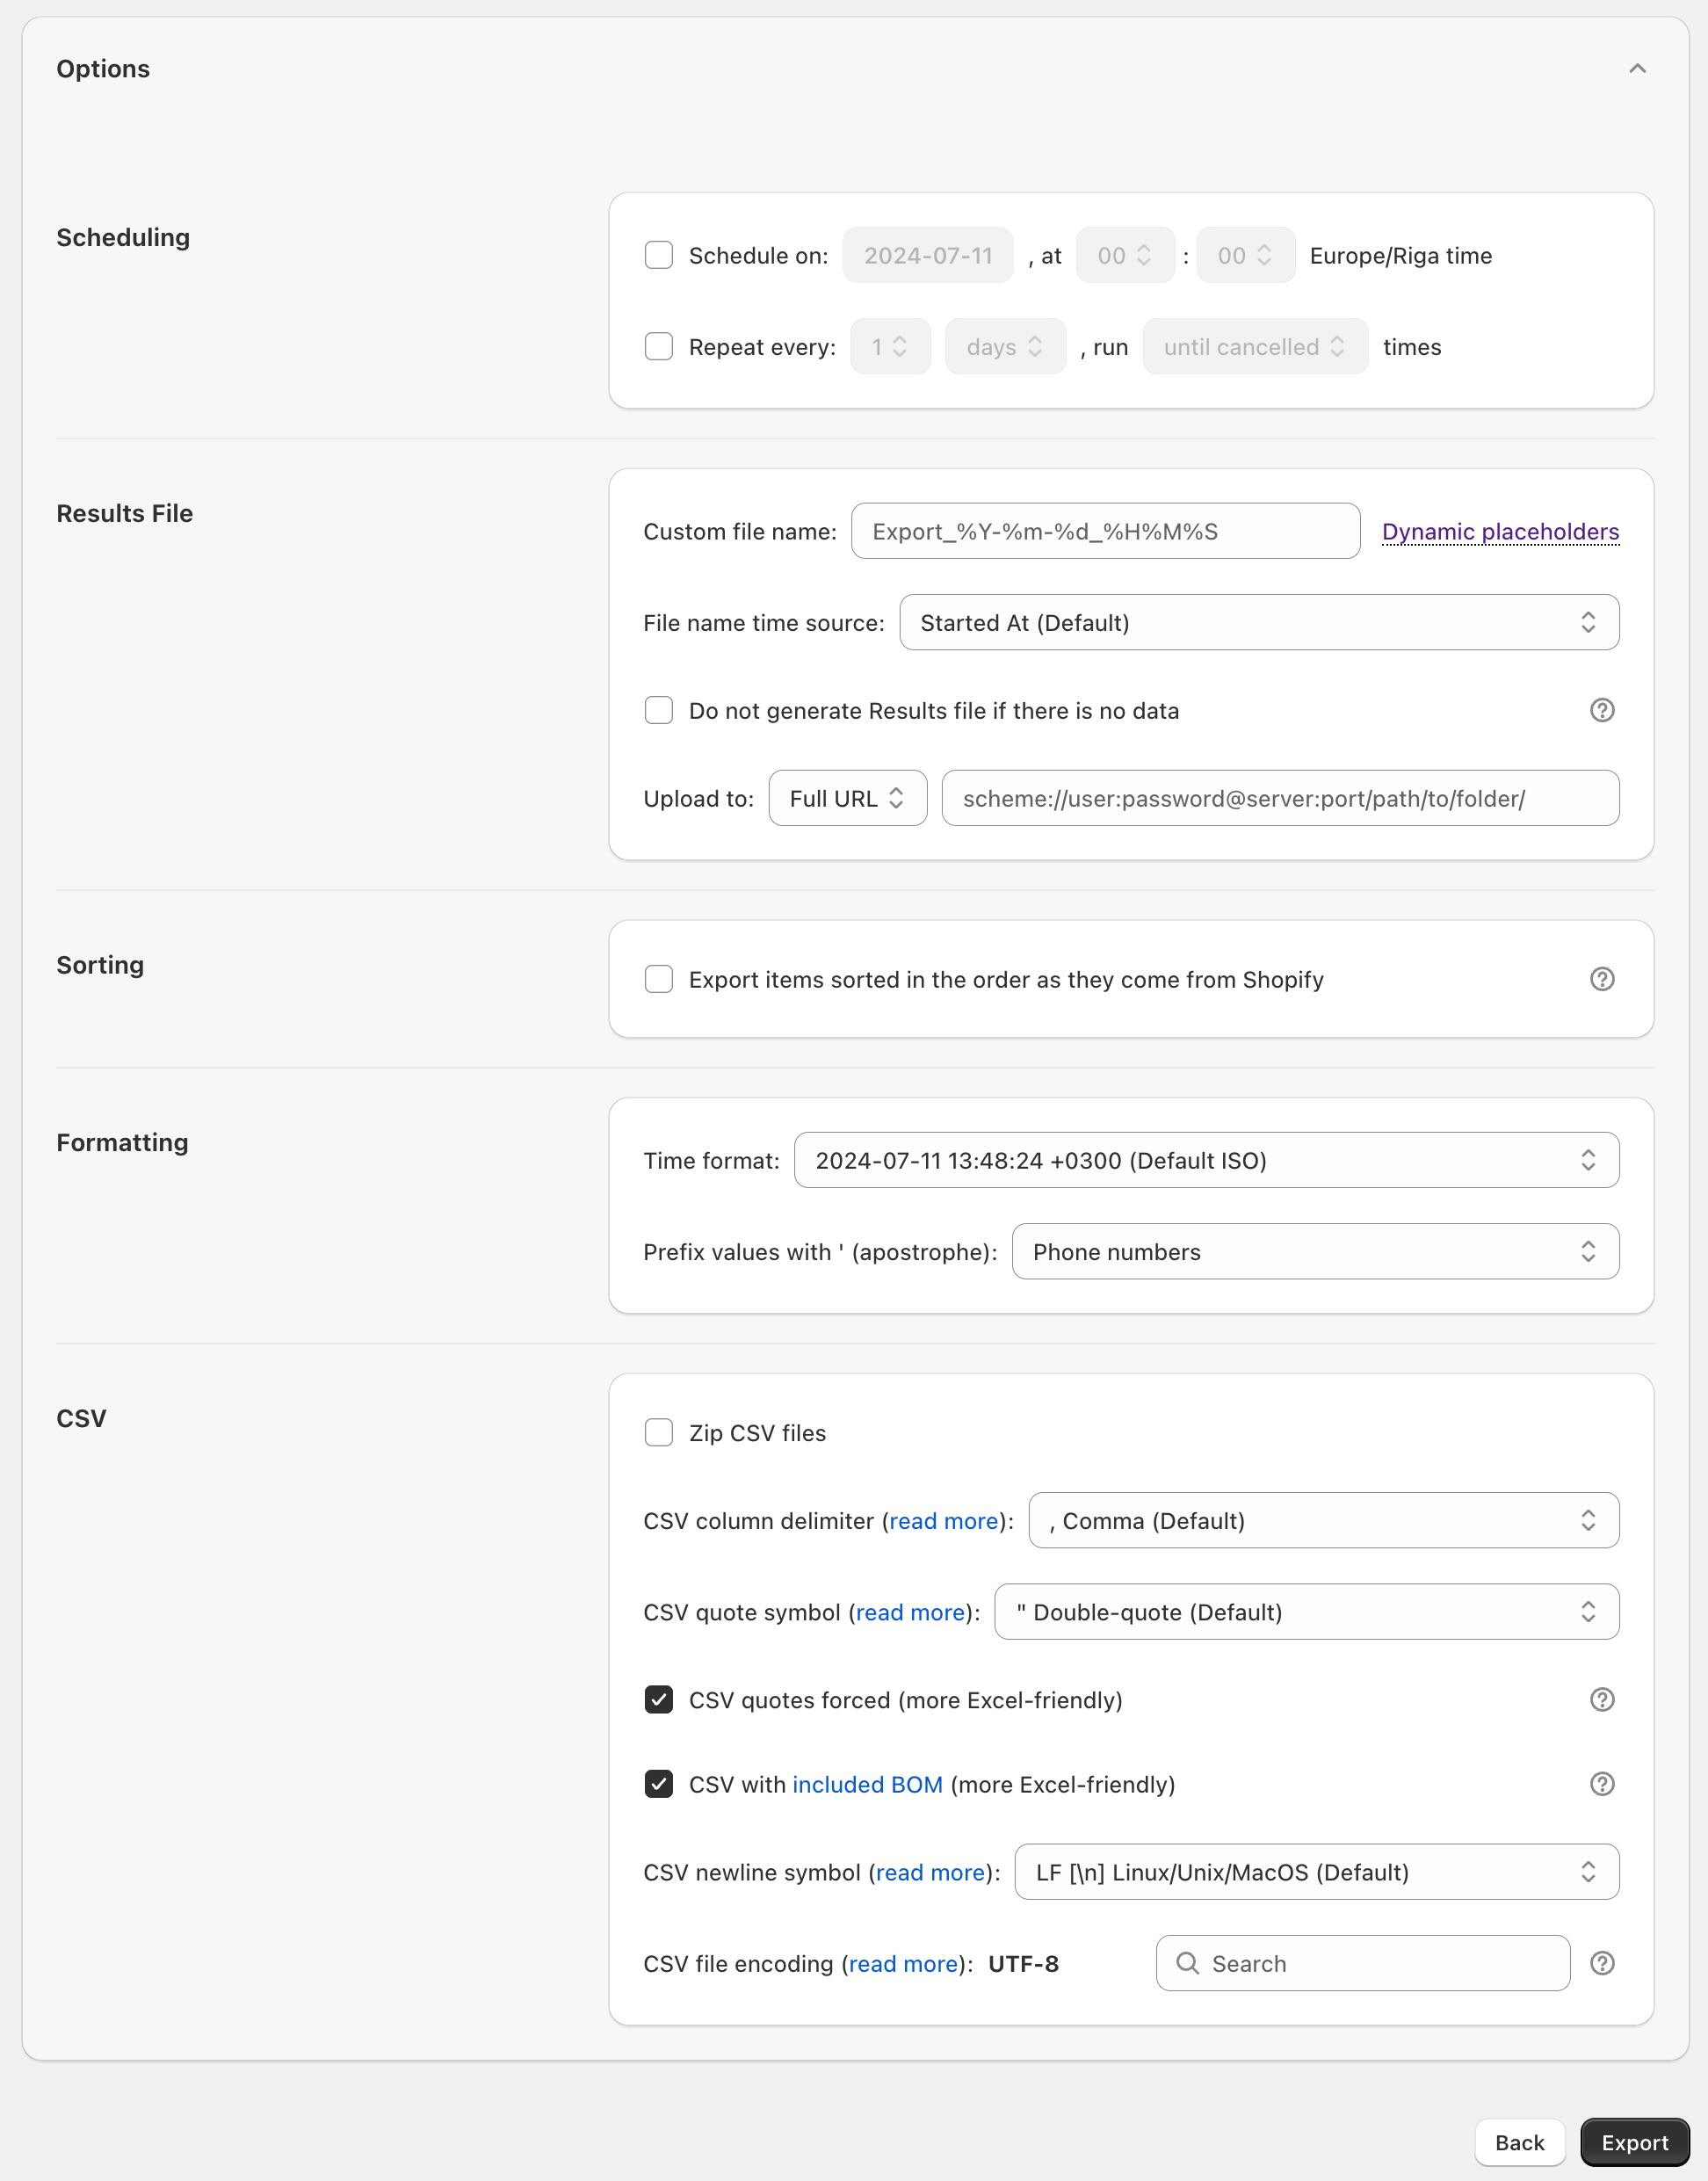
In the “Options” section you can apply various additional settings for your export job:
Custom File Name:
You can specify a custom file name for the export so that the exported file URL is always the same.
Ideal to use for regular backups or outgoing Shopify store data feeds.
Read more about exporting with Custom File Name.
Upload to:
- Matrixify file storage
- FTP directory
- SFTP directory
Exported item sorting
You can also set “Export items sorted in the order as they come from Shopify”, which will make sure that exported items are sorted exactly as they are returned by the Shopify API.
Do note that if you have Big or Enterprise plan, then the app will not leverage your plans speed increase as it will need to use 1 export thread to get data from Shopify instead of multiple.
CSV format-specific export options:
Some options only appear when you have selected to export to a CSV format.
If you wish to import the file back with Matrixify - the file will need to have default CSV options.
Zip CSV files – (Enabled by default) When exporting to CSV file, by default it will be compressed into a ZIP file. If you do not need to compress the CSV files, you can un-check this option.
CSV column delimiter – (Comma by default) You can select other standard delimiters or any custom delimiter you wish.
CSV quote symbol – (Double-quote by default) CSV file cells are enclosed in quotes for programs such as Excel to be able to understand where the new cell starts and not to take the new line in e.g. description as a new row in the file.
CSV quotes forced – (Enabled by default) Makes the exported file more Excel-friendly by enclosing all cells with quote symbol. If not selected, only cells that need to be enclosed will be.
CSV with included BOM – (Enabled by default) When opening a CSV file in Excel – if that CSV file contains special non-English language characters encoded in UTF-8, then those characters are shown as corrupted. To tell Excel that the file is in UTF-8 encoding, and thus have those non-English characters show correctly, the CSV file needs to start with the BOM characters (Byte order mark).
However, if processing the CSV files with automation scripts, then the BOM characters might not be interpreted correctly, so it’s better to not include them if you process CSV files with scripts or other automation services. Unselecting this option will not include the BOM characters in your export.
CSV newline symbol – (LF [\n]) by default) Specify CSV files newline symbol. Shopify be LF [\n]).
CSV file encoding – (UTF-8 by default) Select file encoding format. Should be UTF-8.
3. Export your file and track progress
Once you have done setting it up, you can click the “Export” button to start the export.
The app will direct you to your new exports page where you will be able to track the progress of the export, see all applied filters and options, and all other relevant details about the export.
Once the Export has completed, you will be able to download the Exported file by clicking the “Download Exported File” button.
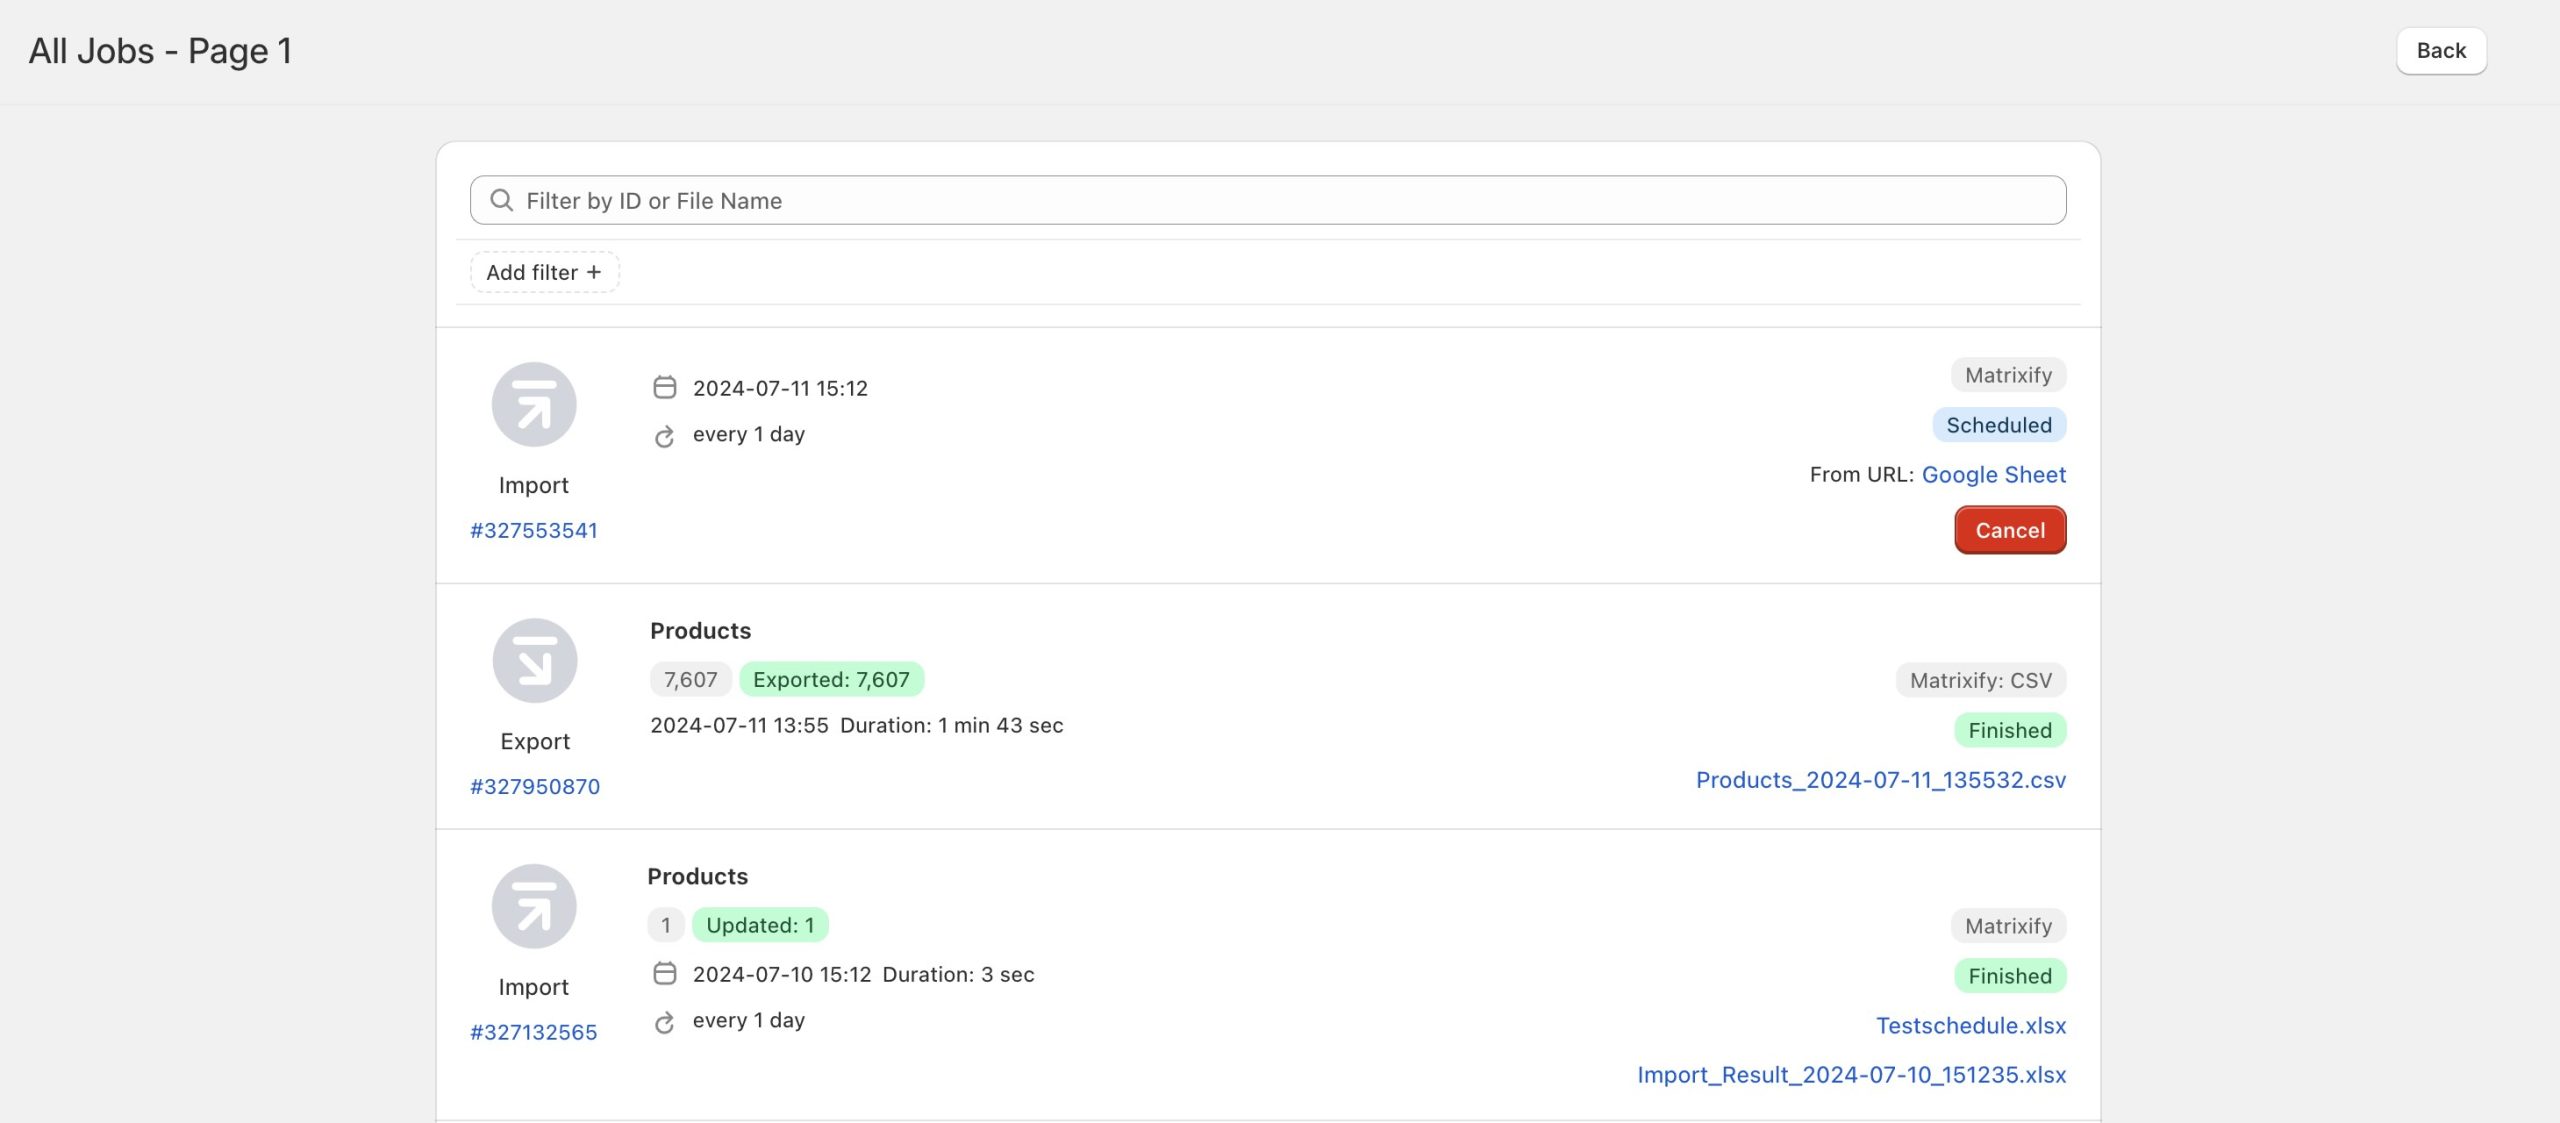
You are free to leave this page and the app. At any time you can find this export job in your “All Jobs” list in the app to see its progress and download file if it is finished.
Where to go from here?
- Install the Matrixify app.
- Look into our “How it works” page to understand other details and things you can do with the app.
- You can also export Orders, Customers, Collections and other items using the Matrixify.
- Contact our support if you have any questions or issues.


